
A couple of weeks ago showed you how to make personalized gift tags using wood tags and a wood burning tool. I used the pointy-end attachment on the wood burning tool and only used a series of dots to create my designs for that project. This time I used the slanted edge and finished off the frame with walnut stain. This super easy frame only took about an hour to make.
Supplies
- Plain wood picture frame from the craft store
- Wood burning tool
- Walnut colored wood stain

Start with a plain wood frame from the craft store. This frame cost me about a dollar. It fits a 4x6 picture. Set the temperature on your wood burning tool on high and start drawing lines across the frame to make stripes. You can then press the tip of the tool into the frame to make little dashes. I also used slanted the tip of the tool sideways to "shade" some areas darker. My final result was this:
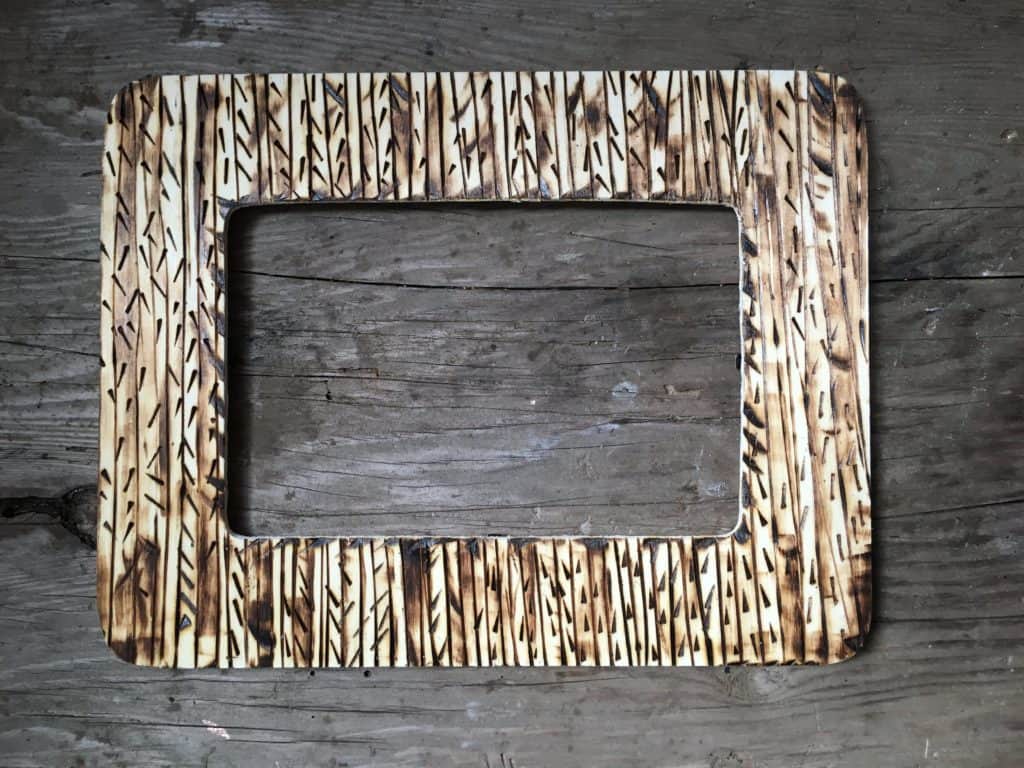
It didn't look quite "done" so I decided to add a stain to it. I used Varathane Stain and Poly in Dark Walnut. I had this stain left over from another project. . I put two coats of stain on this frame. No top coat needed, it's included in the stain.
And if you do want to try a different style of crafting your picture frame, you can try a different style of wood picture frame with Creative Fabrica that is a perfect gift for special occasions.

Doesn't my baby girl's picture look great in this little frame? I displayed her on the book shelf in my dining room.
Are there any other crafts you would like to see me make with my wood burning tool? I'm having a lot of fun playing with this thing in my studio 🙂

Hi I’m Adrienne Carrie Hubbard. I believe a rich life comes not from the things you have, but the things you do; the experiences you create and the people you meet along the way. Thanks for hanging out!
- Adrienne Carrie Hubbard
- Adrienne Carrie Hubbard
- Adrienne Carrie Hubbard
- Adrienne Carrie Hubbard
- Adrienne Carrie Hubbard
- Adrienne Carrie Hubbard
- Adrienne Carrie Hubbard
- Adrienne Carrie Hubbard
- Adrienne Carrie Hubbard
- Adrienne Carrie Hubbard
- Adrienne Carrie Hubbard
- Adrienne Carrie Hubbard
- Adrienne Carrie Hubbard
- Adrienne Carrie Hubbard
- Adrienne Carrie Hubbard
- Adrienne Carrie Hubbard
- Adrienne Carrie Hubbard
- Adrienne Carrie Hubbard
- Adrienne Carrie Hubbard
- Adrienne Carrie Hubbard
- Adrienne Carrie Hubbard
- Adrienne Carrie Hubbard
- Adrienne Carrie Hubbard
- Adrienne Carrie Hubbard
- Adrienne Carrie Hubbard
- Adrienne Carrie Hubbard
- Adrienne Carrie Hubbard
- Adrienne Carrie Hubbard
- Adrienne Carrie Hubbard
- Adrienne Carrie Hubbard
- Adrienne Carrie Hubbard
- Adrienne Carrie Hubbard
- Adrienne Carrie Hubbard
- Adrienne Carrie Hubbard
- Adrienne Carrie Hubbard
- Adrienne Carrie Hubbard
- Adrienne Carrie Hubbard
- Adrienne Carrie Hubbard
- Adrienne Carrie Hubbard
- Adrienne Carrie Hubbard
- Adrienne Carrie Hubbard
- Adrienne Carrie Hubbard
- Adrienne Carrie Hubbard
- Adrienne Carrie Hubbard
- Adrienne Carrie Hubbard
- Adrienne Carrie Hubbard
- Adrienne Carrie Hubbard
- Adrienne Carrie Hubbard
- Adrienne Carrie Hubbard
- Adrienne Carrie Hubbard
- Adrienne Carrie Hubbard
- Adrienne Carrie Hubbard
- Adrienne Carrie Hubbard
- Adrienne Carrie Hubbard
- Adrienne Carrie Hubbard
- Adrienne Carrie Hubbard
- Adrienne Carrie Hubbard
- Adrienne Carrie Hubbard
- Adrienne Carrie Hubbard
- Adrienne Carrie Hubbard
- Adrienne Carrie Hubbard
- Adrienne Carrie Hubbard
- Adrienne Carrie Hubbard
- Adrienne Carrie Hubbard
- Adrienne Carrie Hubbard
- Adrienne Carrie Hubbard
- Adrienne Carrie Hubbard
- Adrienne Carrie Hubbard
- Adrienne Carrie Hubbard
- Adrienne Carrie Hubbard
- Adrienne Carrie Hubbard
- Adrienne Carrie Hubbard
- Adrienne Carrie Hubbard
- Adrienne Carrie Hubbard
- Adrienne Carrie Hubbard
- Adrienne Carrie Hubbard
- Adrienne Carrie Hubbard
- Adrienne Carrie Hubbard
- Adrienne Carrie Hubbard
- Adrienne Carrie Hubbard
- Adrienne Carrie Hubbard
- Adrienne Carrie Hubbard
- Adrienne Carrie Hubbard
- Adrienne Carrie Hubbard
- Adrienne Carrie Hubbard
- Adrienne Carrie Hubbard
- Adrienne Carrie Hubbard
- Adrienne Carrie Hubbard
- Adrienne Carrie Hubbard
- Adrienne Carrie Hubbard
- Adrienne Carrie Hubbard
- Adrienne Carrie Hubbard
- Adrienne Carrie Hubbard
- Adrienne Carrie Hubbard
- Adrienne Carrie Hubbard
- Adrienne Carrie Hubbard
- Adrienne Carrie Hubbard
- Adrienne Carrie Hubbard
- Adrienne Carrie Hubbard
- Adrienne Carrie Hubbard
- Adrienne Carrie Hubbard
- Adrienne Carrie Hubbard
- Adrienne Carrie Hubbard
- Adrienne Carrie Hubbard
- Adrienne Carrie Hubbard
- Adrienne Carrie Hubbard
- Adrienne Carrie Hubbard
- Adrienne Carrie Hubbard
- Adrienne Carrie Hubbard
- Adrienne Carrie Hubbard
- Adrienne Carrie Hubbard
- Adrienne Carrie Hubbard
- Adrienne Carrie Hubbard
- Adrienne Carrie Hubbard
- Adrienne Carrie Hubbard
- Adrienne Carrie Hubbard
- Adrienne Carrie Hubbard
- Adrienne Carrie Hubbard
- Adrienne Carrie Hubbard
- Adrienne Carrie Hubbard
- Adrienne Carrie Hubbard
- Adrienne Carrie Hubbard
- Adrienne Carrie Hubbard
- Adrienne Carrie Hubbard
- Adrienne Carrie Hubbard
- Adrienne Carrie Hubbard
- Adrienne Carrie Hubbard
- Adrienne Carrie Hubbard
- Adrienne Carrie Hubbard
- Adrienne Carrie Hubbard
- Adrienne Carrie Hubbard
- Adrienne Carrie Hubbard
- Adrienne Carrie Hubbard
- Adrienne Carrie Hubbard
- Adrienne Carrie Hubbard
- Adrienne Carrie Hubbard
- Adrienne Carrie Hubbard
- Adrienne Carrie Hubbard
- Adrienne Carrie Hubbard
- Adrienne Carrie Hubbard
- Adrienne Carrie Hubbard
- Adrienne Carrie Hubbard
- Adrienne Carrie Hubbard
- Adrienne Carrie Hubbard
- Adrienne Carrie Hubbard
- Adrienne Carrie Hubbard
- Adrienne Carrie Hubbard
- Adrienne Carrie Hubbard
- Adrienne Carrie Hubbard
- Adrienne Carrie Hubbard
- Adrienne Carrie Hubbard
- Adrienne Carrie Hubbard
- Adrienne Carrie Hubbard
- Adrienne Carrie Hubbard
- Adrienne Carrie Hubbard
- Adrienne Carrie Hubbard
- Adrienne Carrie Hubbard
- Adrienne Carrie Hubbard
- Adrienne Carrie Hubbard
- Adrienne Carrie Hubbard
- Adrienne Carrie Hubbard
- Adrienne Carrie Hubbard
- Adrienne Carrie Hubbard
- Adrienne Carrie Hubbard
- Adrienne Carrie Hubbard
- Adrienne Carrie Hubbard
- Adrienne Carrie Hubbard
- Adrienne Carrie Hubbard
- Adrienne Carrie Hubbard
- Adrienne Carrie Hubbard
- Adrienne Carrie Hubbard
- Adrienne Carrie Hubbard
- Adrienne Carrie Hubbard
- Adrienne Carrie Hubbard
- Adrienne Carrie Hubbard
- Adrienne Carrie Hubbard
- Adrienne Carrie Hubbard
- Adrienne Carrie Hubbard
- Adrienne Carrie Hubbard
- Adrienne Carrie Hubbard
- Adrienne Carrie Hubbard
- Adrienne Carrie Hubbard
- Adrienne Carrie Hubbard
- Adrienne Carrie Hubbard
- Adrienne Carrie Hubbard
- Adrienne Carrie Hubbard
- Adrienne Carrie Hubbard
- Adrienne Carrie Hubbard
- Adrienne Carrie Hubbard
- Adrienne Carrie Hubbard
- Adrienne Carrie Hubbard
- Adrienne Carrie Hubbard
- Adrienne Carrie Hubbard
- Adrienne Carrie Hubbard
- Adrienne Carrie Hubbard
- Adrienne Carrie Hubbard
- Adrienne Carrie Hubbard
- Adrienne Carrie Hubbard
- Adrienne Carrie Hubbard
- Adrienne Carrie Hubbard
- Adrienne Carrie Hubbard
- Adrienne Carrie Hubbard
- Adrienne Carrie Hubbard
- Adrienne Carrie Hubbard
- Adrienne Carrie Hubbard
- Adrienne Carrie Hubbard
- Adrienne Carrie Hubbard
- Adrienne Carrie Hubbard
- Adrienne Carrie Hubbard
- Adrienne Carrie Hubbard
- Adrienne Carrie Hubbard
- Adrienne Carrie Hubbard
- Adrienne Carrie Hubbard
- Adrienne Carrie Hubbard
- Adrienne Carrie Hubbard
- Adrienne Carrie Hubbard
- Adrienne Carrie Hubbard
- Adrienne Carrie Hubbard
- Adrienne Carrie Hubbard
- Adrienne Carrie Hubbard
- Adrienne Carrie Hubbard
- Adrienne Carrie Hubbard
- Adrienne Carrie Hubbard
- Adrienne Carrie Hubbard
- Adrienne Carrie Hubbard
- Adrienne Carrie Hubbard
- Adrienne Carrie Hubbard
- Adrienne Carrie Hubbard
- Adrienne Carrie Hubbard
- Adrienne Carrie Hubbard
- Adrienne Carrie Hubbard
- Adrienne Carrie Hubbard
- Adrienne Carrie Hubbard
- Adrienne Carrie Hubbard
- Adrienne Carrie Hubbard
- Adrienne Carrie Hubbard
- Adrienne Carrie Hubbard
- Adrienne Carrie Hubbard
- Adrienne Carrie Hubbard
- Adrienne Carrie Hubbard
- Adrienne Carrie Hubbard
- Adrienne Carrie Hubbard
- Adrienne Carrie Hubbard
- Adrienne Carrie Hubbard
- Adrienne Carrie Hubbard
- Adrienne Carrie Hubbard
- Adrienne Carrie Hubbard
- Adrienne Carrie Hubbard
- Adrienne Carrie Hubbard
- Adrienne Carrie Hubbard
- Adrienne Carrie Hubbard
- Adrienne Carrie Hubbard
- Adrienne Carrie Hubbard
- Adrienne Carrie Hubbard
- Adrienne Carrie Hubbard
- Adrienne Carrie Hubbard
- Adrienne Carrie Hubbard
- Adrienne Carrie Hubbard
- Adrienne Carrie Hubbard
- Adrienne Carrie Hubbard
- Adrienne Carrie Hubbard
- Adrienne Carrie Hubbard
- Adrienne Carrie Hubbard
- Adrienne Carrie Hubbard
- Adrienne Carrie Hubbard
- Adrienne Carrie Hubbard
- Adrienne Carrie Hubbard
- Adrienne Carrie Hubbard
- Adrienne Carrie Hubbard
- Adrienne Carrie Hubbard
- Adrienne Carrie Hubbard
- Adrienne Carrie Hubbard
- Adrienne Carrie Hubbard
- Adrienne Carrie Hubbard
- Adrienne Carrie Hubbard
- Adrienne Carrie Hubbard
- Adrienne Carrie Hubbard
- Adrienne Carrie Hubbard
- Adrienne Carrie Hubbard
- Adrienne Carrie Hubbard
- Adrienne Carrie Hubbard
- Adrienne Carrie Hubbard
- Adrienne Carrie Hubbard
- Adrienne Carrie Hubbard
- Adrienne Carrie Hubbard
- Adrienne Carrie Hubbard
- Adrienne Carrie Hubbard
- Adrienne Carrie Hubbard
- Adrienne Carrie Hubbard
- Adrienne Carrie Hubbard
- Adrienne Carrie Hubbard
- Adrienne Carrie Hubbard
- Adrienne Carrie Hubbard
- Adrienne Carrie Hubbard
- Adrienne Carrie Hubbard
- Adrienne Carrie Hubbard
- Adrienne Carrie Hubbard
- Adrienne Carrie Hubbard
- Adrienne Carrie Hubbard
- Adrienne Carrie Hubbard
- Adrienne Carrie Hubbard
- Adrienne Carrie Hubbard
- Adrienne Carrie Hubbard
- Adrienne Carrie Hubbard
- Adrienne Carrie Hubbard
- Adrienne Carrie Hubbard
- Adrienne Carrie Hubbard
- Adrienne Carrie Hubbard
- Adrienne Carrie Hubbard
- Adrienne Carrie Hubbard
- Adrienne Carrie Hubbard
- Adrienne Carrie Hubbard
- Adrienne Carrie Hubbard
- Adrienne Carrie Hubbard
- Adrienne Carrie Hubbard
- Adrienne Carrie Hubbard
- Adrienne Carrie Hubbard
- Adrienne Carrie Hubbard
- Adrienne Carrie Hubbard
- Adrienne Carrie Hubbard
- Adrienne Carrie Hubbard
- Adrienne Carrie Hubbard
- Adrienne Carrie Hubbard
- Adrienne Carrie Hubbard
- Adrienne Carrie Hubbard
- Adrienne Carrie Hubbard
- Adrienne Carrie Hubbard
- Adrienne Carrie Hubbard
- Adrienne Carrie Hubbard
- Adrienne Carrie Hubbard
- Adrienne Carrie Hubbard
- Adrienne Carrie Hubbard
- Adrienne Carrie Hubbard
- Adrienne Carrie Hubbard
- Adrienne Carrie Hubbard
- Adrienne Carrie Hubbard
- Adrienne Carrie Hubbard
- Adrienne Carrie Hubbard
- Adrienne Carrie Hubbard
- Adrienne Carrie Hubbard
- Adrienne Carrie Hubbard
- Adrienne Carrie Hubbard
- Adrienne Carrie Hubbard
- Adrienne Carrie Hubbard
- Adrienne Carrie Hubbard
- Adrienne Carrie Hubbard
- Adrienne Carrie Hubbard
- Adrienne Carrie Hubbard
- Adrienne Carrie Hubbard
- Adrienne Carrie Hubbard
- Adrienne Carrie Hubbard
- Adrienne Carrie Hubbard
- Adrienne Carrie Hubbard
- Adrienne Carrie Hubbard
- Adrienne Carrie Hubbard
- Adrienne Carrie Hubbard
- Adrienne Carrie Hubbard
- Adrienne Carrie Hubbard
- Adrienne Carrie Hubbard
- Adrienne Carrie Hubbard
- Adrienne Carrie Hubbard
- Adrienne Carrie Hubbard
- Adrienne Carrie Hubbard
- Adrienne Carrie Hubbard
- Adrienne Carrie Hubbard
- Adrienne Carrie Hubbard
- Adrienne Carrie Hubbard
- Adrienne Carrie Hubbard
- Adrienne Carrie Hubbard
- Adrienne Carrie Hubbard
- Adrienne Carrie Hubbard
- Adrienne Carrie Hubbard
- Adrienne Carrie Hubbard
- Adrienne Carrie Hubbard
- Adrienne Carrie Hubbard
- Adrienne Carrie Hubbard
- Adrienne Carrie Hubbard
- Adrienne Carrie Hubbard
- Adrienne Carrie Hubbard
- Adrienne Carrie Hubbard
- Adrienne Carrie Hubbard
- Adrienne Carrie Hubbard
- Adrienne Carrie Hubbard
- Adrienne Carrie Hubbard
- Adrienne Carrie Hubbard
- Adrienne Carrie Hubbard
- Adrienne Carrie Hubbard
- Adrienne Carrie Hubbard
- Adrienne Carrie Hubbard
- Adrienne Carrie Hubbard
- Adrienne Carrie Hubbard
- Adrienne Carrie Hubbard
- Adrienne Carrie Hubbard
- Adrienne Carrie Hubbard
- Adrienne Carrie Hubbard
- Adrienne Carrie Hubbard
- Adrienne Carrie Hubbard
- Adrienne Carrie Hubbard
- Adrienne Carrie Hubbard
- Adrienne Carrie Hubbard
- Adrienne Carrie Hubbard
- Adrienne Carrie Hubbard
- Adrienne Carrie Hubbard
- Adrienne Carrie Hubbard
- Adrienne Carrie Hubbard
- Adrienne Carrie Hubbard
- Adrienne Carrie Hubbard
- Adrienne Carrie Hubbard
- Adrienne Carrie Hubbard
- Adrienne Carrie Hubbard
- Adrienne Carrie Hubbard
- Adrienne Carrie Hubbard
- Adrienne Carrie Hubbard
- Adrienne Carrie Hubbard
- Adrienne Carrie Hubbard
- Adrienne Carrie Hubbard
- Adrienne Carrie Hubbard
- Adrienne Carrie Hubbard
- Adrienne Carrie Hubbard
- Adrienne Carrie Hubbard
- Adrienne Carrie Hubbard
- Adrienne Carrie Hubbard
- Adrienne Carrie Hubbard
- Adrienne Carrie Hubbard
- Adrienne Carrie Hubbard
- Adrienne Carrie Hubbard
- Adrienne Carrie Hubbard
- Adrienne Carrie Hubbard
- Adrienne Carrie Hubbard
- Adrienne Carrie Hubbard
- Adrienne Carrie Hubbard
- Adrienne Carrie Hubbard
- Adrienne Carrie Hubbard
- Adrienne Carrie Hubbard
- Adrienne Carrie Hubbard
- Adrienne Carrie Hubbard
- Adrienne Carrie Hubbard
- Adrienne Carrie Hubbard
- Adrienne Carrie Hubbard
- Adrienne Carrie Hubbard
- Adrienne Carrie Hubbard
- Adrienne Carrie Hubbard
- Adrienne Carrie Hubbard
- Adrienne Carrie Hubbard
- Adrienne Carrie Hubbard
- Adrienne Carrie Hubbard
- Adrienne Carrie Hubbard
- Adrienne Carrie Hubbard
- Adrienne Carrie Hubbard
- Adrienne Carrie Hubbard
- Adrienne Carrie Hubbard
- Adrienne Carrie Hubbard
- Adrienne Carrie Hubbard
- Adrienne Carrie Hubbard
- Adrienne Carrie Hubbard
- Adrienne Carrie Hubbard
- Adrienne Carrie Hubbard
- Adrienne Carrie Hubbard
- Adrienne Carrie Hubbard
- Adrienne Carrie Hubbard
- Adrienne Carrie Hubbard
- Adrienne Carrie Hubbard
- Adrienne Carrie Hubbard
- Adrienne Carrie Hubbard
- Adrienne Carrie Hubbard
- Adrienne Carrie Hubbard
- Adrienne Carrie Hubbard
- Adrienne Carrie Hubbard
- Adrienne Carrie Hubbard
- Adrienne Carrie Hubbard
- Adrienne Carrie Hubbard
- Adrienne Carrie Hubbard
- Adrienne Carrie Hubbard
- Adrienne Carrie Hubbard
- Adrienne Carrie Hubbard
- Adrienne Carrie Hubbard
- Adrienne Carrie Hubbard
- Adrienne Carrie Hubbard
- Adrienne Carrie Hubbard
- Adrienne Carrie Hubbard
- Adrienne Carrie Hubbard
- Adrienne Carrie Hubbard
- Adrienne Carrie Hubbard
- Adrienne Carrie Hubbard
- Adrienne Carrie Hubbard
- Adrienne Carrie Hubbard
- Adrienne Carrie Hubbard
- Adrienne Carrie Hubbard
- Adrienne Carrie Hubbard
- Adrienne Carrie Hubbard
- Adrienne Carrie Hubbard
- Adrienne Carrie Hubbard
- Adrienne Carrie Hubbard
- Adrienne Carrie Hubbard
- Adrienne Carrie Hubbard
- Adrienne Carrie Hubbard
- Adrienne Carrie Hubbard
- Adrienne Carrie Hubbard
- Adrienne Carrie Hubbard
- Adrienne Carrie Hubbard
- Adrienne Carrie Hubbard
- Adrienne Carrie Hubbard
- Adrienne Carrie Hubbard
- Adrienne Carrie Hubbard
- Adrienne Carrie Hubbard
- Adrienne Carrie Hubbard