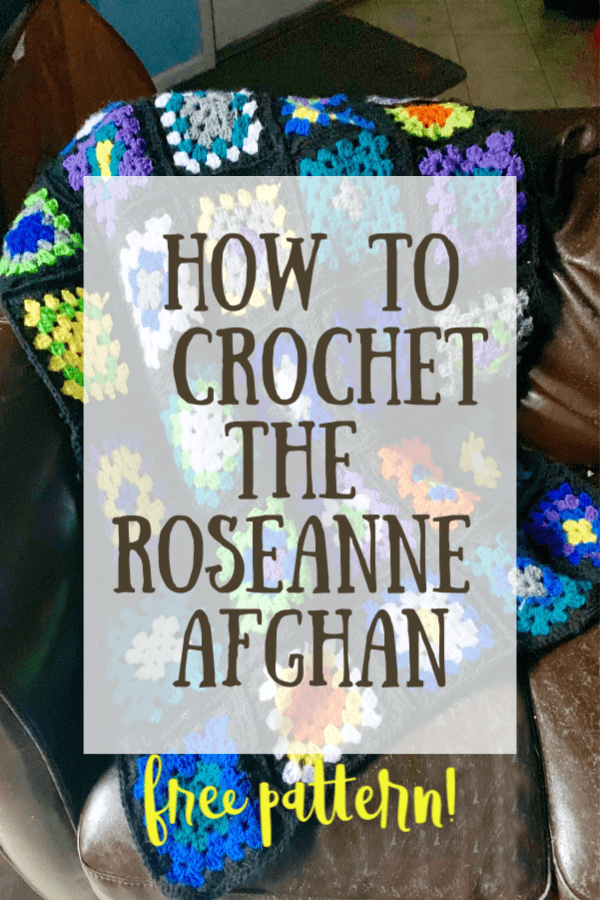
The Roseanne Afghan is an iconic piece of TV set décor. On 'Roseanne' with Roseanne Barr, the Connor family had a crochet afghan on their couch. After the show became a hit, the colorful granny square afghan became an icon. Today I will show you how to crochet a Roseanne blanket for your own living room.
HOW TO MAKE A ROSEANNE INSPIRED GRANNY SQUARE AFGHAN
When I see a multi-colored afghan made with granny squares and bordered with black stitches, I’m instantly reminded of 'Roseanne' and how much I enjoyed watching that show when I was young (except for the last episode which almost ruined the entire series for me and ended on a sour note).
The family squabbles between Roseanne Barr and the rest of the family were so relatable and normalized the interactions in an American family.
TV INSPIRATION FOR GRANNY SQUARE BLANKETS
I never watched the Roseanne reboot that came out a few years ago or "The Connor’s" spin off either. We only have Netflix and not cable so if those shows end up on the streaming platform I’m sure I will check them out eventually.
The blanket apparently shows up in the Roseanne revival and according to the the NY Post, the production company had a several copies of the afghan made for promotional purposes.

The Conner’s weren’t the only TV family who had a granny square afghan displayed on their couch. Apparently other set designers love the same homey decor. The earliest blanket like the one from 'Roseanne' could be found on the TV show, 'Taxi.'
Crochet May Benefit Your Mental Health
Similar crochet blankets can be found on many other shows. Big Bang Theory, Jane The Virgin, and It’s Always Sunny In Philadelphia all have similar throws all with a slightly different color palette.
Set decorator Ann Shea explained why so many sets feature these blankets. In her words, it is because they have "great texture, color and lots of character." The unique touch of a colorful blanket delivers the comfort of a dear friend and brings a comforting familiarity even when you start watching a new series!
MAKING MY CROCHET GRANNY SQUARE AFGHAN
I’ve wanted to make a crochet blanket in this style for a long time featuring the unique bright color combinations. I didn't try to replicate the exact color pattern because each square is truly unique. I like the style of the Roseanne Afghan. It has that granny-chic vintage vibe that I can’t seem to get enough of.
You may also like: Rainbow Crochet Scarf
As someone who appreciates how much time and effort goes into creating homemade creations like this, just being able to finish a project on this scale is a huge accomplishment.
THINGS I LEARNED MAKING THE BLANKET
The squares of the afghan each took me about half an hour.
This afghan is a great project to use up all of your scrap yarn. The more colors you have to mix and match, the better. The black border on the squares tie it all together.
This blanket uses granny squares as its base. There are many, many ways to crochet a granny square, and my instructions are just one method.
Each granny square is finished with a row of black and then I did a single crochet stitch around each square.
You may also like: Crochet Swiffer Cover Tutorial
I sewed the blocks together using a slip stitch.
My finished blanket is not as large as I would like. I lost my crojo at the 75% completion mark. The good thing about crochet granny square blankets is that I can just keep making more squares and add them when I get my groove back.
This blanket is still big enough for now to snuggle up with on the couch. I feel good about what I have accomplished thus far making my own iconic blanket.

The following are affiliate links. We are a participant in the Amazon Services LLC Associates Program, an affiliate advertising program designed to provide a means for us to earn fees by linking to Amazon.com and affiliated sites.
TIPS FOR MAKING THE ROSEANNE AFGHAN
- Weave in the ends as you finish each square, otherwise you will end up with a finished blanket with a thousand loose threads that need to be weaved in and it will make you want to kill yourself. (I have learned this lesson the hard way)
- You can do separate colors for each row of each square or double up some of the colors if you want to save time. You’ll notice that for some of my blocks I used 2, 3 or 4 colors.
- I also recommend sewing the blocks together as you go. After you complete a few of the blocks with the black border you can use the slip stitch to connect them. I tend to stay more motivated when I see my project all coming together.
- You can use many types of yarn but washable acrylic yarn is common in the traditional granny blanket for multi color crochet squares.
SUPPLIES FOR A GRANNY SQUARE BLANKET
- Yarn in 5-10 colors plus several skeins of black yarn. All yarn should be medium weight.
- 5mm crochet hook
- yarn needle
- scissors
Check out the how to card below for the full instructions on a Roseanne blanket pattern.
Roseanne Afghan Granny Square Blanket

Make a granny square blanket like the afghan from the show Roseanne
Materials
- Yarn in 5-10 colors plus several skeins of black yarn. All yarn should be medium weight.
Tools
- 5mm crochet hook
- yarn needle
- scissors
Instructions
How to Crochet a Roseanne Afghan
This granny square begins with a circle. To make a circle chain 6, then join with a slip stitch to form a ring.
Round One
Work round one with clusters of double crochet stitches and chain stitch corner spaces.
· Chain 3 – this counts as the first dc.
· Work 2 more dc in the center of the ring.
· Ch 3, 3 dc into center of the ring.
· Repeat the steps within the brackets two more times.
· Ch 2.
· Slip stitch to the beginning of the round.
You should have a total of 12 dc sts all together in this round, counting the first chain three as one of the double crochet stitches.
Tie off the end and weave it in
Round Two
· Ch 3 – this counts as the first dc stitch.
· 2 dc, ch 3, 3 dc in same space.
· Ch 1, 3 dc in next space, ch 1, 3 dc in same space
· Repeat sequence in brackets 2 more times for a total of 3 times.
· Ch 2, sl st to join the end of the round to the beginning of the round.
You should have a total of 24 dc sts in this round. Each corner of the square will have six double crochet stitches separated by a chain of three.
Tie off the end and weave it in
Round 3.
Start the next color by tying it to one of the corners of the second round
· Ch 3 – this counts as the first dc stitch.
· 2 dc, ch 3, 3 dc in same space.
· {Ch 1, 3 dc in next space, ch 1, 3 dc in same space}
· Repeat sequence in brackets 3 more times for a total of 4times.
· Ch 2, sl st to join the end of the round to the beginning of the round.
· Repeat the steps above three more times to finish the other three sides, beginning with 1 more single crochet in the same corner, after your ch-2.
· At the end of the round, slip stitch to close.
You should have of 36 dc stitches in this row, plus a chain 3 space in each corner.
Tie off the end and weave it in
Round 4
Repeat round 3 except do an extra set of 3 dc on each side where there is an extra space from the stitches you made on the previous row.
You should have 48 dc stitches per side plus a chain 3 space in each corner.
Tie off the end and weave it in.
Round 5
Switch to black yarn.
Repeat round 4 except do an extra set of 3 dc on each side where there is an extra space from the stitches you made on the previous row.
You will have a total of 60 dc with a ch 3 space at each corner.
Round 6
For the last round, single crochet all the way around the square with a ch-3 space at each corner.
Tie off the end and weave it in
Total of 60 sc sts in this round, with 20 sc sts on each side of the square.
End off. Weave in ends. Block if desired.
Putting it all together
To connect the squares together I simply put two together at a time and slip stitched them together. Then I tied off the ends and weaved them in. Continue stitching the squares together until the blanket is the size that you want.
Notes
Abbreviations
Ss- slip stitch
Sc- single crochet
Sc- double crochet
Sts- stitches
Sl- slip stitch
St- stitch
Ch- chain
If you want to use a the same color for more that one row instead of tying off the end and weaving it in you can just flip the granny square over, chain two and double crochet two more times into each space before continuing with the pattern.
More Reading:
- DIY Crochet Plant Hanger: Free Pattern
- Crochet Easter Basket Tutorial
- Crochet Cat Bed- How to Make a Cat Bed with Chunky Crochet

Hi I’m Adrienne Carrie Hubbard. I believe a rich life comes not from the things you have, but the things you do; the experiences you create and the people you meet along the way. Thanks for hanging out!