This DIY air plant holder is simple to make with old picture frames and scrap chicken wire. Air plants are known for their unique foliage and easy care because they don't need soil! Decorate you home with this fun house plant display. Hang it on your wall or give it as a gift!

Air plants or Tillandsias are native to Central and South America and are often found attached to other plants, growing high up in the air. They grow in a range of environments from deserts to tropical rainforests.
Lack of soil is usually prohibitive if you want to grow a garden, but not when it comes to air plants! All you need for a happy air plant garden is a warm-ish climate, a sheltered position, and a bit of water every now and again.
This air plant frame is a great way of showing off your tillandsias collection. Here's how to make it:
Supplies needed to make an air plant holder:
- Picture frames. The ones I used were 12"x12"
- Chicken wire
- Staple gun
- Wire cutters
- Airplants - I like this 10 pack of colorful plants
Directions to make the DIY air plant holder:
- Remove the back off of the frame and take out the glass. Be careful not to cut yourself.
- Measure the chicken wire 12"x12".
- Cut the chicken wire with wire cutters.
- Staple the chicken wire to the back of the frames.
- Insert the base of the plants in the wire. You may need to stretch the wire a little bit with your fingers to make it fit.
How to care for an air plant:
- Every one to two weeks, soak your air plant in room temperature tap water for 5-10 minutes.
- After soaking gently shake excess water from your plant.
- From the time soaking ends, the plant should be able to dry fully in no more than 3 hours. If your plant stays wet longer than this it may rot. Try placing it in a brighter place with more air circulation to facilitate faster drying.
- Once a week, mist your plant thoroughly, so that the entire surface of the plant is moistened (but not so much that there is water dripping down into the plant).
- The hotter and dryer the air (summer, early fall) the more you need to water. The cooler and more humid the air (winter and spring) the less water your air plant will need. Remember, though, that heaters and fireplaces dry the air!
- Do all watering in the morning. Evening soaking or misting disrupts the plants ability to respire overnight, and extends drying time.
Air plants are pretty easygoing when it comes to their temperature. They do best between 50-90 degrees F. Ideally, overnight temperatures will be about 10 degrees cooler than daytime temperature.
Incorporating orchid or Bromeliad fertilizer (like this one) into your watering regimen once or twice a month is a great way to keep your air plant happy. Fertilizing your air plant encourages it to blossom and reproduce.
How long do they live?
Tillandsias usually live for several years and will bloom and produce flowers only one time during their lifetime. The flowers are striking and brilliantly colored, and the bloom period will last several days to many months, depending on the species.

What else can I display my air plant in?
Once you start decorating with air plants you'll want to display them everywhere! Tuck them into shells and driftwood crevices, glass baubles and wire baskets, or superglue their roots to stones or wood.
Place them amongst your larger houseplants, between the leaves or around the base. They make ideal companions for orchids, cactus and bromeliads.
Wall Air Plant Holder
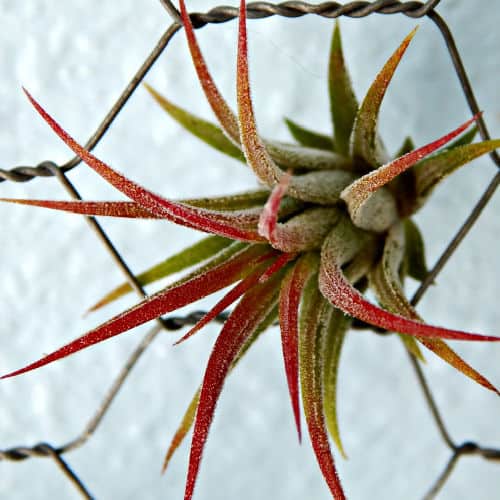
Make this fun air plant holder to hang on your wall. Use an old picture frame and some chicken wire to display these unique plants.
Materials
- 12"x12" picture frame
- Chicken wire
- Air plants
Tools
- Wire cutters
- Staple gun and staples
Instructions
- Remove the back and glass of the picture frame.
- Cut the chicken wire in a 12x12 inch piece.
- Staple the wire to the back of the frame.
- Place the plants in the holes of the wire.
Notes
Attach the plants by twisting craft wire around the plants and chicken wire if necessary.
More house plant posts you may like:
- Indoor fruit trees
- House plant care and tips
- House to get rid of fungus gnats in house plants
- How to water house plants while you are on vacation

Hi I’m Adrienne Carrie Hubbard. I believe a rich life comes not from the things you have, but the things you do; the experiences you create and the people you meet along the way. Thanks for hanging out!
- Adrienne Carrie Hubbard
- Adrienne Carrie Hubbard
- Adrienne Carrie Hubbard
- Adrienne Carrie Hubbard
- Adrienne Carrie Hubbard
- Adrienne Carrie Hubbard
- Adrienne Carrie Hubbard
- Adrienne Carrie Hubbard
- Adrienne Carrie Hubbard
- Adrienne Carrie Hubbard
- Adrienne Carrie Hubbard
- Adrienne Carrie Hubbard
- Adrienne Carrie Hubbard
- Adrienne Carrie Hubbard
- Adrienne Carrie Hubbard
- Adrienne Carrie Hubbard
- Adrienne Carrie Hubbard
- Adrienne Carrie Hubbard
- Adrienne Carrie Hubbard
- Adrienne Carrie Hubbard
- Adrienne Carrie Hubbard
- Adrienne Carrie Hubbard
- Adrienne Carrie Hubbard
- Adrienne Carrie Hubbard
- Adrienne Carrie Hubbard
- Adrienne Carrie Hubbard
- Adrienne Carrie Hubbard
- Adrienne Carrie Hubbard
- Adrienne Carrie Hubbard
- Adrienne Carrie Hubbard
- Adrienne Carrie Hubbard
- Adrienne Carrie Hubbard
- Adrienne Carrie Hubbard
- Adrienne Carrie Hubbard
- Adrienne Carrie Hubbard
- Adrienne Carrie Hubbard
- Adrienne Carrie Hubbard
- Adrienne Carrie Hubbard
- Adrienne Carrie Hubbard
- Adrienne Carrie Hubbard
- Adrienne Carrie Hubbard
- Adrienne Carrie Hubbard
- Adrienne Carrie Hubbard
- Adrienne Carrie Hubbard
- Adrienne Carrie Hubbard
- Adrienne Carrie Hubbard
- Adrienne Carrie Hubbard
- Adrienne Carrie Hubbard
- Adrienne Carrie Hubbard
- Adrienne Carrie Hubbard
- Adrienne Carrie Hubbard
- Adrienne Carrie Hubbard
- Adrienne Carrie Hubbard
- Adrienne Carrie Hubbard
- Adrienne Carrie Hubbard
- Adrienne Carrie Hubbard
- Adrienne Carrie Hubbard
- Adrienne Carrie Hubbard
- Adrienne Carrie Hubbard
- Adrienne Carrie Hubbard
- Adrienne Carrie Hubbard
- Adrienne Carrie Hubbard
- Adrienne Carrie Hubbard
- Adrienne Carrie Hubbard
- Adrienne Carrie Hubbard
- Adrienne Carrie Hubbard
- Adrienne Carrie Hubbard
- Adrienne Carrie Hubbard
- Adrienne Carrie Hubbard
- Adrienne Carrie Hubbard
- Adrienne Carrie Hubbard
- Adrienne Carrie Hubbard
- Adrienne Carrie Hubbard
- Adrienne Carrie Hubbard
- Adrienne Carrie Hubbard
- Adrienne Carrie Hubbard
- Adrienne Carrie Hubbard
- Adrienne Carrie Hubbard
- Adrienne Carrie Hubbard
- Adrienne Carrie Hubbard
- Adrienne Carrie Hubbard
- Adrienne Carrie Hubbard
- Adrienne Carrie Hubbard
- Adrienne Carrie Hubbard
- Adrienne Carrie Hubbard
- Adrienne Carrie Hubbard
- Adrienne Carrie Hubbard
- Adrienne Carrie Hubbard
- Adrienne Carrie Hubbard
- Adrienne Carrie Hubbard
- Adrienne Carrie Hubbard
- Adrienne Carrie Hubbard
- Adrienne Carrie Hubbard
- Adrienne Carrie Hubbard
- Adrienne Carrie Hubbard
- Adrienne Carrie Hubbard
- Adrienne Carrie Hubbard
- Adrienne Carrie Hubbard
- Adrienne Carrie Hubbard
- Adrienne Carrie Hubbard
- Adrienne Carrie Hubbard
- Adrienne Carrie Hubbard
- Adrienne Carrie Hubbard
- Adrienne Carrie Hubbard
- Adrienne Carrie Hubbard
- Adrienne Carrie Hubbard
- Adrienne Carrie Hubbard
- Adrienne Carrie Hubbard
- Adrienne Carrie Hubbard
- Adrienne Carrie Hubbard
- Adrienne Carrie Hubbard
- Adrienne Carrie Hubbard
- Adrienne Carrie Hubbard
- Adrienne Carrie Hubbard
- Adrienne Carrie Hubbard
- Adrienne Carrie Hubbard
- Adrienne Carrie Hubbard
- Adrienne Carrie Hubbard
- Adrienne Carrie Hubbard
- Adrienne Carrie Hubbard
- Adrienne Carrie Hubbard
- Adrienne Carrie Hubbard
- Adrienne Carrie Hubbard
- Adrienne Carrie Hubbard
- Adrienne Carrie Hubbard
- Adrienne Carrie Hubbard
- Adrienne Carrie Hubbard
- Adrienne Carrie Hubbard
- Adrienne Carrie Hubbard
- Adrienne Carrie Hubbard
- Adrienne Carrie Hubbard
- Adrienne Carrie Hubbard
- Adrienne Carrie Hubbard
- Adrienne Carrie Hubbard
- Adrienne Carrie Hubbard
- Adrienne Carrie Hubbard
- Adrienne Carrie Hubbard
- Adrienne Carrie Hubbard
- Adrienne Carrie Hubbard
- Adrienne Carrie Hubbard
- Adrienne Carrie Hubbard
- Adrienne Carrie Hubbard
- Adrienne Carrie Hubbard
- Adrienne Carrie Hubbard
- Adrienne Carrie Hubbard
- Adrienne Carrie Hubbard
- Adrienne Carrie Hubbard
- Adrienne Carrie Hubbard
- Adrienne Carrie Hubbard
- Adrienne Carrie Hubbard
- Adrienne Carrie Hubbard
- Adrienne Carrie Hubbard
- Adrienne Carrie Hubbard
- Adrienne Carrie Hubbard
- Adrienne Carrie Hubbard
- Adrienne Carrie Hubbard
- Adrienne Carrie Hubbard
- Adrienne Carrie Hubbard
- Adrienne Carrie Hubbard
- Adrienne Carrie Hubbard
- Adrienne Carrie Hubbard
- Adrienne Carrie Hubbard
- Adrienne Carrie Hubbard
- Adrienne Carrie Hubbard
- Adrienne Carrie Hubbard
- Adrienne Carrie Hubbard
- Adrienne Carrie Hubbard
- Adrienne Carrie Hubbard
- Adrienne Carrie Hubbard
- Adrienne Carrie Hubbard
- Adrienne Carrie Hubbard
- Adrienne Carrie Hubbard
- Adrienne Carrie Hubbard
- Adrienne Carrie Hubbard
- Adrienne Carrie Hubbard
- Adrienne Carrie Hubbard
- Adrienne Carrie Hubbard
- Adrienne Carrie Hubbard
- Adrienne Carrie Hubbard
- Adrienne Carrie Hubbard
- Adrienne Carrie Hubbard
- Adrienne Carrie Hubbard
- Adrienne Carrie Hubbard
- Adrienne Carrie Hubbard
- Adrienne Carrie Hubbard
- Adrienne Carrie Hubbard
- Adrienne Carrie Hubbard
- Adrienne Carrie Hubbard
- Adrienne Carrie Hubbard
- Adrienne Carrie Hubbard
- Adrienne Carrie Hubbard
- Adrienne Carrie Hubbard
- Adrienne Carrie Hubbard
- Adrienne Carrie Hubbard
- Adrienne Carrie Hubbard
- Adrienne Carrie Hubbard
- Adrienne Carrie Hubbard
- Adrienne Carrie Hubbard
- Adrienne Carrie Hubbard
- Adrienne Carrie Hubbard
- Adrienne Carrie Hubbard
- Adrienne Carrie Hubbard
- Adrienne Carrie Hubbard
- Adrienne Carrie Hubbard
- Adrienne Carrie Hubbard
- Adrienne Carrie Hubbard
- Adrienne Carrie Hubbard
- Adrienne Carrie Hubbard
- Adrienne Carrie Hubbard
- Adrienne Carrie Hubbard
- Adrienne Carrie Hubbard
- Adrienne Carrie Hubbard
- Adrienne Carrie Hubbard
- Adrienne Carrie Hubbard
- Adrienne Carrie Hubbard
- Adrienne Carrie Hubbard
- Adrienne Carrie Hubbard
- Adrienne Carrie Hubbard
- Adrienne Carrie Hubbard
- Adrienne Carrie Hubbard
- Adrienne Carrie Hubbard
- Adrienne Carrie Hubbard
- Adrienne Carrie Hubbard
- Adrienne Carrie Hubbard
- Adrienne Carrie Hubbard
- Adrienne Carrie Hubbard
- Adrienne Carrie Hubbard
- Adrienne Carrie Hubbard
- Adrienne Carrie Hubbard
- Adrienne Carrie Hubbard
- Adrienne Carrie Hubbard
- Adrienne Carrie Hubbard
- Adrienne Carrie Hubbard
- Adrienne Carrie Hubbard
- Adrienne Carrie Hubbard
- Adrienne Carrie Hubbard
- Adrienne Carrie Hubbard
- Adrienne Carrie Hubbard
- Adrienne Carrie Hubbard
- Adrienne Carrie Hubbard
- Adrienne Carrie Hubbard
- Adrienne Carrie Hubbard
- Adrienne Carrie Hubbard
- Adrienne Carrie Hubbard
- Adrienne Carrie Hubbard
- Adrienne Carrie Hubbard
- Adrienne Carrie Hubbard
- Adrienne Carrie Hubbard
- Adrienne Carrie Hubbard
- Adrienne Carrie Hubbard
- Adrienne Carrie Hubbard
- Adrienne Carrie Hubbard
- Adrienne Carrie Hubbard
- Adrienne Carrie Hubbard
- Adrienne Carrie Hubbard
- Adrienne Carrie Hubbard
- Adrienne Carrie Hubbard
- Adrienne Carrie Hubbard
- Adrienne Carrie Hubbard
- Adrienne Carrie Hubbard
- Adrienne Carrie Hubbard
- Adrienne Carrie Hubbard
- Adrienne Carrie Hubbard
- Adrienne Carrie Hubbard
- Adrienne Carrie Hubbard
- Adrienne Carrie Hubbard
- Adrienne Carrie Hubbard
- Adrienne Carrie Hubbard
- Adrienne Carrie Hubbard
- Adrienne Carrie Hubbard
- Adrienne Carrie Hubbard
- Adrienne Carrie Hubbard
- Adrienne Carrie Hubbard
- Adrienne Carrie Hubbard
- Adrienne Carrie Hubbard
- Adrienne Carrie Hubbard
- Adrienne Carrie Hubbard
- Adrienne Carrie Hubbard
- Adrienne Carrie Hubbard
- Adrienne Carrie Hubbard
- Adrienne Carrie Hubbard
- Adrienne Carrie Hubbard
- Adrienne Carrie Hubbard
- Adrienne Carrie Hubbard
- Adrienne Carrie Hubbard
- Adrienne Carrie Hubbard
- Adrienne Carrie Hubbard
- Adrienne Carrie Hubbard
- Adrienne Carrie Hubbard
- Adrienne Carrie Hubbard
- Adrienne Carrie Hubbard
- Adrienne Carrie Hubbard
- Adrienne Carrie Hubbard
- Adrienne Carrie Hubbard
- Adrienne Carrie Hubbard
- Adrienne Carrie Hubbard
- Adrienne Carrie Hubbard
- Adrienne Carrie Hubbard
- Adrienne Carrie Hubbard
- Adrienne Carrie Hubbard
- Adrienne Carrie Hubbard
- Adrienne Carrie Hubbard
- Adrienne Carrie Hubbard
- Adrienne Carrie Hubbard
- Adrienne Carrie Hubbard
- Adrienne Carrie Hubbard
- Adrienne Carrie Hubbard
- Adrienne Carrie Hubbard
- Adrienne Carrie Hubbard
- Adrienne Carrie Hubbard
- Adrienne Carrie Hubbard
- Adrienne Carrie Hubbard
- Adrienne Carrie Hubbard
- Adrienne Carrie Hubbard
- Adrienne Carrie Hubbard
- Adrienne Carrie Hubbard
- Adrienne Carrie Hubbard
- Adrienne Carrie Hubbard
- Adrienne Carrie Hubbard
- Adrienne Carrie Hubbard
- Adrienne Carrie Hubbard
- Adrienne Carrie Hubbard
- Adrienne Carrie Hubbard
- Adrienne Carrie Hubbard
- Adrienne Carrie Hubbard
- Adrienne Carrie Hubbard
- Adrienne Carrie Hubbard
- Adrienne Carrie Hubbard
- Adrienne Carrie Hubbard
- Adrienne Carrie Hubbard
- Adrienne Carrie Hubbard
- Adrienne Carrie Hubbard
- Adrienne Carrie Hubbard
- Adrienne Carrie Hubbard
- Adrienne Carrie Hubbard
- Adrienne Carrie Hubbard
- Adrienne Carrie Hubbard
- Adrienne Carrie Hubbard
- Adrienne Carrie Hubbard
- Adrienne Carrie Hubbard
- Adrienne Carrie Hubbard
- Adrienne Carrie Hubbard
- Adrienne Carrie Hubbard
- Adrienne Carrie Hubbard
- Adrienne Carrie Hubbard
- Adrienne Carrie Hubbard
- Adrienne Carrie Hubbard
- Adrienne Carrie Hubbard
- Adrienne Carrie Hubbard
- Adrienne Carrie Hubbard
- Adrienne Carrie Hubbard
- Adrienne Carrie Hubbard
- Adrienne Carrie Hubbard
- Adrienne Carrie Hubbard
- Adrienne Carrie Hubbard
- Adrienne Carrie Hubbard
- Adrienne Carrie Hubbard
- Adrienne Carrie Hubbard
- Adrienne Carrie Hubbard
- Adrienne Carrie Hubbard
- Adrienne Carrie Hubbard
- Adrienne Carrie Hubbard
- Adrienne Carrie Hubbard
- Adrienne Carrie Hubbard
- Adrienne Carrie Hubbard
- Adrienne Carrie Hubbard
- Adrienne Carrie Hubbard
- Adrienne Carrie Hubbard
- Adrienne Carrie Hubbard
- Adrienne Carrie Hubbard
- Adrienne Carrie Hubbard
- Adrienne Carrie Hubbard
- Adrienne Carrie Hubbard
- Adrienne Carrie Hubbard
- Adrienne Carrie Hubbard
- Adrienne Carrie Hubbard
- Adrienne Carrie Hubbard
- Adrienne Carrie Hubbard
- Adrienne Carrie Hubbard
- Adrienne Carrie Hubbard
- Adrienne Carrie Hubbard
- Adrienne Carrie Hubbard
- Adrienne Carrie Hubbard
- Adrienne Carrie Hubbard
- Adrienne Carrie Hubbard
- Adrienne Carrie Hubbard
- Adrienne Carrie Hubbard
- Adrienne Carrie Hubbard
- Adrienne Carrie Hubbard
- Adrienne Carrie Hubbard
- Adrienne Carrie Hubbard
- Adrienne Carrie Hubbard
- Adrienne Carrie Hubbard
- Adrienne Carrie Hubbard
- Adrienne Carrie Hubbard
- Adrienne Carrie Hubbard
- Adrienne Carrie Hubbard
- Adrienne Carrie Hubbard
- Adrienne Carrie Hubbard
- Adrienne Carrie Hubbard
- Adrienne Carrie Hubbard
- Adrienne Carrie Hubbard
- Adrienne Carrie Hubbard
- Adrienne Carrie Hubbard
- Adrienne Carrie Hubbard
- Adrienne Carrie Hubbard
- Adrienne Carrie Hubbard
- Adrienne Carrie Hubbard
- Adrienne Carrie Hubbard
- Adrienne Carrie Hubbard
- Adrienne Carrie Hubbard
- Adrienne Carrie Hubbard
- Adrienne Carrie Hubbard
- Adrienne Carrie Hubbard
- Adrienne Carrie Hubbard
- Adrienne Carrie Hubbard
- Adrienne Carrie Hubbard
- Adrienne Carrie Hubbard
- Adrienne Carrie Hubbard
- Adrienne Carrie Hubbard
- Adrienne Carrie Hubbard
- Adrienne Carrie Hubbard
- Adrienne Carrie Hubbard
- Adrienne Carrie Hubbard
- Adrienne Carrie Hubbard
- Adrienne Carrie Hubbard
- Adrienne Carrie Hubbard
- Adrienne Carrie Hubbard
- Adrienne Carrie Hubbard
- Adrienne Carrie Hubbard
- Adrienne Carrie Hubbard
- Adrienne Carrie Hubbard
- Adrienne Carrie Hubbard
- Adrienne Carrie Hubbard
- Adrienne Carrie Hubbard
- Adrienne Carrie Hubbard
- Adrienne Carrie Hubbard
- Adrienne Carrie Hubbard
- Adrienne Carrie Hubbard
- Adrienne Carrie Hubbard
- Adrienne Carrie Hubbard
- Adrienne Carrie Hubbard
- Adrienne Carrie Hubbard
- Adrienne Carrie Hubbard
- Adrienne Carrie Hubbard
- Adrienne Carrie Hubbard
- Adrienne Carrie Hubbard
- Adrienne Carrie Hubbard
- Adrienne Carrie Hubbard
- Adrienne Carrie Hubbard
- Adrienne Carrie Hubbard
- Adrienne Carrie Hubbard
- Adrienne Carrie Hubbard
- Adrienne Carrie Hubbard
- Adrienne Carrie Hubbard
- Adrienne Carrie Hubbard
- Adrienne Carrie Hubbard
- Adrienne Carrie Hubbard
- Adrienne Carrie Hubbard
- Adrienne Carrie Hubbard
- Adrienne Carrie Hubbard
- Adrienne Carrie Hubbard
- Adrienne Carrie Hubbard
- Adrienne Carrie Hubbard
- Adrienne Carrie Hubbard
- Adrienne Carrie Hubbard
- Adrienne Carrie Hubbard
- Adrienne Carrie Hubbard
- Adrienne Carrie Hubbard
- Adrienne Carrie Hubbard
- Adrienne Carrie Hubbard
- Adrienne Carrie Hubbard
- Adrienne Carrie Hubbard
- Adrienne Carrie Hubbard
- Adrienne Carrie Hubbard
- Adrienne Carrie Hubbard
- Adrienne Carrie Hubbard
- Adrienne Carrie Hubbard
- Adrienne Carrie Hubbard
- Adrienne Carrie Hubbard
- Adrienne Carrie Hubbard
- Adrienne Carrie Hubbard
- Adrienne Carrie Hubbard
- Adrienne Carrie Hubbard
- Adrienne Carrie Hubbard
- Adrienne Carrie Hubbard
- Adrienne Carrie Hubbard
- Adrienne Carrie Hubbard
- Adrienne Carrie Hubbard
- Adrienne Carrie Hubbard
- Adrienne Carrie Hubbard
- Adrienne Carrie Hubbard
- Adrienne Carrie Hubbard
- Adrienne Carrie Hubbard
- Adrienne Carrie Hubbard
- Adrienne Carrie Hubbard
- Adrienne Carrie Hubbard
- Adrienne Carrie Hubbard
- Adrienne Carrie Hubbard
- Adrienne Carrie Hubbard
- Adrienne Carrie Hubbard
- Adrienne Carrie Hubbard
- Adrienne Carrie Hubbard
- Adrienne Carrie Hubbard
- Adrienne Carrie Hubbard
- Adrienne Carrie Hubbard