Memory Wire Bracelet
I’m always trying to learn new jewelry making skills. I have been selling my handmade jewelry in my Etsy shop Crafty Little Gnome for over 7 years now. My latest obsession is working with wire and beads and making memory wire bracelets. No matter how I try to downsize my bead collection, it just keeps growing.
I have a simple tutorial today that will help you use up all the extra beads in your collection that you love, but aren’t quite sure what to do with.
Related content: How to Make a Wire Wrap Pendant and How to Make Beaded Friendship Bracelets

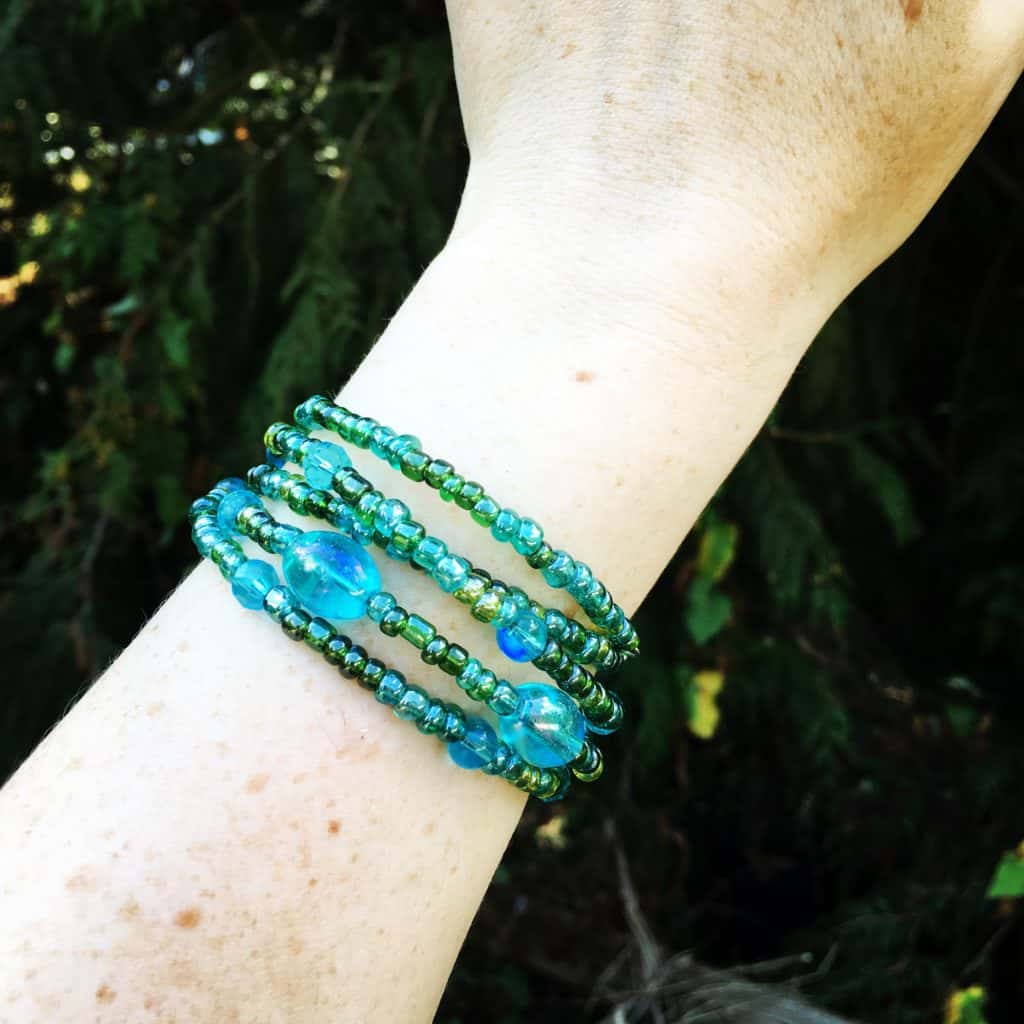
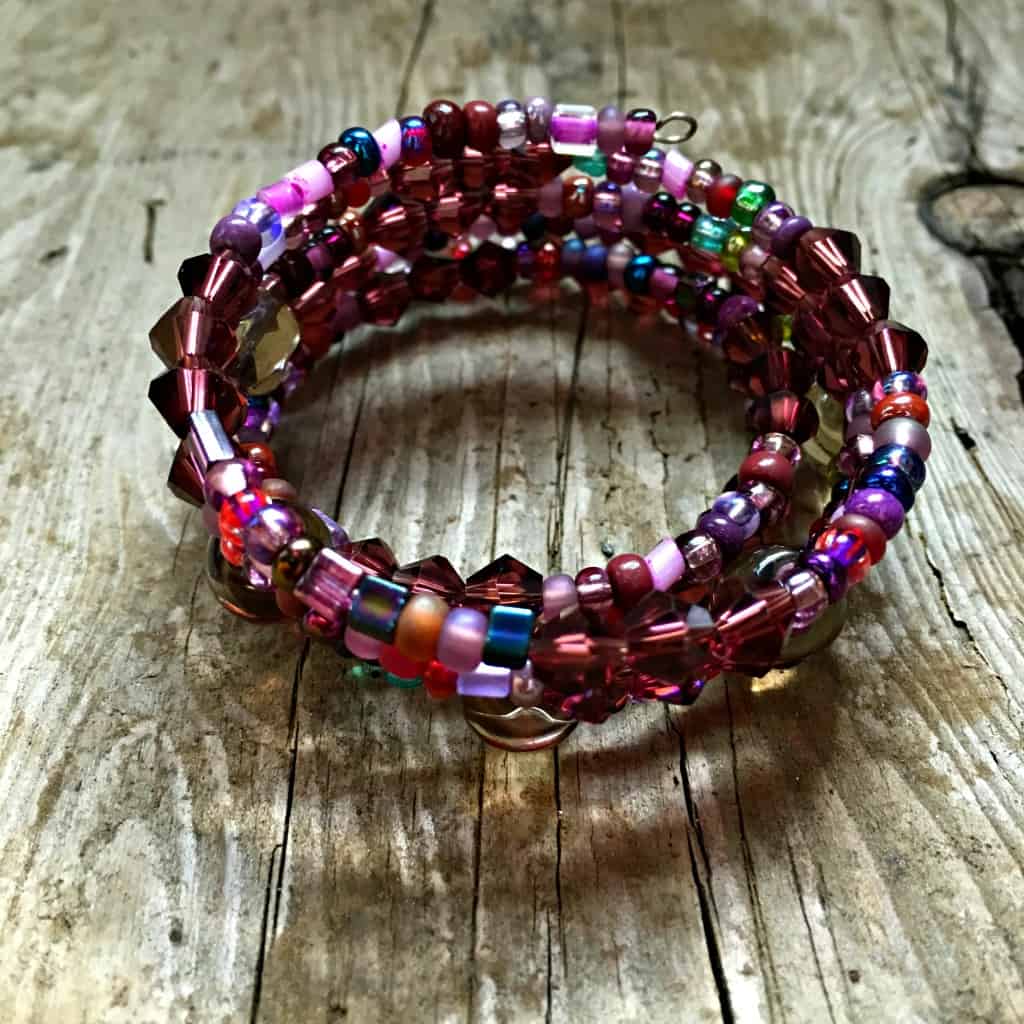
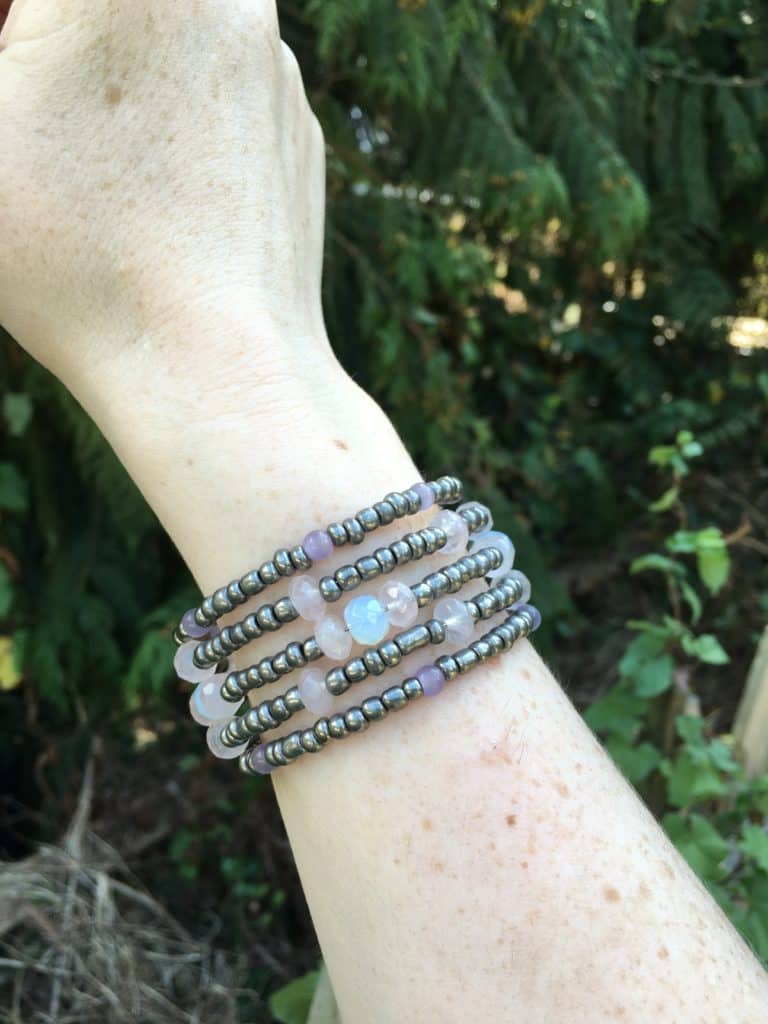
Memory wire bracelets are quite simple to make and look so lovely. The hardest part is choosing what beads to use.
Memory wire is a type of steel wire that keeps its cold-forged shape. This characteristic helps keep wire designs in place after completion, making memory wire an excellent choice for quick and easy projects.Memory wire is typically sold in coils with pre-formed loops sized for bracelets, necklaces or rings,
Memory wire bracelet supplies:

You can buy memory wire in a large spool or you can purchase it cut and ready to go at the right size. If you are cutting your own use strong metal clippers as memory wire is a lot stronger than other jewelry making wire.
Start by making a loop at the end of the memory wire with your pliers. Bend it at a 90 degree angle and then turn the wire into a circle.


Now all you have to do is string on your beads. I like to start with some seed beads and then add some larger beads in a pattern. When I get to the middle of the bracelet I add The biggest beads and then I continue with the opposite, and go smaller until I get to the end of the wire. Since the wire is already coiled and keeps it's shape you don't have to worry to much about the memory wire bracelet size. I usually make the bracelets long enough to curl around the wrist four or five times.
Related content: DIY stretchy beaded bracelet
How to finish a memory wire bracelet
Then I secure the end the same way I did at the beginning. Memory wire is very strong and can be difficult to cut and bend so you may have to use some extra force to secure the ends with a loop.
Slip it onto your wrist and you are ready to go!
You may also want to check out this video tutorial from the O'Neil Sisters:


Hi I’m Adrienne Carrie Hubbard. I believe a rich life comes not from the things you have, but the things you do; the experiences you create and the people you meet along the way. Thanks for hanging out!
- Adrienne Carrie Hubbard
- Adrienne Carrie Hubbard
- Adrienne Carrie Hubbard
- Adrienne Carrie Hubbard
- Adrienne Carrie Hubbard
- Adrienne Carrie Hubbard
- Adrienne Carrie Hubbard
- Adrienne Carrie Hubbard
- Adrienne Carrie Hubbard
- Adrienne Carrie Hubbard
- Adrienne Carrie Hubbard
- Adrienne Carrie Hubbard
- Adrienne Carrie Hubbard
- Adrienne Carrie Hubbard
- Adrienne Carrie Hubbard
- Adrienne Carrie Hubbard
- Adrienne Carrie Hubbard
- Adrienne Carrie Hubbard
- Adrienne Carrie Hubbard
- Adrienne Carrie Hubbard
- Adrienne Carrie Hubbard
- Adrienne Carrie Hubbard
- Adrienne Carrie Hubbard
- Adrienne Carrie Hubbard
- Adrienne Carrie Hubbard
- Adrienne Carrie Hubbard
- Adrienne Carrie Hubbard
- Adrienne Carrie Hubbard
- Adrienne Carrie Hubbard
- Adrienne Carrie Hubbard
- Adrienne Carrie Hubbard
- Adrienne Carrie Hubbard
- Adrienne Carrie Hubbard
- Adrienne Carrie Hubbard
- Adrienne Carrie Hubbard
- Adrienne Carrie Hubbard
- Adrienne Carrie Hubbard
- Adrienne Carrie Hubbard
- Adrienne Carrie Hubbard
- Adrienne Carrie Hubbard
- Adrienne Carrie Hubbard
- Adrienne Carrie Hubbard
- Adrienne Carrie Hubbard
- Adrienne Carrie Hubbard
- Adrienne Carrie Hubbard
- Adrienne Carrie Hubbard
- Adrienne Carrie Hubbard
- Adrienne Carrie Hubbard
- Adrienne Carrie Hubbard
- Adrienne Carrie Hubbard
- Adrienne Carrie Hubbard
- Adrienne Carrie Hubbard
- Adrienne Carrie Hubbard
- Adrienne Carrie Hubbard
- Adrienne Carrie Hubbard
- Adrienne Carrie Hubbard
- Adrienne Carrie Hubbard
- Adrienne Carrie Hubbard
- Adrienne Carrie Hubbard
- Adrienne Carrie Hubbard
- Adrienne Carrie Hubbard
- Adrienne Carrie Hubbard
- Adrienne Carrie Hubbard
- Adrienne Carrie Hubbard
- Adrienne Carrie Hubbard
- Adrienne Carrie Hubbard
- Adrienne Carrie Hubbard
- Adrienne Carrie Hubbard
- Adrienne Carrie Hubbard
- Adrienne Carrie Hubbard
- Adrienne Carrie Hubbard
- Adrienne Carrie Hubbard
- Adrienne Carrie Hubbard
- Adrienne Carrie Hubbard
- Adrienne Carrie Hubbard
- Adrienne Carrie Hubbard
- Adrienne Carrie Hubbard
- Adrienne Carrie Hubbard
- Adrienne Carrie Hubbard
- Adrienne Carrie Hubbard
- Adrienne Carrie Hubbard
- Adrienne Carrie Hubbard
- Adrienne Carrie Hubbard
- Adrienne Carrie Hubbard
- Adrienne Carrie Hubbard
- Adrienne Carrie Hubbard
- Adrienne Carrie Hubbard
- Adrienne Carrie Hubbard
- Adrienne Carrie Hubbard
- Adrienne Carrie Hubbard
- Adrienne Carrie Hubbard
- Adrienne Carrie Hubbard
- Adrienne Carrie Hubbard
- Adrienne Carrie Hubbard
- Adrienne Carrie Hubbard
- Adrienne Carrie Hubbard
- Adrienne Carrie Hubbard
- Adrienne Carrie Hubbard
- Adrienne Carrie Hubbard
- Adrienne Carrie Hubbard
- Adrienne Carrie Hubbard
- Adrienne Carrie Hubbard
- Adrienne Carrie Hubbard
- Adrienne Carrie Hubbard
- Adrienne Carrie Hubbard
- Adrienne Carrie Hubbard
- Adrienne Carrie Hubbard
- Adrienne Carrie Hubbard
- Adrienne Carrie Hubbard
- Adrienne Carrie Hubbard
- Adrienne Carrie Hubbard
- Adrienne Carrie Hubbard
- Adrienne Carrie Hubbard
- Adrienne Carrie Hubbard
- Adrienne Carrie Hubbard
- Adrienne Carrie Hubbard
- Adrienne Carrie Hubbard
- Adrienne Carrie Hubbard
- Adrienne Carrie Hubbard
- Adrienne Carrie Hubbard
- Adrienne Carrie Hubbard
- Adrienne Carrie Hubbard
- Adrienne Carrie Hubbard
- Adrienne Carrie Hubbard
- Adrienne Carrie Hubbard
- Adrienne Carrie Hubbard
- Adrienne Carrie Hubbard
- Adrienne Carrie Hubbard
- Adrienne Carrie Hubbard
- Adrienne Carrie Hubbard
- Adrienne Carrie Hubbard
- Adrienne Carrie Hubbard
- Adrienne Carrie Hubbard
- Adrienne Carrie Hubbard
- Adrienne Carrie Hubbard
- Adrienne Carrie Hubbard
- Adrienne Carrie Hubbard
- Adrienne Carrie Hubbard
- Adrienne Carrie Hubbard
- Adrienne Carrie Hubbard
- Adrienne Carrie Hubbard
- Adrienne Carrie Hubbard
- Adrienne Carrie Hubbard
- Adrienne Carrie Hubbard
- Adrienne Carrie Hubbard
- Adrienne Carrie Hubbard
- Adrienne Carrie Hubbard
- Adrienne Carrie Hubbard
- Adrienne Carrie Hubbard
- Adrienne Carrie Hubbard
- Adrienne Carrie Hubbard
- Adrienne Carrie Hubbard
- Adrienne Carrie Hubbard
- Adrienne Carrie Hubbard
- Adrienne Carrie Hubbard
- Adrienne Carrie Hubbard
- Adrienne Carrie Hubbard
- Adrienne Carrie Hubbard
- Adrienne Carrie Hubbard
- Adrienne Carrie Hubbard
- Adrienne Carrie Hubbard
- Adrienne Carrie Hubbard
- Adrienne Carrie Hubbard
- Adrienne Carrie Hubbard
- Adrienne Carrie Hubbard
- Adrienne Carrie Hubbard
- Adrienne Carrie Hubbard
- Adrienne Carrie Hubbard
- Adrienne Carrie Hubbard
- Adrienne Carrie Hubbard
- Adrienne Carrie Hubbard
- Adrienne Carrie Hubbard
- Adrienne Carrie Hubbard
- Adrienne Carrie Hubbard
- Adrienne Carrie Hubbard
- Adrienne Carrie Hubbard
- Adrienne Carrie Hubbard
- Adrienne Carrie Hubbard
- Adrienne Carrie Hubbard
- Adrienne Carrie Hubbard
- Adrienne Carrie Hubbard
- Adrienne Carrie Hubbard
- Adrienne Carrie Hubbard
- Adrienne Carrie Hubbard
- Adrienne Carrie Hubbard
- Adrienne Carrie Hubbard
- Adrienne Carrie Hubbard
- Adrienne Carrie Hubbard
- Adrienne Carrie Hubbard
- Adrienne Carrie Hubbard
- Adrienne Carrie Hubbard
- Adrienne Carrie Hubbard
- Adrienne Carrie Hubbard
- Adrienne Carrie Hubbard
- Adrienne Carrie Hubbard
- Adrienne Carrie Hubbard
- Adrienne Carrie Hubbard
- Adrienne Carrie Hubbard
- Adrienne Carrie Hubbard
- Adrienne Carrie Hubbard
- Adrienne Carrie Hubbard
- Adrienne Carrie Hubbard
- Adrienne Carrie Hubbard
- Adrienne Carrie Hubbard
- Adrienne Carrie Hubbard
- Adrienne Carrie Hubbard
- Adrienne Carrie Hubbard
- Adrienne Carrie Hubbard
- Adrienne Carrie Hubbard
- Adrienne Carrie Hubbard
- Adrienne Carrie Hubbard
- Adrienne Carrie Hubbard
- Adrienne Carrie Hubbard
- Adrienne Carrie Hubbard
- Adrienne Carrie Hubbard
- Adrienne Carrie Hubbard
- Adrienne Carrie Hubbard
- Adrienne Carrie Hubbard
- Adrienne Carrie Hubbard
- Adrienne Carrie Hubbard
- Adrienne Carrie Hubbard
- Adrienne Carrie Hubbard
- Adrienne Carrie Hubbard
- Adrienne Carrie Hubbard
- Adrienne Carrie Hubbard
- Adrienne Carrie Hubbard
- Adrienne Carrie Hubbard
- Adrienne Carrie Hubbard
- Adrienne Carrie Hubbard
- Adrienne Carrie Hubbard
- Adrienne Carrie Hubbard
- Adrienne Carrie Hubbard
- Adrienne Carrie Hubbard
- Adrienne Carrie Hubbard
- Adrienne Carrie Hubbard
- Adrienne Carrie Hubbard
- Adrienne Carrie Hubbard
- Adrienne Carrie Hubbard
- Adrienne Carrie Hubbard
- Adrienne Carrie Hubbard
- Adrienne Carrie Hubbard
- Adrienne Carrie Hubbard
- Adrienne Carrie Hubbard
- Adrienne Carrie Hubbard
- Adrienne Carrie Hubbard
- Adrienne Carrie Hubbard
- Adrienne Carrie Hubbard
- Adrienne Carrie Hubbard
- Adrienne Carrie Hubbard
- Adrienne Carrie Hubbard
- Adrienne Carrie Hubbard
- Adrienne Carrie Hubbard
- Adrienne Carrie Hubbard
- Adrienne Carrie Hubbard
- Adrienne Carrie Hubbard
- Adrienne Carrie Hubbard
- Adrienne Carrie Hubbard
- Adrienne Carrie Hubbard
- Adrienne Carrie Hubbard
- Adrienne Carrie Hubbard
- Adrienne Carrie Hubbard
- Adrienne Carrie Hubbard
- Adrienne Carrie Hubbard
- Adrienne Carrie Hubbard
- Adrienne Carrie Hubbard
- Adrienne Carrie Hubbard
- Adrienne Carrie Hubbard
- Adrienne Carrie Hubbard
- Adrienne Carrie Hubbard
- Adrienne Carrie Hubbard
- Adrienne Carrie Hubbard
- Adrienne Carrie Hubbard
- Adrienne Carrie Hubbard
- Adrienne Carrie Hubbard
- Adrienne Carrie Hubbard
- Adrienne Carrie Hubbard
- Adrienne Carrie Hubbard
- Adrienne Carrie Hubbard
- Adrienne Carrie Hubbard
- Adrienne Carrie Hubbard
- Adrienne Carrie Hubbard
- Adrienne Carrie Hubbard
- Adrienne Carrie Hubbard
- Adrienne Carrie Hubbard
- Adrienne Carrie Hubbard
- Adrienne Carrie Hubbard
- Adrienne Carrie Hubbard
- Adrienne Carrie Hubbard
- Adrienne Carrie Hubbard
- Adrienne Carrie Hubbard
- Adrienne Carrie Hubbard
- Adrienne Carrie Hubbard
- Adrienne Carrie Hubbard
- Adrienne Carrie Hubbard
- Adrienne Carrie Hubbard
- Adrienne Carrie Hubbard
- Adrienne Carrie Hubbard
- Adrienne Carrie Hubbard
- Adrienne Carrie Hubbard
- Adrienne Carrie Hubbard
- Adrienne Carrie Hubbard
- Adrienne Carrie Hubbard
- Adrienne Carrie Hubbard
- Adrienne Carrie Hubbard
- Adrienne Carrie Hubbard
- Adrienne Carrie Hubbard
- Adrienne Carrie Hubbard
- Adrienne Carrie Hubbard
- Adrienne Carrie Hubbard
- Adrienne Carrie Hubbard
- Adrienne Carrie Hubbard
- Adrienne Carrie Hubbard
- Adrienne Carrie Hubbard
- Adrienne Carrie Hubbard
- Adrienne Carrie Hubbard
- Adrienne Carrie Hubbard
- Adrienne Carrie Hubbard
- Adrienne Carrie Hubbard
- Adrienne Carrie Hubbard
- Adrienne Carrie Hubbard
- Adrienne Carrie Hubbard
- Adrienne Carrie Hubbard
- Adrienne Carrie Hubbard
- Adrienne Carrie Hubbard
- Adrienne Carrie Hubbard
- Adrienne Carrie Hubbard
- Adrienne Carrie Hubbard
- Adrienne Carrie Hubbard
- Adrienne Carrie Hubbard
- Adrienne Carrie Hubbard
- Adrienne Carrie Hubbard
- Adrienne Carrie Hubbard
- Adrienne Carrie Hubbard
- Adrienne Carrie Hubbard
- Adrienne Carrie Hubbard
- Adrienne Carrie Hubbard
- Adrienne Carrie Hubbard
- Adrienne Carrie Hubbard
- Adrienne Carrie Hubbard
- Adrienne Carrie Hubbard
- Adrienne Carrie Hubbard
- Adrienne Carrie Hubbard
- Adrienne Carrie Hubbard
- Adrienne Carrie Hubbard
- Adrienne Carrie Hubbard
- Adrienne Carrie Hubbard
- Adrienne Carrie Hubbard
- Adrienne Carrie Hubbard
- Adrienne Carrie Hubbard
- Adrienne Carrie Hubbard
- Adrienne Carrie Hubbard
- Adrienne Carrie Hubbard
- Adrienne Carrie Hubbard
- Adrienne Carrie Hubbard
- Adrienne Carrie Hubbard
- Adrienne Carrie Hubbard
- Adrienne Carrie Hubbard
- Adrienne Carrie Hubbard
- Adrienne Carrie Hubbard
- Adrienne Carrie Hubbard
- Adrienne Carrie Hubbard
- Adrienne Carrie Hubbard
- Adrienne Carrie Hubbard
- Adrienne Carrie Hubbard
- Adrienne Carrie Hubbard
- Adrienne Carrie Hubbard
- Adrienne Carrie Hubbard
- Adrienne Carrie Hubbard
- Adrienne Carrie Hubbard
- Adrienne Carrie Hubbard
- Adrienne Carrie Hubbard
- Adrienne Carrie Hubbard
- Adrienne Carrie Hubbard
- Adrienne Carrie Hubbard
- Adrienne Carrie Hubbard
- Adrienne Carrie Hubbard
- Adrienne Carrie Hubbard
- Adrienne Carrie Hubbard
- Adrienne Carrie Hubbard
- Adrienne Carrie Hubbard
- Adrienne Carrie Hubbard
- Adrienne Carrie Hubbard
- Adrienne Carrie Hubbard
- Adrienne Carrie Hubbard
- Adrienne Carrie Hubbard
- Adrienne Carrie Hubbard
- Adrienne Carrie Hubbard
- Adrienne Carrie Hubbard
- Adrienne Carrie Hubbard
- Adrienne Carrie Hubbard
- Adrienne Carrie Hubbard
- Adrienne Carrie Hubbard
- Adrienne Carrie Hubbard
- Adrienne Carrie Hubbard
- Adrienne Carrie Hubbard
- Adrienne Carrie Hubbard
- Adrienne Carrie Hubbard
- Adrienne Carrie Hubbard
- Adrienne Carrie Hubbard
- Adrienne Carrie Hubbard
- Adrienne Carrie Hubbard
- Adrienne Carrie Hubbard
- Adrienne Carrie Hubbard
- Adrienne Carrie Hubbard
- Adrienne Carrie Hubbard
- Adrienne Carrie Hubbard
- Adrienne Carrie Hubbard
- Adrienne Carrie Hubbard
- Adrienne Carrie Hubbard
- Adrienne Carrie Hubbard
- Adrienne Carrie Hubbard
- Adrienne Carrie Hubbard
- Adrienne Carrie Hubbard
- Adrienne Carrie Hubbard
- Adrienne Carrie Hubbard
- Adrienne Carrie Hubbard
- Adrienne Carrie Hubbard
- Adrienne Carrie Hubbard
- Adrienne Carrie Hubbard
- Adrienne Carrie Hubbard
- Adrienne Carrie Hubbard
- Adrienne Carrie Hubbard
- Adrienne Carrie Hubbard
- Adrienne Carrie Hubbard
- Adrienne Carrie Hubbard
- Adrienne Carrie Hubbard
- Adrienne Carrie Hubbard
- Adrienne Carrie Hubbard
- Adrienne Carrie Hubbard
- Adrienne Carrie Hubbard
- Adrienne Carrie Hubbard
- Adrienne Carrie Hubbard
- Adrienne Carrie Hubbard
- Adrienne Carrie Hubbard
- Adrienne Carrie Hubbard
- Adrienne Carrie Hubbard
- Adrienne Carrie Hubbard
- Adrienne Carrie Hubbard
- Adrienne Carrie Hubbard
- Adrienne Carrie Hubbard
- Adrienne Carrie Hubbard
- Adrienne Carrie Hubbard
- Adrienne Carrie Hubbard
- Adrienne Carrie Hubbard
- Adrienne Carrie Hubbard
- Adrienne Carrie Hubbard
- Adrienne Carrie Hubbard
- Adrienne Carrie Hubbard
- Adrienne Carrie Hubbard
- Adrienne Carrie Hubbard
- Adrienne Carrie Hubbard
- Adrienne Carrie Hubbard
- Adrienne Carrie Hubbard
- Adrienne Carrie Hubbard
- Adrienne Carrie Hubbard
- Adrienne Carrie Hubbard
- Adrienne Carrie Hubbard
- Adrienne Carrie Hubbard
- Adrienne Carrie Hubbard
- Adrienne Carrie Hubbard
- Adrienne Carrie Hubbard
- Adrienne Carrie Hubbard
- Adrienne Carrie Hubbard
- Adrienne Carrie Hubbard
- Adrienne Carrie Hubbard
- Adrienne Carrie Hubbard
- Adrienne Carrie Hubbard
- Adrienne Carrie Hubbard
- Adrienne Carrie Hubbard
- Adrienne Carrie Hubbard
- Adrienne Carrie Hubbard
- Adrienne Carrie Hubbard
- Adrienne Carrie Hubbard
- Adrienne Carrie Hubbard
- Adrienne Carrie Hubbard
- Adrienne Carrie Hubbard
- Adrienne Carrie Hubbard
- Adrienne Carrie Hubbard
- Adrienne Carrie Hubbard
- Adrienne Carrie Hubbard
- Adrienne Carrie Hubbard
- Adrienne Carrie Hubbard
- Adrienne Carrie Hubbard
- Adrienne Carrie Hubbard
- Adrienne Carrie Hubbard
- Adrienne Carrie Hubbard
- Adrienne Carrie Hubbard
- Adrienne Carrie Hubbard
- Adrienne Carrie Hubbard
- Adrienne Carrie Hubbard
- Adrienne Carrie Hubbard
- Adrienne Carrie Hubbard
- Adrienne Carrie Hubbard
- Adrienne Carrie Hubbard
- Adrienne Carrie Hubbard
- Adrienne Carrie Hubbard
- Adrienne Carrie Hubbard
- Adrienne Carrie Hubbard
- Adrienne Carrie Hubbard
- Adrienne Carrie Hubbard
- Adrienne Carrie Hubbard
- Adrienne Carrie Hubbard
- Adrienne Carrie Hubbard
- Adrienne Carrie Hubbard
- Adrienne Carrie Hubbard
- Adrienne Carrie Hubbard