This paper bag gift wrap craft is fun for kids of all ages. Use construction paper to cut out simple shapes. Glue the shapes onto white gift bags and with a few strokes of a marker they are transformed into cute woodland creatures. Experiment with colors and shapes and see what kind of magical creatures your little ones can come up with.
Paper Bag Gift Wrap
Hey Gnomies,
I’ve been getting ready for the holidays and that means lots of toy shopping for my little girl. Today I’m going to show you a fun paper bag gift wrap tutorial that will easily transform a plain gift bag into a cute woodland animal design.
Woodland Animal Paper Bag Gift Wrap
Gift bags are such an easy way to wrap presents. No messing around with awkward boxes or packaging- just slip them into a bag, add some tissue paper and you’re good to go.
You may also like: Log reindeer project
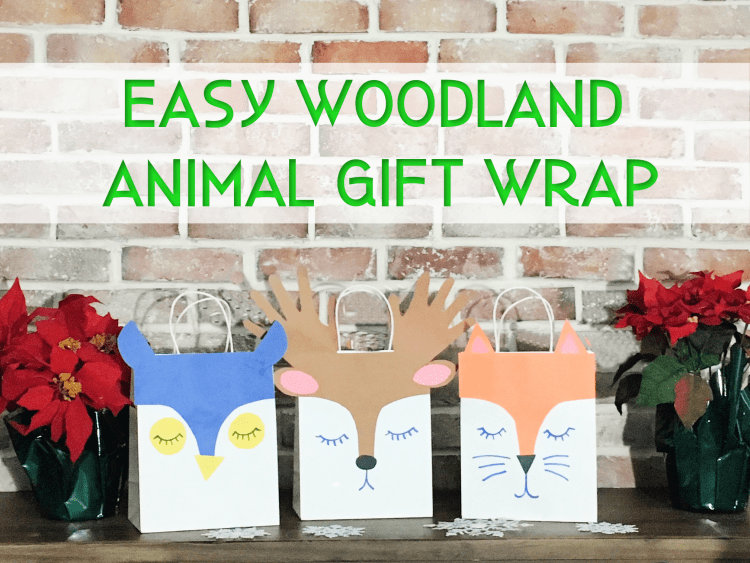
There are so many ways to transform a plain gift bag into something special but today I’m going to share an adorable woodland creature paper bag gift wrap idea. I will show you how to make three different critters, a deer (or make it a reindeer if you like) fox and owl.

Materials for Paper Bag Gift Wrap
- plain white gift bag- buy them in bulk and save money
- scissors
- glue stick
- construction paper- Blue, brown, orange, pink, yellow and black. One sheet each.
- marker

You may also like: Paper plate awards
Instructions for Woodland Animal Gift Wrap
These cute bags are so easy to make. Simply cut out shapes out of construction paper and glue them to the bags. Draw on the eyes and faces with a marker. The only limit is your imagination. You could make all different kinds of animals but I focused on the deer, fox and owl.
Reindeer Gift Bag
- Measure the width of the bag onto the construction paper.
- Cut out a rounded T shape that is half the length of the bag.
- Trace hands on brown paper, cut them out and glue to the top of the bag.
- Cut out two small oval shaped ears out of brown paper and two slightly smaller pink oval shapes. Glue the pink ovals onto the brown and then glue them under the hand shaped antlers.
- Cut out a small black circle for the nose and glue it on.
- Draw on the eyes and mouth with a marker.
Fox Gift Bag
- Measure the width of the bag onto the construction paper.
- Cut out a rounded T shape that is half the length of the bag in orange construction paper.
- Cut two small orange triangles for the ears and two slightly smaller pink triangles. Glue the pink triangles onto the orange and then glue them to the top of the bag.
- Cut a small triangle out of black construction paper and glue it upside down for the nose.
- Use a marker to draw on eyes, a mouth and whiskers.
Owl Gift Bag
- Measure the width of the bag onto the construction paper.
- Cut out a rounded T shape that is half the length of the bag in blue construction paper.
- Glue it to the bag.
- Cut out a circle out of blue construction paper and cut it in half. Glue it onto the top of the paper bag to make the ears.
- Cut two circles out of yellow paper and glue them onto the bag for the eyes.
- Cut a yellow triangle and glue it upside down onto the bag for the beak.
- Draw on the eyes with a marker.
You may also like: Paper Plate Unicorn Valentine Box
Woodland Animal Paper Bag Gift Wrap

Woodland animal paper bag gift wrap is an easy way to decorate simple white paper bags into something cute and fun. Make an owl, deer or fox.
Materials
- plain white gift bag
- glue stick
- construction paper in brown, orange, blue, pink, yellow and black
- marker
Tools
- scissors
Instructions
Reindeer Gift Bag
Measure the width of the bag onto the construction paper.
Cut out a rounded T shape that is half the length of the bag.
Trace hands on brown paper, cut them out and glue to the top of the bag.
Cut out two small oval shaped ears out of brown paper and two slightly smaller pink oval shapes. Glue the pink ovals onto the brown and then glue them under the hand shaped antlers.
Cut out a small black circle for the nose and glue it on.
Draw on the eyes and mouth with a marker.
Fox Gift Bag
Measure the width of the bag onto the construction paper.
Cut out a rounded T shape that is half the length of the bag in orange construction paper.
Cut two small orange triangles for the ears and two slightly smaller pink triangles. Glue the pink triangles onto the orange and then glue them to the top of the bag.
Cut a small triangle out of black construction paper and glue it upside down for the nose.
Use a marker to draw on eyes, a mouth and whiskers.
Owl Gift Bag
Measure the width of the bag onto the construction paper.
Cut out a rounded T shape that is half the length of the bag in blue construction paper.
Glue it to the bag.
Cut out a circle out of blue construction paper and cut it in half. Glue it onto the top of the paper bag to make the ears.
Cut two circles out of yellow paper and glue them onto the bag for the eyes.
Cut a yellow triangle and glue it upside down onto the bag for the beak.
Draw on the eyes with a marker.
Notes
Make the deer into a Rudolph for Christmas by adding a red nose!
What woodland creatures will you create? Let me know in the comments!

Hi I’m Adrienne Carrie Hubbard. I believe a rich life comes not from the things you have, but the things you do; the experiences you create and the people you meet along the way. Thanks for hanging out!