Mason jars and home décor go hand in hand , which is why I love making mason jar crafts! This summer, why not bring your love of rustic mason jars to the garden? These adorable mason jar lid DIY garden markers are the perfect way to label all your plants with a little bit of rustic charm. Whether you’re hoping to label all your herbs or want a fun way to name all the plants in your veggie garden, these cute garden markers are the perfect summer craft.

This is a guest post from Emily at Hunny I'm Home. Thanks Emily!
Why you should use garden markers
While markers aren’t absolutely necessary in a garden, they do make things a little easier during the early stages of planting. It may be simple to see what types of plants are growing in your garden in the middle of the growing season as your plants are growing fruit. But knowing exactly what is planted and where it’s planted is a little more difficult at the beginning of the season.
Whether you’re growing your garden from seed or planting small seedlings in the ground, small plants are much harder to identify than fully grown ones. By adding garden markers to your garden, you can make things a little easier on yourself.
Garden markers are helpful if you’re a beginner gardener who has trouble distinguishing between the seedlings in your garden. And they’re great for experienced gardeners who have a large variety of plants in their garden beds.
No matter your reason for adding garden markers to your garden this summer, making your own DIY garden markers is definitely the way to go!
In addition to being a fun project to pass the time, making your own garden markers allows you to add a little bit of personality to your garden that store-bought garden markers just won’t provide.

Supplies for DIY garden herb signs
One thing I love about this simple craft is that I already had everything I needed to put them together at home! I’m always looking for fun ways to use mason jars for crafting, which means I always have tons of mason jar lids just waiting to be used in a cool new craft! And if you love mason jars as much as me, I bet you do to! Here’s what you’ll need to make these rustic DIY garden markers:
- Mason jar lid inserts (any size will do)- I like these ones
- White paint
- Paintbrush
- Washi tape- I love these patterns
- Black marker
- Craft sticks
- Mod Podge
- Glue
How to make jar lid herb signs
These jar lid garden markers are so simple to make! In fact, the hardest part of putting this craft together is waiting for the paint to dry!
The first step to putting together your garden markers is to paint the top of each lid. While this step isn’t absolutely necessary, I love the rustic look it gives your garden markers. To get a matte finish, I used white chalk paint on each of my garden markers. It took three coats of paint to completely cover the lids.
When your paint has dried, you can have a little bit of fun decorating your garden markers! Place of couple strips of washi tape across the center of each jar lid to add a pop of color and make it easier to label each of your lids (if you need to clean your jar, check out how to remove the label from your jars).
After decorating each lid with washi tape, it’s time to start labeling! Since my DIY garden markers are going in my herb garden, I labeled each lid with the name of the herbs in my garden. To do this, I used a fine point permanent marker.
Next, you can add a little more color to your garden markers by decorating the craft stick with washi tape. Again, this step isn’t necessary, but I thought it was a fun touch! Simply cover the stick with your favorite washi tape from the top of the stick to the bottom.
At this point, you’re probably wondering how well these garden markers are going to hold up outside in the garden. That’s where the mod podge comes in! To ensure your labels and washi tape stay in place while outside, it’s important to add a protective layer over the top of your DIY garden markers.
To do this, simply brush a coat or two of mod podge over both sides of the mason jar lids and craft sticks, paying special attention to the edges of washi tape.
Allow your Mod Podge to dry completely, then attach the craft sticks to the back of the mason jar lids. Then, all you have to do is add your adorable garden markers to your garden!
DIY Herb Signs for the Garden

Make these cute herb garden signs with mason jar lids and craft sticks. Add some colorful Washi tape for a whimsical touch.
Materials
- Mason jar lid inserts
- White paint
- Washi tape
- Craft sticks
- Mod podge
- Glue
Tools
- Paintbrush
- Black marker
Instructions
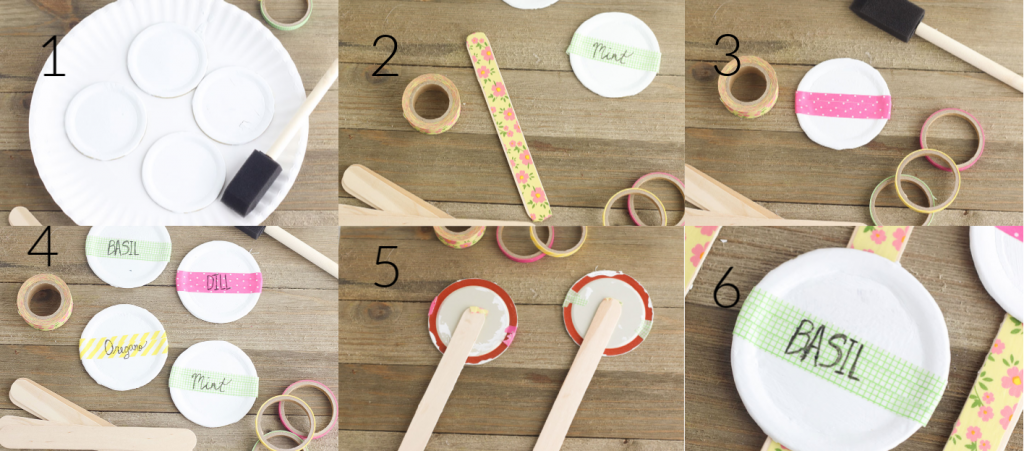
1. Paint the front of each mason jar lid insert with white paint.
2. When the paint has dried, create a line in the center of each lid with washi tape.
3. Label each garden marker with the name of the plant using a black marker.
4. Cover the craft sticks with washi tape.
5. Paint a layer of mod podge over the mason jar lids and craft sticks to protect them from the
elements in the garden.
6. When the mod podge has dried, glue the stick to the back of each mason jar lid.
7. Place the garden markers in the garden in front of each plant type.
About Emily
Emily is a midwestern mom of two boys. She loves all things DIY -- from home renovations to kids birthday party planning. Whether she's making a new farmhouse craft for her home or helping her kids with a cool activity, you can bet she's in the middle of some kind of DIY project (or three) right now!
You may also like:

Hi I’m Adrienne Carrie Hubbard. I believe a rich life comes not from the things you have, but the things you do; the experiences you create and the people you meet along the way. Thanks for hanging out!
Juliana Pinto says
Very cute and useful too
adrienne says
Thanks!
Rebecca says
Cute