Kitchen Cabinet Makeover
Hey Gnomies,
I’ve been working on some kitchen updates recently and want to share my progress. In case you missed it, I installed a faux tin backsplash last month, which you can check out here. Today I am going to share the before and after details of my kitchen cabinet makeover and how I almost ruined my cabinets with a crackle paint finish.
Update! Checkout my latest cabinet transformation here

My kitchen cabinets before I painted the bottom ones grey
The next step in my kitchen makeover project was painting the cabinets. I thought long and hard about what colors I wanted and emailed back and forth with my mom about 30 times before deciding that I would do a crackle finish on the cabinets.
Big mistake.
The plan was to put the crackle paint on top of the white and then paint grey right on top. The finished result was supposed to be grey cabinets with a hint of white showing through.
The cabinets are the original ones that came with our house when it was built 25 years ago. They were cheap then, so you can imagine the rough shape that they are in now.

This is what the kitchen looked like a year ago before I started my latest makeover.
8 years ago I painted the cabinets white from the original faux 80’s wood and switched the handles but I never replaced the hinges which were a gross, rusted brass.
Things like cabinet hinges and handles don’t seem that expensive until you take into account that you need to buy about 30 of them if you are replacing every one of them in the entire kitchen. It adds up quickly, which is why I never replaced them the first time around.
I also seemed to forget how much painting cabinets sucks. It’s not a fun job by any means. Especially when you have to fix your horrible crackle finish nightmare and start again. There is a reason I waited eight years to repaint them.
I did a lot of research about crackle paint and thought I was good to go but I would definitely not recommend doing this on cabinets, large areas or vertical spaces.
This is what it looked like when I painted the grey paint over the crackle coat.
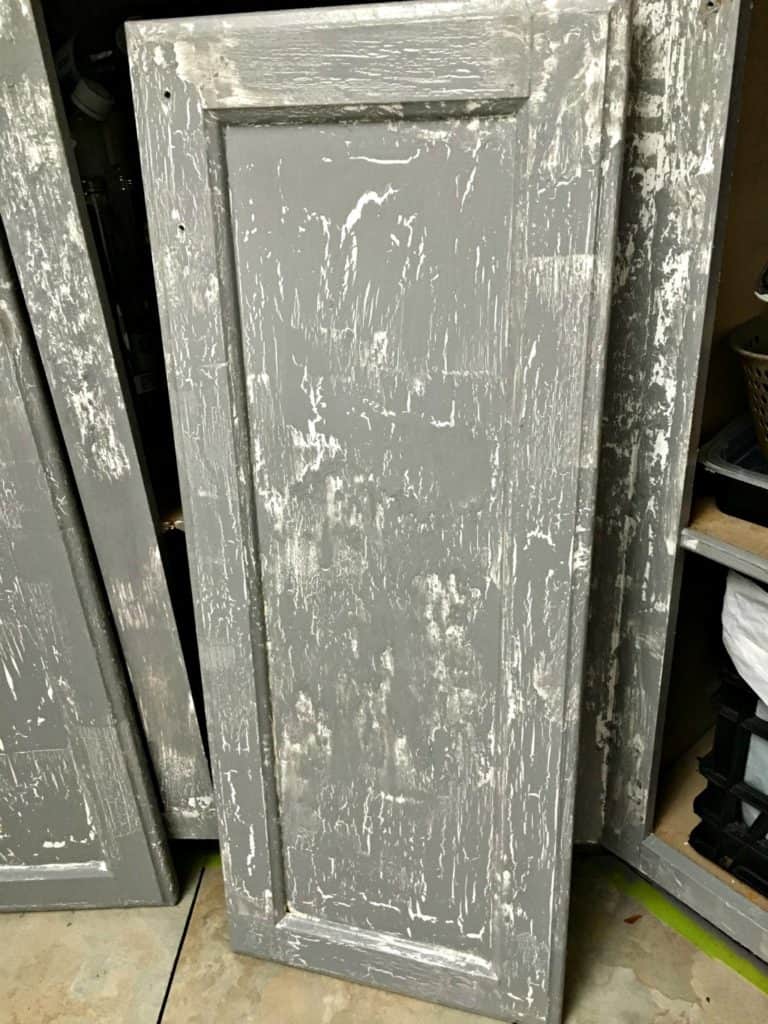
Yikes!
Even though the crackle coat had dried completely, as soon as I put the grey on top it liquefied into a horrible mess! All the paint started melting and sliding down the cabinets. OMG Becky, it was a disaster!
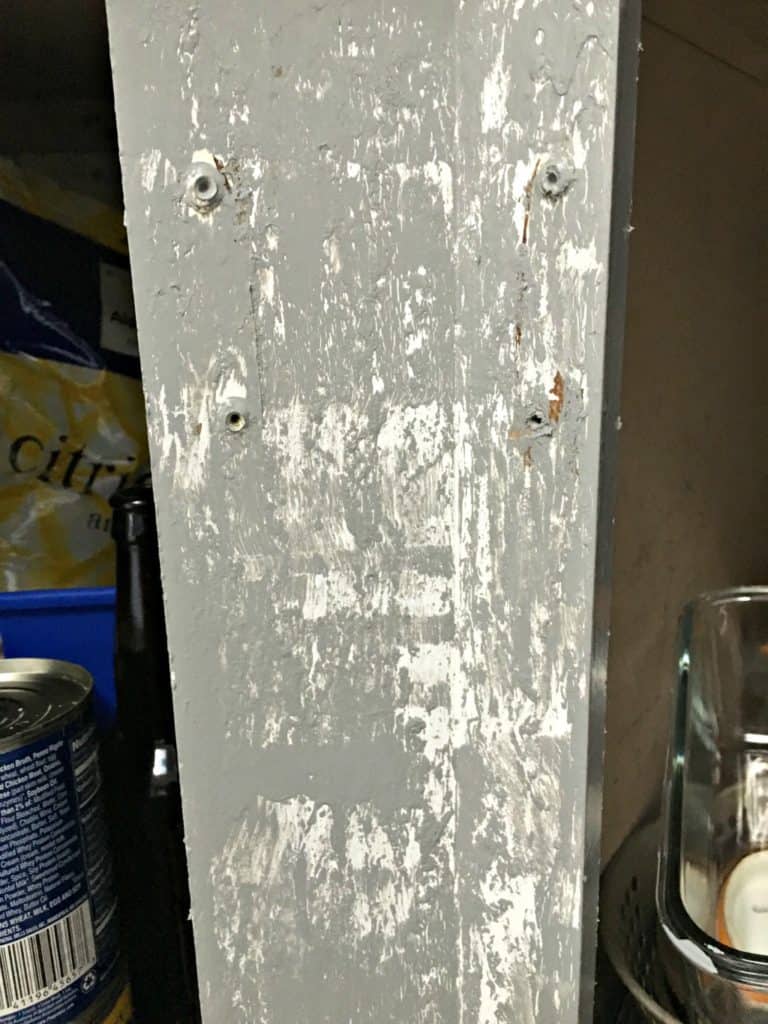
I painted the whole lower section of cabinets, hoping somehow it would get better. My husband came home and told me that it looked really bad so I knew I had to sand off the crackle and start again.
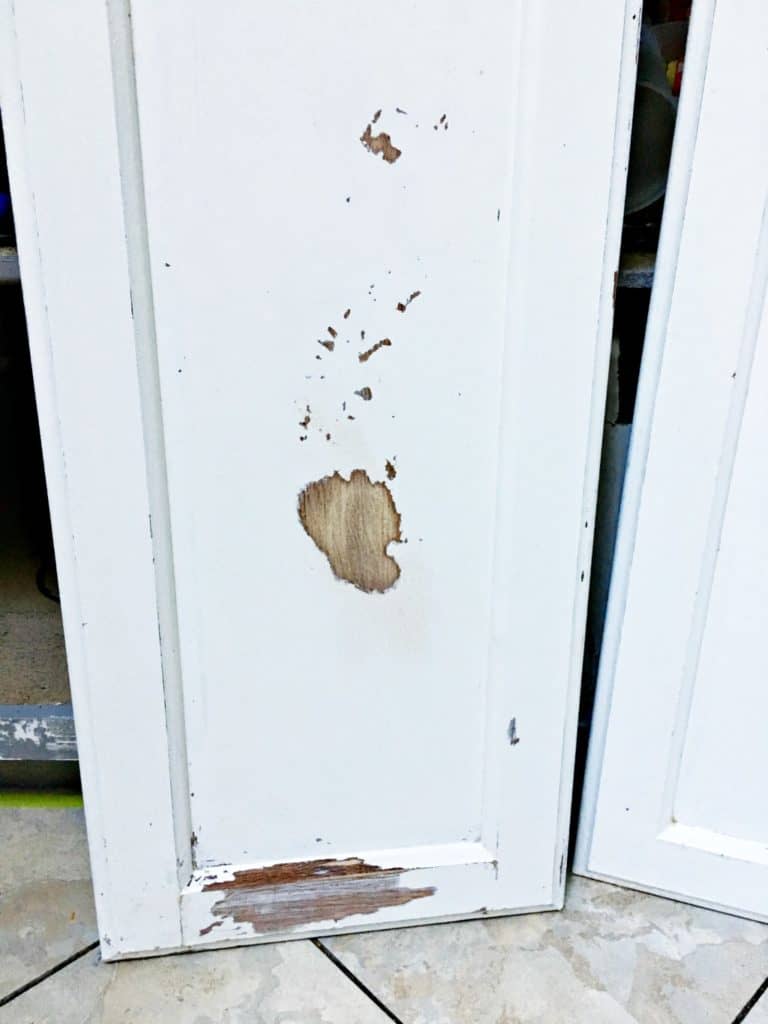
If this happens to you, the best way to remove the crackle paint it is to try to peel it off. It almost comes off in sheets. I rinsed the cabinets in the sink and manged to scrub the rest of the paint off. In some places I scrubbed a little too hard:
Once the cabinets were back the original white I ended up covering them with two coats of grey paint. The grey is from Color Place at Walmart and is called Granite Grey. It’s one of the premixed grab and go paints.

I let the two coats completely dry on each cabinet and then re-attached the handles and new silver hinges that I bought. I had to drill new holes in the cabinets for the new hinges to fit, which was another added pain in the butt.

The "After" Result with the bottom cabinets painted grey
It took me just over a week to paint the bottom cabinets. I still have to do the upper ones. I think I am just going to do a fresh coat of white and attach new hinges but I am still open to suggestions. I’ve been getting some great feedback from readers on Facebook so feel free to chime in there or in the comments here.

It wouldn't be a photo of my house without Luna bombing her way in the picture.
I need to take a break from cabinet painting for a while so I don’t lose my mind, especially since painting the upper ones will be worse because there is more of them and reattaching them when they are up high is a serious pain in the butt.

Next up I am working on tiling over the laminate kitchen counters. If you look closely in some of these pictures you can see the new tile I started installing. It's not finished yet but I’ve got a few different tutorials planned including a demonstration of how to use a wet tile saw.
Another helpful guide that may interest you is installing kitchen cabinets like a pro.
Stay tuned crafty my friends and pray my tile project works out better than my crackle finish.
![]()

Hi I’m Adrienne Carrie Hubbard. I believe a rich life comes not from the things you have, but the things you do; the experiences you create and the people you meet along the way. Thanks for hanging out!
- Adrienne Carrie Hubbard
- Adrienne Carrie Hubbard
- Adrienne Carrie Hubbard
- Adrienne Carrie Hubbard
- Adrienne Carrie Hubbard
- Adrienne Carrie Hubbard
- Adrienne Carrie Hubbard
- Adrienne Carrie Hubbard
- Adrienne Carrie Hubbard
- Adrienne Carrie Hubbard
- Adrienne Carrie Hubbard
- Adrienne Carrie Hubbard
- Adrienne Carrie Hubbard
- Adrienne Carrie Hubbard
- Adrienne Carrie Hubbard
- Adrienne Carrie Hubbard
- Adrienne Carrie Hubbard
- Adrienne Carrie Hubbard
- Adrienne Carrie Hubbard
- Adrienne Carrie Hubbard
- Adrienne Carrie Hubbard
- Adrienne Carrie Hubbard
- Adrienne Carrie Hubbard
- Adrienne Carrie Hubbard
- Adrienne Carrie Hubbard
- Adrienne Carrie Hubbard
- Adrienne Carrie Hubbard
- Adrienne Carrie Hubbard
- Adrienne Carrie Hubbard
- Adrienne Carrie Hubbard
- Adrienne Carrie Hubbard
- Adrienne Carrie Hubbard
- Adrienne Carrie Hubbard
- Adrienne Carrie Hubbard
- Adrienne Carrie Hubbard
- Adrienne Carrie Hubbard
- Adrienne Carrie Hubbard
- Adrienne Carrie Hubbard
- Adrienne Carrie Hubbard
- Adrienne Carrie Hubbard
- Adrienne Carrie Hubbard
- Adrienne Carrie Hubbard
- Adrienne Carrie Hubbard
- Adrienne Carrie Hubbard
- Adrienne Carrie Hubbard
- Adrienne Carrie Hubbard
- Adrienne Carrie Hubbard
- Adrienne Carrie Hubbard
- Adrienne Carrie Hubbard
- Adrienne Carrie Hubbard
- Adrienne Carrie Hubbard
- Adrienne Carrie Hubbard
- Adrienne Carrie Hubbard
- Adrienne Carrie Hubbard
- Adrienne Carrie Hubbard
- Adrienne Carrie Hubbard
- Adrienne Carrie Hubbard
- Adrienne Carrie Hubbard
- Adrienne Carrie Hubbard
- Adrienne Carrie Hubbard
- Adrienne Carrie Hubbard
- Adrienne Carrie Hubbard
- Adrienne Carrie Hubbard
- Adrienne Carrie Hubbard
- Adrienne Carrie Hubbard
- Adrienne Carrie Hubbard
- Adrienne Carrie Hubbard
- Adrienne Carrie Hubbard
- Adrienne Carrie Hubbard
- Adrienne Carrie Hubbard
- Adrienne Carrie Hubbard
- Adrienne Carrie Hubbard
- Adrienne Carrie Hubbard
- Adrienne Carrie Hubbard
- Adrienne Carrie Hubbard
- Adrienne Carrie Hubbard
- Adrienne Carrie Hubbard
- Adrienne Carrie Hubbard
- Adrienne Carrie Hubbard
- Adrienne Carrie Hubbard
- Adrienne Carrie Hubbard
- Adrienne Carrie Hubbard
- Adrienne Carrie Hubbard
- Adrienne Carrie Hubbard
- Adrienne Carrie Hubbard
- Adrienne Carrie Hubbard
- Adrienne Carrie Hubbard
- Adrienne Carrie Hubbard
- Adrienne Carrie Hubbard
- Adrienne Carrie Hubbard
- Adrienne Carrie Hubbard
- Adrienne Carrie Hubbard
- Adrienne Carrie Hubbard
- Adrienne Carrie Hubbard
- Adrienne Carrie Hubbard
- Adrienne Carrie Hubbard
- Adrienne Carrie Hubbard
- Adrienne Carrie Hubbard
- Adrienne Carrie Hubbard
- Adrienne Carrie Hubbard
- Adrienne Carrie Hubbard
- Adrienne Carrie Hubbard
- Adrienne Carrie Hubbard
- Adrienne Carrie Hubbard
- Adrienne Carrie Hubbard
- Adrienne Carrie Hubbard
- Adrienne Carrie Hubbard
- Adrienne Carrie Hubbard
- Adrienne Carrie Hubbard
- Adrienne Carrie Hubbard
- Adrienne Carrie Hubbard
- Adrienne Carrie Hubbard
- Adrienne Carrie Hubbard
- Adrienne Carrie Hubbard
- Adrienne Carrie Hubbard
- Adrienne Carrie Hubbard
- Adrienne Carrie Hubbard
- Adrienne Carrie Hubbard
- Adrienne Carrie Hubbard
- Adrienne Carrie Hubbard
- Adrienne Carrie Hubbard
- Adrienne Carrie Hubbard
- Adrienne Carrie Hubbard
- Adrienne Carrie Hubbard
- Adrienne Carrie Hubbard
- Adrienne Carrie Hubbard
- Adrienne Carrie Hubbard
- Adrienne Carrie Hubbard
- Adrienne Carrie Hubbard
- Adrienne Carrie Hubbard
- Adrienne Carrie Hubbard
- Adrienne Carrie Hubbard
- Adrienne Carrie Hubbard
- Adrienne Carrie Hubbard
- Adrienne Carrie Hubbard
- Adrienne Carrie Hubbard
- Adrienne Carrie Hubbard
- Adrienne Carrie Hubbard
- Adrienne Carrie Hubbard
- Adrienne Carrie Hubbard
- Adrienne Carrie Hubbard
- Adrienne Carrie Hubbard
- Adrienne Carrie Hubbard
- Adrienne Carrie Hubbard
- Adrienne Carrie Hubbard
- Adrienne Carrie Hubbard
- Adrienne Carrie Hubbard
- Adrienne Carrie Hubbard
- Adrienne Carrie Hubbard
- Adrienne Carrie Hubbard
- Adrienne Carrie Hubbard
- Adrienne Carrie Hubbard
- Adrienne Carrie Hubbard
- Adrienne Carrie Hubbard
- Adrienne Carrie Hubbard
- Adrienne Carrie Hubbard
- Adrienne Carrie Hubbard
- Adrienne Carrie Hubbard
- Adrienne Carrie Hubbard
- Adrienne Carrie Hubbard
- Adrienne Carrie Hubbard
- Adrienne Carrie Hubbard
- Adrienne Carrie Hubbard
- Adrienne Carrie Hubbard
- Adrienne Carrie Hubbard
- Adrienne Carrie Hubbard
- Adrienne Carrie Hubbard
- Adrienne Carrie Hubbard
- Adrienne Carrie Hubbard
- Adrienne Carrie Hubbard
- Adrienne Carrie Hubbard
- Adrienne Carrie Hubbard
- Adrienne Carrie Hubbard
- Adrienne Carrie Hubbard
- Adrienne Carrie Hubbard
- Adrienne Carrie Hubbard
- Adrienne Carrie Hubbard
- Adrienne Carrie Hubbard
- Adrienne Carrie Hubbard
- Adrienne Carrie Hubbard
- Adrienne Carrie Hubbard
- Adrienne Carrie Hubbard
- Adrienne Carrie Hubbard
- Adrienne Carrie Hubbard
- Adrienne Carrie Hubbard
- Adrienne Carrie Hubbard
- Adrienne Carrie Hubbard
- Adrienne Carrie Hubbard
- Adrienne Carrie Hubbard
- Adrienne Carrie Hubbard
- Adrienne Carrie Hubbard
- Adrienne Carrie Hubbard
- Adrienne Carrie Hubbard
- Adrienne Carrie Hubbard
- Adrienne Carrie Hubbard
- Adrienne Carrie Hubbard
- Adrienne Carrie Hubbard
- Adrienne Carrie Hubbard
- Adrienne Carrie Hubbard
- Adrienne Carrie Hubbard
- Adrienne Carrie Hubbard
- Adrienne Carrie Hubbard
- Adrienne Carrie Hubbard
- Adrienne Carrie Hubbard
- Adrienne Carrie Hubbard
- Adrienne Carrie Hubbard
- Adrienne Carrie Hubbard
- Adrienne Carrie Hubbard
- Adrienne Carrie Hubbard
- Adrienne Carrie Hubbard
- Adrienne Carrie Hubbard
- Adrienne Carrie Hubbard
- Adrienne Carrie Hubbard
- Adrienne Carrie Hubbard
- Adrienne Carrie Hubbard
- Adrienne Carrie Hubbard
- Adrienne Carrie Hubbard
- Adrienne Carrie Hubbard
- Adrienne Carrie Hubbard
- Adrienne Carrie Hubbard
- Adrienne Carrie Hubbard
- Adrienne Carrie Hubbard
- Adrienne Carrie Hubbard
- Adrienne Carrie Hubbard
- Adrienne Carrie Hubbard
- Adrienne Carrie Hubbard
- Adrienne Carrie Hubbard
- Adrienne Carrie Hubbard
- Adrienne Carrie Hubbard
- Adrienne Carrie Hubbard
- Adrienne Carrie Hubbard
- Adrienne Carrie Hubbard
- Adrienne Carrie Hubbard
- Adrienne Carrie Hubbard
- Adrienne Carrie Hubbard
- Adrienne Carrie Hubbard
- Adrienne Carrie Hubbard
- Adrienne Carrie Hubbard
- Adrienne Carrie Hubbard
- Adrienne Carrie Hubbard
- Adrienne Carrie Hubbard
- Adrienne Carrie Hubbard
- Adrienne Carrie Hubbard
- Adrienne Carrie Hubbard
- Adrienne Carrie Hubbard
- Adrienne Carrie Hubbard
- Adrienne Carrie Hubbard
- Adrienne Carrie Hubbard
- Adrienne Carrie Hubbard
- Adrienne Carrie Hubbard
- Adrienne Carrie Hubbard
- Adrienne Carrie Hubbard
- Adrienne Carrie Hubbard
- Adrienne Carrie Hubbard
- Adrienne Carrie Hubbard
- Adrienne Carrie Hubbard
- Adrienne Carrie Hubbard
- Adrienne Carrie Hubbard
- Adrienne Carrie Hubbard
- Adrienne Carrie Hubbard
- Adrienne Carrie Hubbard
- Adrienne Carrie Hubbard
- Adrienne Carrie Hubbard
- Adrienne Carrie Hubbard
- Adrienne Carrie Hubbard
- Adrienne Carrie Hubbard
- Adrienne Carrie Hubbard
- Adrienne Carrie Hubbard
- Adrienne Carrie Hubbard
- Adrienne Carrie Hubbard
- Adrienne Carrie Hubbard
- Adrienne Carrie Hubbard
- Adrienne Carrie Hubbard
- Adrienne Carrie Hubbard
- Adrienne Carrie Hubbard
- Adrienne Carrie Hubbard
- Adrienne Carrie Hubbard
- Adrienne Carrie Hubbard
- Adrienne Carrie Hubbard
- Adrienne Carrie Hubbard
- Adrienne Carrie Hubbard
- Adrienne Carrie Hubbard
- Adrienne Carrie Hubbard
- Adrienne Carrie Hubbard
- Adrienne Carrie Hubbard
- Adrienne Carrie Hubbard
- Adrienne Carrie Hubbard
- Adrienne Carrie Hubbard
- Adrienne Carrie Hubbard
- Adrienne Carrie Hubbard
- Adrienne Carrie Hubbard
- Adrienne Carrie Hubbard
- Adrienne Carrie Hubbard
- Adrienne Carrie Hubbard
- Adrienne Carrie Hubbard
- Adrienne Carrie Hubbard
- Adrienne Carrie Hubbard
- Adrienne Carrie Hubbard
- Adrienne Carrie Hubbard
- Adrienne Carrie Hubbard
- Adrienne Carrie Hubbard
- Adrienne Carrie Hubbard
- Adrienne Carrie Hubbard
- Adrienne Carrie Hubbard
- Adrienne Carrie Hubbard
- Adrienne Carrie Hubbard
- Adrienne Carrie Hubbard
- Adrienne Carrie Hubbard
- Adrienne Carrie Hubbard
- Adrienne Carrie Hubbard
- Adrienne Carrie Hubbard
- Adrienne Carrie Hubbard
- Adrienne Carrie Hubbard
- Adrienne Carrie Hubbard
- Adrienne Carrie Hubbard
- Adrienne Carrie Hubbard
- Adrienne Carrie Hubbard
- Adrienne Carrie Hubbard
- Adrienne Carrie Hubbard
- Adrienne Carrie Hubbard
- Adrienne Carrie Hubbard
- Adrienne Carrie Hubbard
- Adrienne Carrie Hubbard
- Adrienne Carrie Hubbard
- Adrienne Carrie Hubbard
- Adrienne Carrie Hubbard
- Adrienne Carrie Hubbard
- Adrienne Carrie Hubbard
- Adrienne Carrie Hubbard
- Adrienne Carrie Hubbard
- Adrienne Carrie Hubbard
- Adrienne Carrie Hubbard
- Adrienne Carrie Hubbard
- Adrienne Carrie Hubbard
- Adrienne Carrie Hubbard
- Adrienne Carrie Hubbard
- Adrienne Carrie Hubbard
- Adrienne Carrie Hubbard
- Adrienne Carrie Hubbard
- Adrienne Carrie Hubbard
- Adrienne Carrie Hubbard
- Adrienne Carrie Hubbard
- Adrienne Carrie Hubbard
- Adrienne Carrie Hubbard
- Adrienne Carrie Hubbard
- Adrienne Carrie Hubbard
- Adrienne Carrie Hubbard
- Adrienne Carrie Hubbard
- Adrienne Carrie Hubbard
- Adrienne Carrie Hubbard
- Adrienne Carrie Hubbard
- Adrienne Carrie Hubbard
- Adrienne Carrie Hubbard
- Adrienne Carrie Hubbard
- Adrienne Carrie Hubbard
- Adrienne Carrie Hubbard
- Adrienne Carrie Hubbard
- Adrienne Carrie Hubbard
- Adrienne Carrie Hubbard
- Adrienne Carrie Hubbard
- Adrienne Carrie Hubbard
- Adrienne Carrie Hubbard
- Adrienne Carrie Hubbard
- Adrienne Carrie Hubbard
- Adrienne Carrie Hubbard
- Adrienne Carrie Hubbard
- Adrienne Carrie Hubbard
- Adrienne Carrie Hubbard
- Adrienne Carrie Hubbard
- Adrienne Carrie Hubbard
- Adrienne Carrie Hubbard
- Adrienne Carrie Hubbard
- Adrienne Carrie Hubbard
- Adrienne Carrie Hubbard
- Adrienne Carrie Hubbard
- Adrienne Carrie Hubbard
- Adrienne Carrie Hubbard
- Adrienne Carrie Hubbard
- Adrienne Carrie Hubbard
- Adrienne Carrie Hubbard
- Adrienne Carrie Hubbard
- Adrienne Carrie Hubbard
- Adrienne Carrie Hubbard
- Adrienne Carrie Hubbard
- Adrienne Carrie Hubbard
- Adrienne Carrie Hubbard
- Adrienne Carrie Hubbard
- Adrienne Carrie Hubbard
- Adrienne Carrie Hubbard
- Adrienne Carrie Hubbard
- Adrienne Carrie Hubbard
- Adrienne Carrie Hubbard
- Adrienne Carrie Hubbard
- Adrienne Carrie Hubbard
- Adrienne Carrie Hubbard
- Adrienne Carrie Hubbard
- Adrienne Carrie Hubbard
- Adrienne Carrie Hubbard
- Adrienne Carrie Hubbard
- Adrienne Carrie Hubbard
- Adrienne Carrie Hubbard
- Adrienne Carrie Hubbard
- Adrienne Carrie Hubbard
- Adrienne Carrie Hubbard
- Adrienne Carrie Hubbard
- Adrienne Carrie Hubbard
- Adrienne Carrie Hubbard
- Adrienne Carrie Hubbard
- Adrienne Carrie Hubbard
- Adrienne Carrie Hubbard
- Adrienne Carrie Hubbard
- Adrienne Carrie Hubbard
- Adrienne Carrie Hubbard
- Adrienne Carrie Hubbard
- Adrienne Carrie Hubbard
- Adrienne Carrie Hubbard
- Adrienne Carrie Hubbard
- Adrienne Carrie Hubbard
- Adrienne Carrie Hubbard
- Adrienne Carrie Hubbard
- Adrienne Carrie Hubbard
- Adrienne Carrie Hubbard
- Adrienne Carrie Hubbard
- Adrienne Carrie Hubbard
- Adrienne Carrie Hubbard
- Adrienne Carrie Hubbard
- Adrienne Carrie Hubbard
- Adrienne Carrie Hubbard
- Adrienne Carrie Hubbard
- Adrienne Carrie Hubbard
- Adrienne Carrie Hubbard
- Adrienne Carrie Hubbard
- Adrienne Carrie Hubbard
- Adrienne Carrie Hubbard
- Adrienne Carrie Hubbard
- Adrienne Carrie Hubbard
- Adrienne Carrie Hubbard
- Adrienne Carrie Hubbard
- Adrienne Carrie Hubbard
- Adrienne Carrie Hubbard
- Adrienne Carrie Hubbard
- Adrienne Carrie Hubbard
- Adrienne Carrie Hubbard
- Adrienne Carrie Hubbard
- Adrienne Carrie Hubbard
- Adrienne Carrie Hubbard
- Adrienne Carrie Hubbard
- Adrienne Carrie Hubbard
- Adrienne Carrie Hubbard
- Adrienne Carrie Hubbard
- Adrienne Carrie Hubbard
- Adrienne Carrie Hubbard
- Adrienne Carrie Hubbard
- Adrienne Carrie Hubbard
- Adrienne Carrie Hubbard
- Adrienne Carrie Hubbard
- Adrienne Carrie Hubbard
- Adrienne Carrie Hubbard
- Adrienne Carrie Hubbard
- Adrienne Carrie Hubbard
- Adrienne Carrie Hubbard
- Adrienne Carrie Hubbard
- Adrienne Carrie Hubbard
- Adrienne Carrie Hubbard
- Adrienne Carrie Hubbard
- Adrienne Carrie Hubbard
- Adrienne Carrie Hubbard
- Adrienne Carrie Hubbard
- Adrienne Carrie Hubbard
- Adrienne Carrie Hubbard
- Adrienne Carrie Hubbard
- Adrienne Carrie Hubbard
- Adrienne Carrie Hubbard
- Adrienne Carrie Hubbard
- Adrienne Carrie Hubbard
- Adrienne Carrie Hubbard
- Adrienne Carrie Hubbard
- Adrienne Carrie Hubbard
- Adrienne Carrie Hubbard
- Adrienne Carrie Hubbard
- Adrienne Carrie Hubbard
- Adrienne Carrie Hubbard
- Adrienne Carrie Hubbard
- Adrienne Carrie Hubbard
- Adrienne Carrie Hubbard
- Adrienne Carrie Hubbard
- Adrienne Carrie Hubbard
- Adrienne Carrie Hubbard
- Adrienne Carrie Hubbard
- Adrienne Carrie Hubbard
- Adrienne Carrie Hubbard
- Adrienne Carrie Hubbard
- Adrienne Carrie Hubbard
- Adrienne Carrie Hubbard
- Adrienne Carrie Hubbard
- Adrienne Carrie Hubbard
- Adrienne Carrie Hubbard
- Adrienne Carrie Hubbard
- Adrienne Carrie Hubbard
- Adrienne Carrie Hubbard
- Adrienne Carrie Hubbard
- Adrienne Carrie Hubbard
- Adrienne Carrie Hubbard
- Adrienne Carrie Hubbard
- Adrienne Carrie Hubbard
- Adrienne Carrie Hubbard