This DIY essential oil warmer is a quick and easy craft that's big on style. I used science lab supplies to create this unique home decor item that can be used to diffuse oils or be used as a vase. This DIY essential oil warmer will allow you to fill your whole home with natural therapeutic fragrance and it makes a great conversation piece!
DIY Essential Oil Warmer
Hey Gnomies,
Are you surviving the cold, January weather? I'm sitting in my living room covered in about 30 blankets with a hat and slippers on and I am still cold. Unless you are one of those lucky people living down south I suspect you are too.
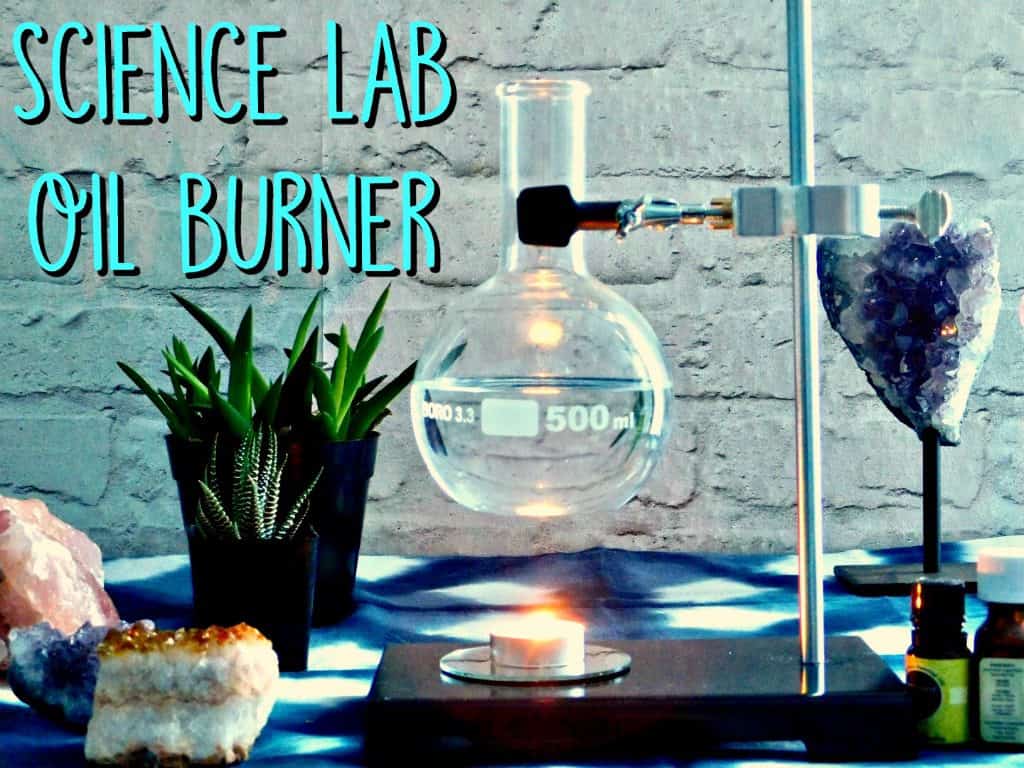
One thing I love to do no matter what time of the year it is, is to scent my home with essential oils. I have several types of oil warmers and diffusers all around my house.. I decided once again to figure out how to make my own version, but at a fraction of the price. The Free People version will set you back over $160 but mine only cost $40 including shipping. I purchased the lab supplies from American Science Surplus. You can also find the lab stand, clamp and flask on Ebay or similar sites. Go get your lab coat and safety googles, I'm going to show you how to make a scientifically-awesome essential oil warmer!

Supplies for DIY essential oil warmer:
- Single arm adjustable jaw burette clamp
- Lab support stand
- Flask
- Small mirror
- Tea light candle
- Essential oils
You may also like: DIY incense burner

Directions for DIY essential oil warmer:
This project couldn't be simpler. Screw the pieces of the base and the stand together and attach the clamp. Then, place the water-filled flask in the clamp and screw it securely.
Place your mirror on the stand under the flask.
How do you heat essential oils?
Fill your flask at least halfway with water. Add 1-9 drops of the essential oil of your choice to the water and light the candle. As the water heats up the air will fill with the scent of the oils.
How long should you diffuse oils for?
Inhalation by diffusion is one of the safest and most effective ways to reap the benefits of essential oils. In fact, it’s the fastest way to get essential oils into your bloodstream.
There's also no standard recommendation for how long to diffuse your oils. A standard rule of thumb is to diffuse for 15 to 20 minutes, which is more than enough time to saturate a standard-size room with scent molecules.
Room temperature and air circulation can cause molecules to evaporate more or less quickly. For example, warm spaces create greater excitement within bonds of aromatic molecules, which causes them to vanish rapidly. So you may need to add a few extra drops if you’re diffusing in a particularly hot room.
You may also like: DIY sea urchin incense holder
The 10 essential oils everyone should stock up on:
- Lemon- Uplifts mood. Helps promote good digestion and immunity
- Lavender- Antibacterial properties and helps promote a good night sleep
- Cinnamon- Antioxidant and anti inflammatory properties
- Lemongrass- Anti-fungal and astringent properties
- Clary Sage- Stress reduction, natural antidepressant
- Tea Tree Oil- Anti- inflammatory, antibacterial and anti-fungal properties
- Eucalyptus- Decongestant, Antiseptic, deodorizing
- Rosemary- Improves heart rate, blood pressure and respiratory rate
- Sweet Orange- energizing, anti- anxiety
- Peppermint- antiviral, stimulant
How can you tell if an essential oil has gone bad?
- The smell. The typical aromatic scent of essential oils differs from oil to oil. Knowing what your favorite oils smell like can make it easier to identify when that particular oil is off
- Increased sensitization. Pay attention to your skin to see if you experience redness, itching or irritation. This can happen if the oil is too strong on your skin – the potency of the oil can lead to hyper-sensitivity.
- Consistency of oil. Almost all essential oils have a similar smooth and fluid consistency. If the oil has gone bad, it’s possible the consistency of the oil will thicken up. The oil can also take on a cloudy appearance, rather than the typical translucent coloration.
What affects essential oil shelf life?
- Light, heat and exposure to air. Air, light, heat and humidity all contribute to the expiration of an essential oil. Not storing oils properly and exposing them to such elements can cause oils to oxidize more quickly.
- Oxidation. Deterioration is the greatest risk affecting the shelf life of an essential oil. Oxidation depends on chemical components, so the shelf life of individual oils will vary. Be aware of topically using an oil that has oxidized as it could lead to increased sensitization to the skin.
- Chemical composition. Oils higher in alcohol, especially citrus oils, are more at risk of expiring within 1-2 years. Oils with heavier consistency, like Patchouli or Vetiver, can last longer, up to 5-6 years.
- No H₂0. Essential oils don’t contain water; therefore, they can’t grow mold. The antibacterial and antiviral properties in the oil protect it from microorganisms.

What crafty projects are you working on lately? Let me know in the comments or post some photos with over on my Facebook page.


Hi I’m Adrienne Carrie Hubbard. I believe a rich life comes not from the things you have, but the things you do; the experiences you create and the people you meet along the way. Thanks for hanging out!
The Furnshop says
This is awesome. I liked this DIY Essential Oil Warmer. Many thanks for sharing this blog post.
Mike says
What A great design. Love it!!!!
adrienne says
Thanks Mike!
Anna nuttall says
When my niece is a little bit older, I might do this with her. This look so cool. xx
adrienne says
Thanks Anna
AMANDA says
This looks really freaking cool!! I need this in my life!
adrienne says
Thank you Amanda!
Rachel Ritlop says
OMG this is so cool! And so smart! Not only is it functional, it's such a cool and unique home decor piece!
Rachel | The Confused Millennial
adrienne says
Thank you!