Learn how to make a wooden DIY letter board with a few simply supplies from the craft store. You can use this letter board to display fun sayings during the holidays or any time of year! This fun DIY project looks totally professional and can be made in just a few hours. Read on to learn how to make it yourself!

Share all your feelings with this DIY letter board. Got something to say? Spell it out this holiday season for all to see on this fun Christmas project. Sure, you can buy a letter board, but where's the fun with that? When you make something yourself you guarantee that no one else will have the same one as you.
You can choose a generic message, have your kids spell out something festive or even use this letter board as a way for your Elf on a Shelf to communicate with the family!
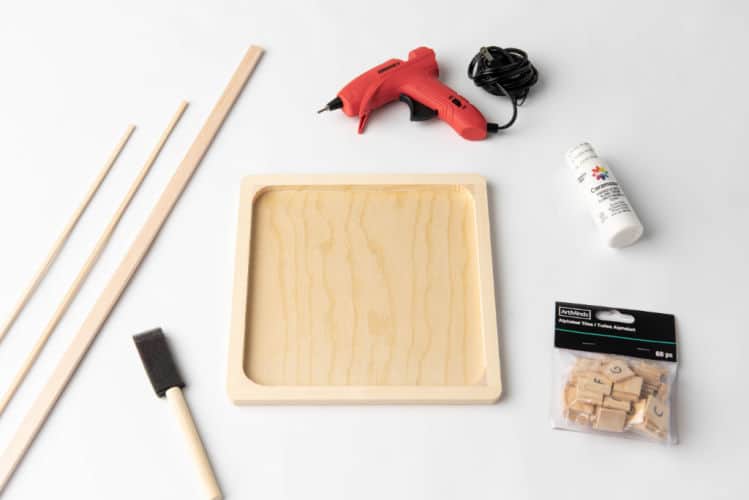
Supplies for DIY letter board :
- 9 x 9 wood plaque- Purchased at Hobby Lobby but you can buy similar here
- Squared Dowel Rods 3/32 x 3⁄8 x 36” and 5/32 x 5/32 x 24”-Can find other sizes at most craft stores
- Paint I used white paint - White acrylic paint was used but you can use any paint or stain
- Sponge brush or paint brush
- Hot glue gun
- Wood letters. You can buy them in bulk here

Instructions:
- =Begin by cutting the wood to size. Craft wood can often be cut with a razor knife but you can use a table or hand saw if you prefer. Cut the dowels into three, 7 inch lengths.
- Start by painting the wood with a brush in a well ventilated area. If you would rather stain the wood, follow the same steps below except stain as normal. Remember to wipe stain off if used. Apply the paint or stain in the direction of the grain of the wood. Allow paint to set and dry.
- Glue the wood together. First, place base piece of wood flat on surface.
- Next, grab the thicker and glue to base.
- Once dry, glue the smaller dowels to the larger ones along the outside edge. This is used to support wood letter tiles to prevent them from falling off.
- Place wood letters on sign.
What message will you display on your custom-made letter board?
More Christmas crafts you may like:
DIY Letter Board Christmas Sign

Make this fun Christmas letter board to display your favorite holiday sayings and keep it up all year long to share what's on your mind.
Materials
- • 9 x 9 wood plaque
- • Squared Dowel Rods 3/32 x 3⁄8 x 36” and 5/32 x 5/32 x 24”-Can find other sizes at most craft stores
- • Paint
- • Wood letters
Tools
- Sponge brush or paint brush
- Hot glue gun
- Craft knife or saw
Instructions
- If wood is not cut to size, please go ahead and do that first. Craft wood can often be cut with a razor knife but you can use a table or hand saw if you prefer. Cut the dowels into three, 7 inch lengths.
- Start by painting the wood with a brush in a well ventilated
area. If you would rather stain the wood, follow the same steps below except with stain. Apply the paint or stain in the direction of the grain of the wood. Allow paint to set and dry. Remember to wipe stain off if used. - Glue the wood pieces together. First, place base piece of wood flat on surface.
- Next, grab the thicker wood strips and glue to base.
- Once dry, glue the smaller dowels to the larger ones along the
outside edge. This is used to support wood letter tiles to prevent them from falling off. - Place wood letters on sign and share your message!

Hi I’m Adrienne Carrie Hubbard. I believe a rich life comes not from the things you have, but the things you do; the experiences you create and the people you meet along the way. Thanks for hanging out!
- Adrienne Carrie Hubbard
- Adrienne Carrie Hubbard
- Adrienne Carrie Hubbard
- Adrienne Carrie Hubbard
- Adrienne Carrie Hubbard
- Adrienne Carrie Hubbard
- Adrienne Carrie Hubbard
- Adrienne Carrie Hubbard
- Adrienne Carrie Hubbard
- Adrienne Carrie Hubbard
- Adrienne Carrie Hubbard
- Adrienne Carrie Hubbard
- Adrienne Carrie Hubbard
- Adrienne Carrie Hubbard
- Adrienne Carrie Hubbard
- Adrienne Carrie Hubbard
- Adrienne Carrie Hubbard
- Adrienne Carrie Hubbard
- Adrienne Carrie Hubbard
- Adrienne Carrie Hubbard
- Adrienne Carrie Hubbard
- Adrienne Carrie Hubbard
- Adrienne Carrie Hubbard
- Adrienne Carrie Hubbard
- Adrienne Carrie Hubbard
- Adrienne Carrie Hubbard
- Adrienne Carrie Hubbard
- Adrienne Carrie Hubbard
- Adrienne Carrie Hubbard
- Adrienne Carrie Hubbard
- Adrienne Carrie Hubbard
- Adrienne Carrie Hubbard
- Adrienne Carrie Hubbard
- Adrienne Carrie Hubbard
- Adrienne Carrie Hubbard
- Adrienne Carrie Hubbard
- Adrienne Carrie Hubbard
- Adrienne Carrie Hubbard
- Adrienne Carrie Hubbard
- Adrienne Carrie Hubbard
- Adrienne Carrie Hubbard
- Adrienne Carrie Hubbard
- Adrienne Carrie Hubbard
- Adrienne Carrie Hubbard
- Adrienne Carrie Hubbard
- Adrienne Carrie Hubbard
- Adrienne Carrie Hubbard
- Adrienne Carrie Hubbard
- Adrienne Carrie Hubbard
- Adrienne Carrie Hubbard
- Adrienne Carrie Hubbard
- Adrienne Carrie Hubbard
- Adrienne Carrie Hubbard
- Adrienne Carrie Hubbard
- Adrienne Carrie Hubbard
- Adrienne Carrie Hubbard
- Adrienne Carrie Hubbard
- Adrienne Carrie Hubbard
- Adrienne Carrie Hubbard
- Adrienne Carrie Hubbard
- Adrienne Carrie Hubbard
- Adrienne Carrie Hubbard
- Adrienne Carrie Hubbard
- Adrienne Carrie Hubbard
- Adrienne Carrie Hubbard
- Adrienne Carrie Hubbard
- Adrienne Carrie Hubbard
- Adrienne Carrie Hubbard
- Adrienne Carrie Hubbard
- Adrienne Carrie Hubbard
- Adrienne Carrie Hubbard
- Adrienne Carrie Hubbard
- Adrienne Carrie Hubbard
- Adrienne Carrie Hubbard
- Adrienne Carrie Hubbard
- Adrienne Carrie Hubbard
- Adrienne Carrie Hubbard
- Adrienne Carrie Hubbard
- Adrienne Carrie Hubbard
- Adrienne Carrie Hubbard
- Adrienne Carrie Hubbard
- Adrienne Carrie Hubbard
- Adrienne Carrie Hubbard
- Adrienne Carrie Hubbard
- Adrienne Carrie Hubbard
- Adrienne Carrie Hubbard
- Adrienne Carrie Hubbard
- Adrienne Carrie Hubbard
- Adrienne Carrie Hubbard
- Adrienne Carrie Hubbard
- Adrienne Carrie Hubbard
- Adrienne Carrie Hubbard
- Adrienne Carrie Hubbard
- Adrienne Carrie Hubbard
- Adrienne Carrie Hubbard
- Adrienne Carrie Hubbard
- Adrienne Carrie Hubbard
- Adrienne Carrie Hubbard
- Adrienne Carrie Hubbard
- Adrienne Carrie Hubbard
- Adrienne Carrie Hubbard
- Adrienne Carrie Hubbard
- Adrienne Carrie Hubbard
- Adrienne Carrie Hubbard
- Adrienne Carrie Hubbard
- Adrienne Carrie Hubbard
- Adrienne Carrie Hubbard
- Adrienne Carrie Hubbard
- Adrienne Carrie Hubbard
- Adrienne Carrie Hubbard
- Adrienne Carrie Hubbard
- Adrienne Carrie Hubbard
- Adrienne Carrie Hubbard
- Adrienne Carrie Hubbard
- Adrienne Carrie Hubbard
- Adrienne Carrie Hubbard
- Adrienne Carrie Hubbard
- Adrienne Carrie Hubbard
- Adrienne Carrie Hubbard
- Adrienne Carrie Hubbard
- Adrienne Carrie Hubbard
- Adrienne Carrie Hubbard
- Adrienne Carrie Hubbard
- Adrienne Carrie Hubbard
- Adrienne Carrie Hubbard
- Adrienne Carrie Hubbard
- Adrienne Carrie Hubbard
- Adrienne Carrie Hubbard
- Adrienne Carrie Hubbard
- Adrienne Carrie Hubbard
- Adrienne Carrie Hubbard
- Adrienne Carrie Hubbard
- Adrienne Carrie Hubbard
- Adrienne Carrie Hubbard
- Adrienne Carrie Hubbard
- Adrienne Carrie Hubbard
- Adrienne Carrie Hubbard
- Adrienne Carrie Hubbard
- Adrienne Carrie Hubbard
- Adrienne Carrie Hubbard
- Adrienne Carrie Hubbard
- Adrienne Carrie Hubbard
- Adrienne Carrie Hubbard
- Adrienne Carrie Hubbard
- Adrienne Carrie Hubbard
- Adrienne Carrie Hubbard
- Adrienne Carrie Hubbard
- Adrienne Carrie Hubbard
- Adrienne Carrie Hubbard
- Adrienne Carrie Hubbard
- Adrienne Carrie Hubbard
- Adrienne Carrie Hubbard
- Adrienne Carrie Hubbard
- Adrienne Carrie Hubbard
- Adrienne Carrie Hubbard
- Adrienne Carrie Hubbard
- Adrienne Carrie Hubbard
- Adrienne Carrie Hubbard
- Adrienne Carrie Hubbard
- Adrienne Carrie Hubbard
- Adrienne Carrie Hubbard
- Adrienne Carrie Hubbard
- Adrienne Carrie Hubbard
- Adrienne Carrie Hubbard
- Adrienne Carrie Hubbard
- Adrienne Carrie Hubbard
- Adrienne Carrie Hubbard
- Adrienne Carrie Hubbard
- Adrienne Carrie Hubbard
- Adrienne Carrie Hubbard
- Adrienne Carrie Hubbard
- Adrienne Carrie Hubbard
- Adrienne Carrie Hubbard
- Adrienne Carrie Hubbard
- Adrienne Carrie Hubbard
- Adrienne Carrie Hubbard
- Adrienne Carrie Hubbard
- Adrienne Carrie Hubbard
- Adrienne Carrie Hubbard
- Adrienne Carrie Hubbard
- Adrienne Carrie Hubbard
- Adrienne Carrie Hubbard
- Adrienne Carrie Hubbard
- Adrienne Carrie Hubbard
- Adrienne Carrie Hubbard
- Adrienne Carrie Hubbard
- Adrienne Carrie Hubbard
- Adrienne Carrie Hubbard
- Adrienne Carrie Hubbard
- Adrienne Carrie Hubbard
- Adrienne Carrie Hubbard
- Adrienne Carrie Hubbard
- Adrienne Carrie Hubbard
- Adrienne Carrie Hubbard
- Adrienne Carrie Hubbard
- Adrienne Carrie Hubbard
- Adrienne Carrie Hubbard
- Adrienne Carrie Hubbard
- Adrienne Carrie Hubbard
- Adrienne Carrie Hubbard
- Adrienne Carrie Hubbard
- Adrienne Carrie Hubbard
- Adrienne Carrie Hubbard
- Adrienne Carrie Hubbard
- Adrienne Carrie Hubbard
- Adrienne Carrie Hubbard
- Adrienne Carrie Hubbard
- Adrienne Carrie Hubbard
- Adrienne Carrie Hubbard
- Adrienne Carrie Hubbard
- Adrienne Carrie Hubbard
- Adrienne Carrie Hubbard
- Adrienne Carrie Hubbard
- Adrienne Carrie Hubbard
- Adrienne Carrie Hubbard
- Adrienne Carrie Hubbard
- Adrienne Carrie Hubbard
- Adrienne Carrie Hubbard
- Adrienne Carrie Hubbard
- Adrienne Carrie Hubbard
- Adrienne Carrie Hubbard
- Adrienne Carrie Hubbard
- Adrienne Carrie Hubbard
- Adrienne Carrie Hubbard
- Adrienne Carrie Hubbard
- Adrienne Carrie Hubbard
- Adrienne Carrie Hubbard
- Adrienne Carrie Hubbard
- Adrienne Carrie Hubbard
- Adrienne Carrie Hubbard
- Adrienne Carrie Hubbard
- Adrienne Carrie Hubbard
- Adrienne Carrie Hubbard
- Adrienne Carrie Hubbard
- Adrienne Carrie Hubbard
- Adrienne Carrie Hubbard
- Adrienne Carrie Hubbard
- Adrienne Carrie Hubbard
- Adrienne Carrie Hubbard
- Adrienne Carrie Hubbard
- Adrienne Carrie Hubbard
- Adrienne Carrie Hubbard
- Adrienne Carrie Hubbard
- Adrienne Carrie Hubbard
- Adrienne Carrie Hubbard
- Adrienne Carrie Hubbard
- Adrienne Carrie Hubbard
- Adrienne Carrie Hubbard
- Adrienne Carrie Hubbard
- Adrienne Carrie Hubbard
- Adrienne Carrie Hubbard
- Adrienne Carrie Hubbard
- Adrienne Carrie Hubbard
- Adrienne Carrie Hubbard
- Adrienne Carrie Hubbard
- Adrienne Carrie Hubbard
- Adrienne Carrie Hubbard
- Adrienne Carrie Hubbard
- Adrienne Carrie Hubbard
- Adrienne Carrie Hubbard
- Adrienne Carrie Hubbard
- Adrienne Carrie Hubbard
- Adrienne Carrie Hubbard
- Adrienne Carrie Hubbard
- Adrienne Carrie Hubbard
- Adrienne Carrie Hubbard
- Adrienne Carrie Hubbard
- Adrienne Carrie Hubbard
- Adrienne Carrie Hubbard
- Adrienne Carrie Hubbard
- Adrienne Carrie Hubbard
- Adrienne Carrie Hubbard
- Adrienne Carrie Hubbard
- Adrienne Carrie Hubbard
- Adrienne Carrie Hubbard
- Adrienne Carrie Hubbard
- Adrienne Carrie Hubbard
- Adrienne Carrie Hubbard
- Adrienne Carrie Hubbard
- Adrienne Carrie Hubbard
- Adrienne Carrie Hubbard
- Adrienne Carrie Hubbard
- Adrienne Carrie Hubbard
- Adrienne Carrie Hubbard
- Adrienne Carrie Hubbard
- Adrienne Carrie Hubbard
- Adrienne Carrie Hubbard
- Adrienne Carrie Hubbard
- Adrienne Carrie Hubbard
- Adrienne Carrie Hubbard
- Adrienne Carrie Hubbard
- Adrienne Carrie Hubbard
- Adrienne Carrie Hubbard
- Adrienne Carrie Hubbard
- Adrienne Carrie Hubbard
- Adrienne Carrie Hubbard
- Adrienne Carrie Hubbard
- Adrienne Carrie Hubbard
- Adrienne Carrie Hubbard
- Adrienne Carrie Hubbard
- Adrienne Carrie Hubbard
- Adrienne Carrie Hubbard
- Adrienne Carrie Hubbard
- Adrienne Carrie Hubbard
- Adrienne Carrie Hubbard
- Adrienne Carrie Hubbard
- Adrienne Carrie Hubbard
- Adrienne Carrie Hubbard
- Adrienne Carrie Hubbard
- Adrienne Carrie Hubbard
- Adrienne Carrie Hubbard
- Adrienne Carrie Hubbard
- Adrienne Carrie Hubbard
- Adrienne Carrie Hubbard
- Adrienne Carrie Hubbard
- Adrienne Carrie Hubbard
- Adrienne Carrie Hubbard
- Adrienne Carrie Hubbard
- Adrienne Carrie Hubbard
- Adrienne Carrie Hubbard
- Adrienne Carrie Hubbard
- Adrienne Carrie Hubbard
- Adrienne Carrie Hubbard
- Adrienne Carrie Hubbard
- Adrienne Carrie Hubbard
- Adrienne Carrie Hubbard
- Adrienne Carrie Hubbard
- Adrienne Carrie Hubbard
- Adrienne Carrie Hubbard
- Adrienne Carrie Hubbard
- Adrienne Carrie Hubbard
- Adrienne Carrie Hubbard
- Adrienne Carrie Hubbard
- Adrienne Carrie Hubbard
- Adrienne Carrie Hubbard
- Adrienne Carrie Hubbard
- Adrienne Carrie Hubbard
- Adrienne Carrie Hubbard
- Adrienne Carrie Hubbard
- Adrienne Carrie Hubbard
- Adrienne Carrie Hubbard
- Adrienne Carrie Hubbard
- Adrienne Carrie Hubbard
- Adrienne Carrie Hubbard
- Adrienne Carrie Hubbard
- Adrienne Carrie Hubbard
- Adrienne Carrie Hubbard
- Adrienne Carrie Hubbard
- Adrienne Carrie Hubbard
- Adrienne Carrie Hubbard
- Adrienne Carrie Hubbard
- Adrienne Carrie Hubbard
- Adrienne Carrie Hubbard
- Adrienne Carrie Hubbard
- Adrienne Carrie Hubbard
- Adrienne Carrie Hubbard
- Adrienne Carrie Hubbard
- Adrienne Carrie Hubbard
- Adrienne Carrie Hubbard
- Adrienne Carrie Hubbard
- Adrienne Carrie Hubbard
- Adrienne Carrie Hubbard
- Adrienne Carrie Hubbard
- Adrienne Carrie Hubbard
- Adrienne Carrie Hubbard
- Adrienne Carrie Hubbard
- Adrienne Carrie Hubbard
- Adrienne Carrie Hubbard
- Adrienne Carrie Hubbard
- Adrienne Carrie Hubbard
- Adrienne Carrie Hubbard
- Adrienne Carrie Hubbard
- Adrienne Carrie Hubbard
- Adrienne Carrie Hubbard
- Adrienne Carrie Hubbard
- Adrienne Carrie Hubbard
- Adrienne Carrie Hubbard
- Adrienne Carrie Hubbard
- Adrienne Carrie Hubbard
- Adrienne Carrie Hubbard
- Adrienne Carrie Hubbard
- Adrienne Carrie Hubbard
- Adrienne Carrie Hubbard
- Adrienne Carrie Hubbard
- Adrienne Carrie Hubbard
- Adrienne Carrie Hubbard
- Adrienne Carrie Hubbard
- Adrienne Carrie Hubbard
- Adrienne Carrie Hubbard
- Adrienne Carrie Hubbard
- Adrienne Carrie Hubbard
- Adrienne Carrie Hubbard
- Adrienne Carrie Hubbard
- Adrienne Carrie Hubbard
- Adrienne Carrie Hubbard
- Adrienne Carrie Hubbard
- Adrienne Carrie Hubbard
- Adrienne Carrie Hubbard
- Adrienne Carrie Hubbard
- Adrienne Carrie Hubbard
- Adrienne Carrie Hubbard
- Adrienne Carrie Hubbard
- Adrienne Carrie Hubbard
- Adrienne Carrie Hubbard
- Adrienne Carrie Hubbard
- Adrienne Carrie Hubbard
- Adrienne Carrie Hubbard
- Adrienne Carrie Hubbard
- Adrienne Carrie Hubbard
- Adrienne Carrie Hubbard
- Adrienne Carrie Hubbard
- Adrienne Carrie Hubbard
- Adrienne Carrie Hubbard
- Adrienne Carrie Hubbard
- Adrienne Carrie Hubbard
- Adrienne Carrie Hubbard
- Adrienne Carrie Hubbard
- Adrienne Carrie Hubbard
- Adrienne Carrie Hubbard
- Adrienne Carrie Hubbard
- Adrienne Carrie Hubbard
- Adrienne Carrie Hubbard
- Adrienne Carrie Hubbard
- Adrienne Carrie Hubbard
- Adrienne Carrie Hubbard
- Adrienne Carrie Hubbard
- Adrienne Carrie Hubbard
- Adrienne Carrie Hubbard
- Adrienne Carrie Hubbard
- Adrienne Carrie Hubbard
- Adrienne Carrie Hubbard
- Adrienne Carrie Hubbard
- Adrienne Carrie Hubbard
- Adrienne Carrie Hubbard
- Adrienne Carrie Hubbard
- Adrienne Carrie Hubbard
- Adrienne Carrie Hubbard
- Adrienne Carrie Hubbard
- Adrienne Carrie Hubbard
- Adrienne Carrie Hubbard
- Adrienne Carrie Hubbard
- Adrienne Carrie Hubbard
- Adrienne Carrie Hubbard
- Adrienne Carrie Hubbard
- Adrienne Carrie Hubbard
- Adrienne Carrie Hubbard
- Adrienne Carrie Hubbard
- Adrienne Carrie Hubbard
- Adrienne Carrie Hubbard
- Adrienne Carrie Hubbard
- Adrienne Carrie Hubbard
- Adrienne Carrie Hubbard
- Adrienne Carrie Hubbard
- Adrienne Carrie Hubbard
- Adrienne Carrie Hubbard
- Adrienne Carrie Hubbard
- Adrienne Carrie Hubbard
- Adrienne Carrie Hubbard
- Adrienne Carrie Hubbard
- Adrienne Carrie Hubbard
- Adrienne Carrie Hubbard
- Adrienne Carrie Hubbard
- Adrienne Carrie Hubbard
- Adrienne Carrie Hubbard
- Adrienne Carrie Hubbard
- Adrienne Carrie Hubbard
- Adrienne Carrie Hubbard
- Adrienne Carrie Hubbard
- Adrienne Carrie Hubbard
- Adrienne Carrie Hubbard
- Adrienne Carrie Hubbard
- Adrienne Carrie Hubbard
- Adrienne Carrie Hubbard
- Adrienne Carrie Hubbard
- Adrienne Carrie Hubbard
- Adrienne Carrie Hubbard
- Adrienne Carrie Hubbard
- Adrienne Carrie Hubbard
- Adrienne Carrie Hubbard
- Adrienne Carrie Hubbard
- Adrienne Carrie Hubbard
- Adrienne Carrie Hubbard
- Adrienne Carrie Hubbard
- Adrienne Carrie Hubbard
- Adrienne Carrie Hubbard
- Adrienne Carrie Hubbard
- Adrienne Carrie Hubbard
- Adrienne Carrie Hubbard
- Adrienne Carrie Hubbard
- Adrienne Carrie Hubbard
- Adrienne Carrie Hubbard
- Adrienne Carrie Hubbard
- Adrienne Carrie Hubbard
- Adrienne Carrie Hubbard
- Adrienne Carrie Hubbard
- Adrienne Carrie Hubbard
- Adrienne Carrie Hubbard
- Adrienne Carrie Hubbard
- Adrienne Carrie Hubbard
- Adrienne Carrie Hubbard
- Adrienne Carrie Hubbard
- Adrienne Carrie Hubbard
- Adrienne Carrie Hubbard
- Adrienne Carrie Hubbard
- Adrienne Carrie Hubbard
- Adrienne Carrie Hubbard