Learn how to install ceiling tiles and give your home the makeover you didn’t know it needed. This instant upgrade will give your home a luxe look on a budget. Use the following steps to install them in just a few hours.

Learn how to install ceiling tiles with this easy tutorial
Thank you to Fasade for supplying materials for this project.
Hey Gnomies,
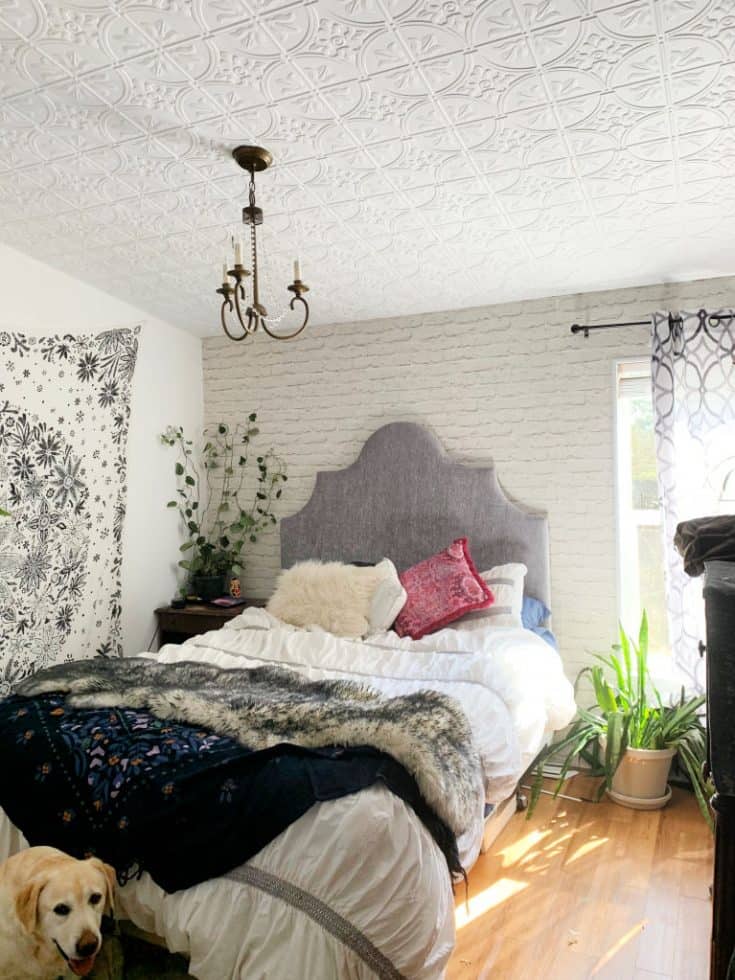
I recently upgraded the ceiling in my bedroom and today I’m sharing the before and after pics as well as showing you how easy it is to install ceiling tiles.
The ceiling in your house is one of the places that you really don’t think about when it comes to comes to home improvement projects. By using a product like Fasade Celing Tiles you can totally upgrade the whole look and feel of a room in your home in just a few hours.
You may also like: Faux Tin Kitchen Backsplash
Before I started, the ceiling in my bedroom had a pattern stamped into the drywall which looked fine but wasn't really my style.

Like most humans, I spend a lot of time in bed and that means a lot of time looking up at the ceiling. Why not make your ceiling look beautiful since it's the first thing you see in the morning and the last thing you see before bed?
You may also like: How to install a brick tile floor
I decided to try Fasade ceiling tiles and I am so happy that I did. My husband and I worked on this project in one afternoon and the results are amazing. I've worked with Fasade in the past on my faux tin kitchen backsplash project and 3 years later my backsplash still looks as good as the day I installed it. I contacted them to see if they would be interested in working with me on this ceiling project and they graciously sent over some ceiling panels for me to try.
These tiles are very thin- but super durable plastic. I opted for the Fasade Ceiling Tile -2x4 Direct Apply-Traditional 2 in Matte White style.
You can purchase Fasade products from DIY Decor Store.
They come in 2x2 or 2x4 sized sheets and they simply glue up to the ceiling. They can also be laid into any standard 15/16” grid system.
I used the online calculator to determine how many tiles I needed and then placed my order.

Before you begin:
You need to make sure your ceiling is clean. You may want to apply a fresh coat of primer or paint on the ceiling before you install the panels.
Wipe the back of each panel with some rubbing alcohol. This will remove any the finger prints, dust or dirt to ensure maximum adhesion to the ceiling.
Acceptable substrates:
- Drywall
- Plaster
- Smooth tile
Any damaged, loose or uneven areas must be repaired, patched, leveled and primed. Fill cracks and irregularities with wallboard compound or spackling, then sand smooth with fine-grade sandpaper.
You may also like: How to Make a DIY Headboard
Next, apply the glue to the back of the panel using a caulking gun.

What kind of glue do you use?
The preferred method for installing Glue-Up ceiling panels is to apply the adhesive directly to the back of the panels. Then use use a notched trowel (¼″ x ¼″ x ¾″) and spread the adhesive evenly on the panel. ACP, the manufacturer of Fasade recommends using Loctite PL Premium adhesive. Do not use double-sided tape to install ceiling panels.

What kind of scissors should you use to cut the panels?
I used regular craft scissors. The panels cut very easily.
Will the panels stay up?
I will admit I was nervous the first night after we installed the ceiling tiles that they would fall down on us in the middle of the night.
I'm happy to report that they stayed up just fine and are very secure.
How to install ceiling tiles
Learn how to install ceiling tiles in the interior of your home
Materials
- Fasade ceiling tiles
- Loctite PL Premum Fast Grab. 1 10.5 oz tube per 2 2x4 panels
Tools
- scissors
- knife
- caulking gun
- rubbing alchol
- old rags
Instructions
- Measure ceiling and order supplies. Order 10% more than you need to account for mistakes and areas that need to be trimmed.
- Clean the back of the panel with rubbing alcohol
- Use a caulking gun to apply adhesive to the back of the panel.
- Press the panel to the ceiling and smooth it down.
- Trim panels if necessary to fit and overlap at the edges for a seamless application.
- After an hour apply pressure again to ensure strong adhesion.
Notes
Use mineral spirits to clean up and wayward glue.
What do you think of my ceiling tiles? Would you try this in your home?
Make sure you check out DIY Decor Store for more home ceiling and backsplash inspiration.

You may also like: How to Clean Popcorn Ceiling

Hi I’m Adrienne Carrie Hubbard. I believe a rich life comes not from the things you have, but the things you do; the experiences you create and the people you meet along the way. Thanks for hanging out!
Julie Wanstedt says
As a director of digital marketing, I'm confused whether you're trying to educate your audience or provide a post so chalk full of advertisements that the user experience becomes secondary.
I certainly will not become a subscriber or click on any of your content from hometalk in the future.
adrienne says
As a director of digital marketing you should know that bloggers make money from ads. No ads=no blog. Please don't comment on my website again. Have a good day.
Amy Patterson says
I was planning on installing faux tin ceiling tiles in my kitchen. The substrate I have put up is particle board. will this work? do I have to prime this?
adrienne says
I believe particle board is fine. I would check with Fasade to make sure though.
Kelly says
I love how it looks! Did a great job! But I have popcorn ceiling & don't think it would work for me. I'd love to get rid of it!!
adrienne says
Thanks Kelly! I would recommend removing the popcorn first. Light texture is OK but it still need to be relatively flat 🙂
Cheryll says
I am definitely gonna try this. My problem is how do you go around the ceiling fan?. I guess I can unscrew it. Is that what y'all did?
adrienne says
I loosened it and then I cut a slit in the side of the panel and slid it into place. If you can take it down completely and then put it back up I would recommend that!