Make this DIY fabric face mask for yourself or members of your community with this free pattern. This mask is reversible, washable and has a wire embedded to conform to the bridge of your nose. Help keep your loved ones protected with this homemade cloth mask that is suitable for beginner sewists.

Homemade cloth face masks are in high demand
Surgical face masks such as the N 95 are in short supply and hospitals and heath care workers are asking those who know how to sew to help make masks to help fill the need during this emergency. With just two fat quarters of cotton cloth you can make five masks for your loved ones to use or to donate.
With two fat quarters of 100% cotton fabric you can make up to 5 masks. Fat quarters are the little squares of fabric you can find at the craft store or in the sewing section of Walmart. They are typically a non-stretch fabric that comes in all sorts of colors and patterns and a mostly used for quilting and other projects.
I am going to be donating all the masks I make aside from the ones I am keeping for my family to use for personal use. I encourage you to do the same.
The pattern I created is my intellectual property but you are free to use it to make masks to donate or to use yourself. Just don't sell them. Don't be that guy.
Get access to the free template below:
Supplies for DIY fabric face mask
- 2 cotton “fat quarters” of 100% cotton non-stretchy fabric
- Coordinating thread
- Scissors
- Straight pins
- Tape measure
- ¼ inch elastic cut into 7 inch long pieces
- Iron and ironing board
- 3 inch long 20 gauge wire
- Wire cutters and pliers
- Sewing machine
Check out the full video tutorial here
Supply alternatives
I realize that not all of these supplies will be available to everyone right now, especially if you can't get out of the house or stores are closed. Here are some alternatives:
If you don't have craft wire you can try using other kinds of wire. Pipe cleaners, floral wire, even twist ties could work. Try out different things if you don't have access to craft or jewelry making wire.
Elastic may also be hard to come by. Thin elastic hairbands from the dollar store work well, just cut them in half. You can get 7 for a dollar. Spare shoelaces or ribbon can also work- just use what you have on hand (as long as it's new and clean)
The best fabric to use for DIY fabric face masks
100% cotton is best but you can also use denim or linen. Non-stretchy fabric is preferred. I used fat quarters from Walmart since there was no one working at the fabric counter and I wasn't able to get fabric cut.
Two fat quarters will make about 5 masks and will cost about $2.
How to wash your homemade cloth mask
Simply toss it in the laundry with the rest of your clothes and tumble dry. Consider adding a little bit of bleach to the wash cycle. Tumble dry. Place masks in a mesh laundry bag if you have one available.
Easy Homemade Fabric Mask

Learn how to make a homemade fabric face mask with this easy tutorial that is appropriate for beginners.
Materials
- 2 cotton “fat quarters” of 100% cotton, non-stretchy fabric
- Coordinating thread
- ¼ inch elastic cut into 7 inch long pieces
- 3 inch long 20 gauge wire
- Printed out template
Tools
- Wire cutters and pliers
- Sewing machine
- Iron and ironing board
- Scissors
- Straight pins
- Tape measure
Instructions
- Watch the video embedded in the blog post to get an idea of the instructions. Then do the following steps to make your own.
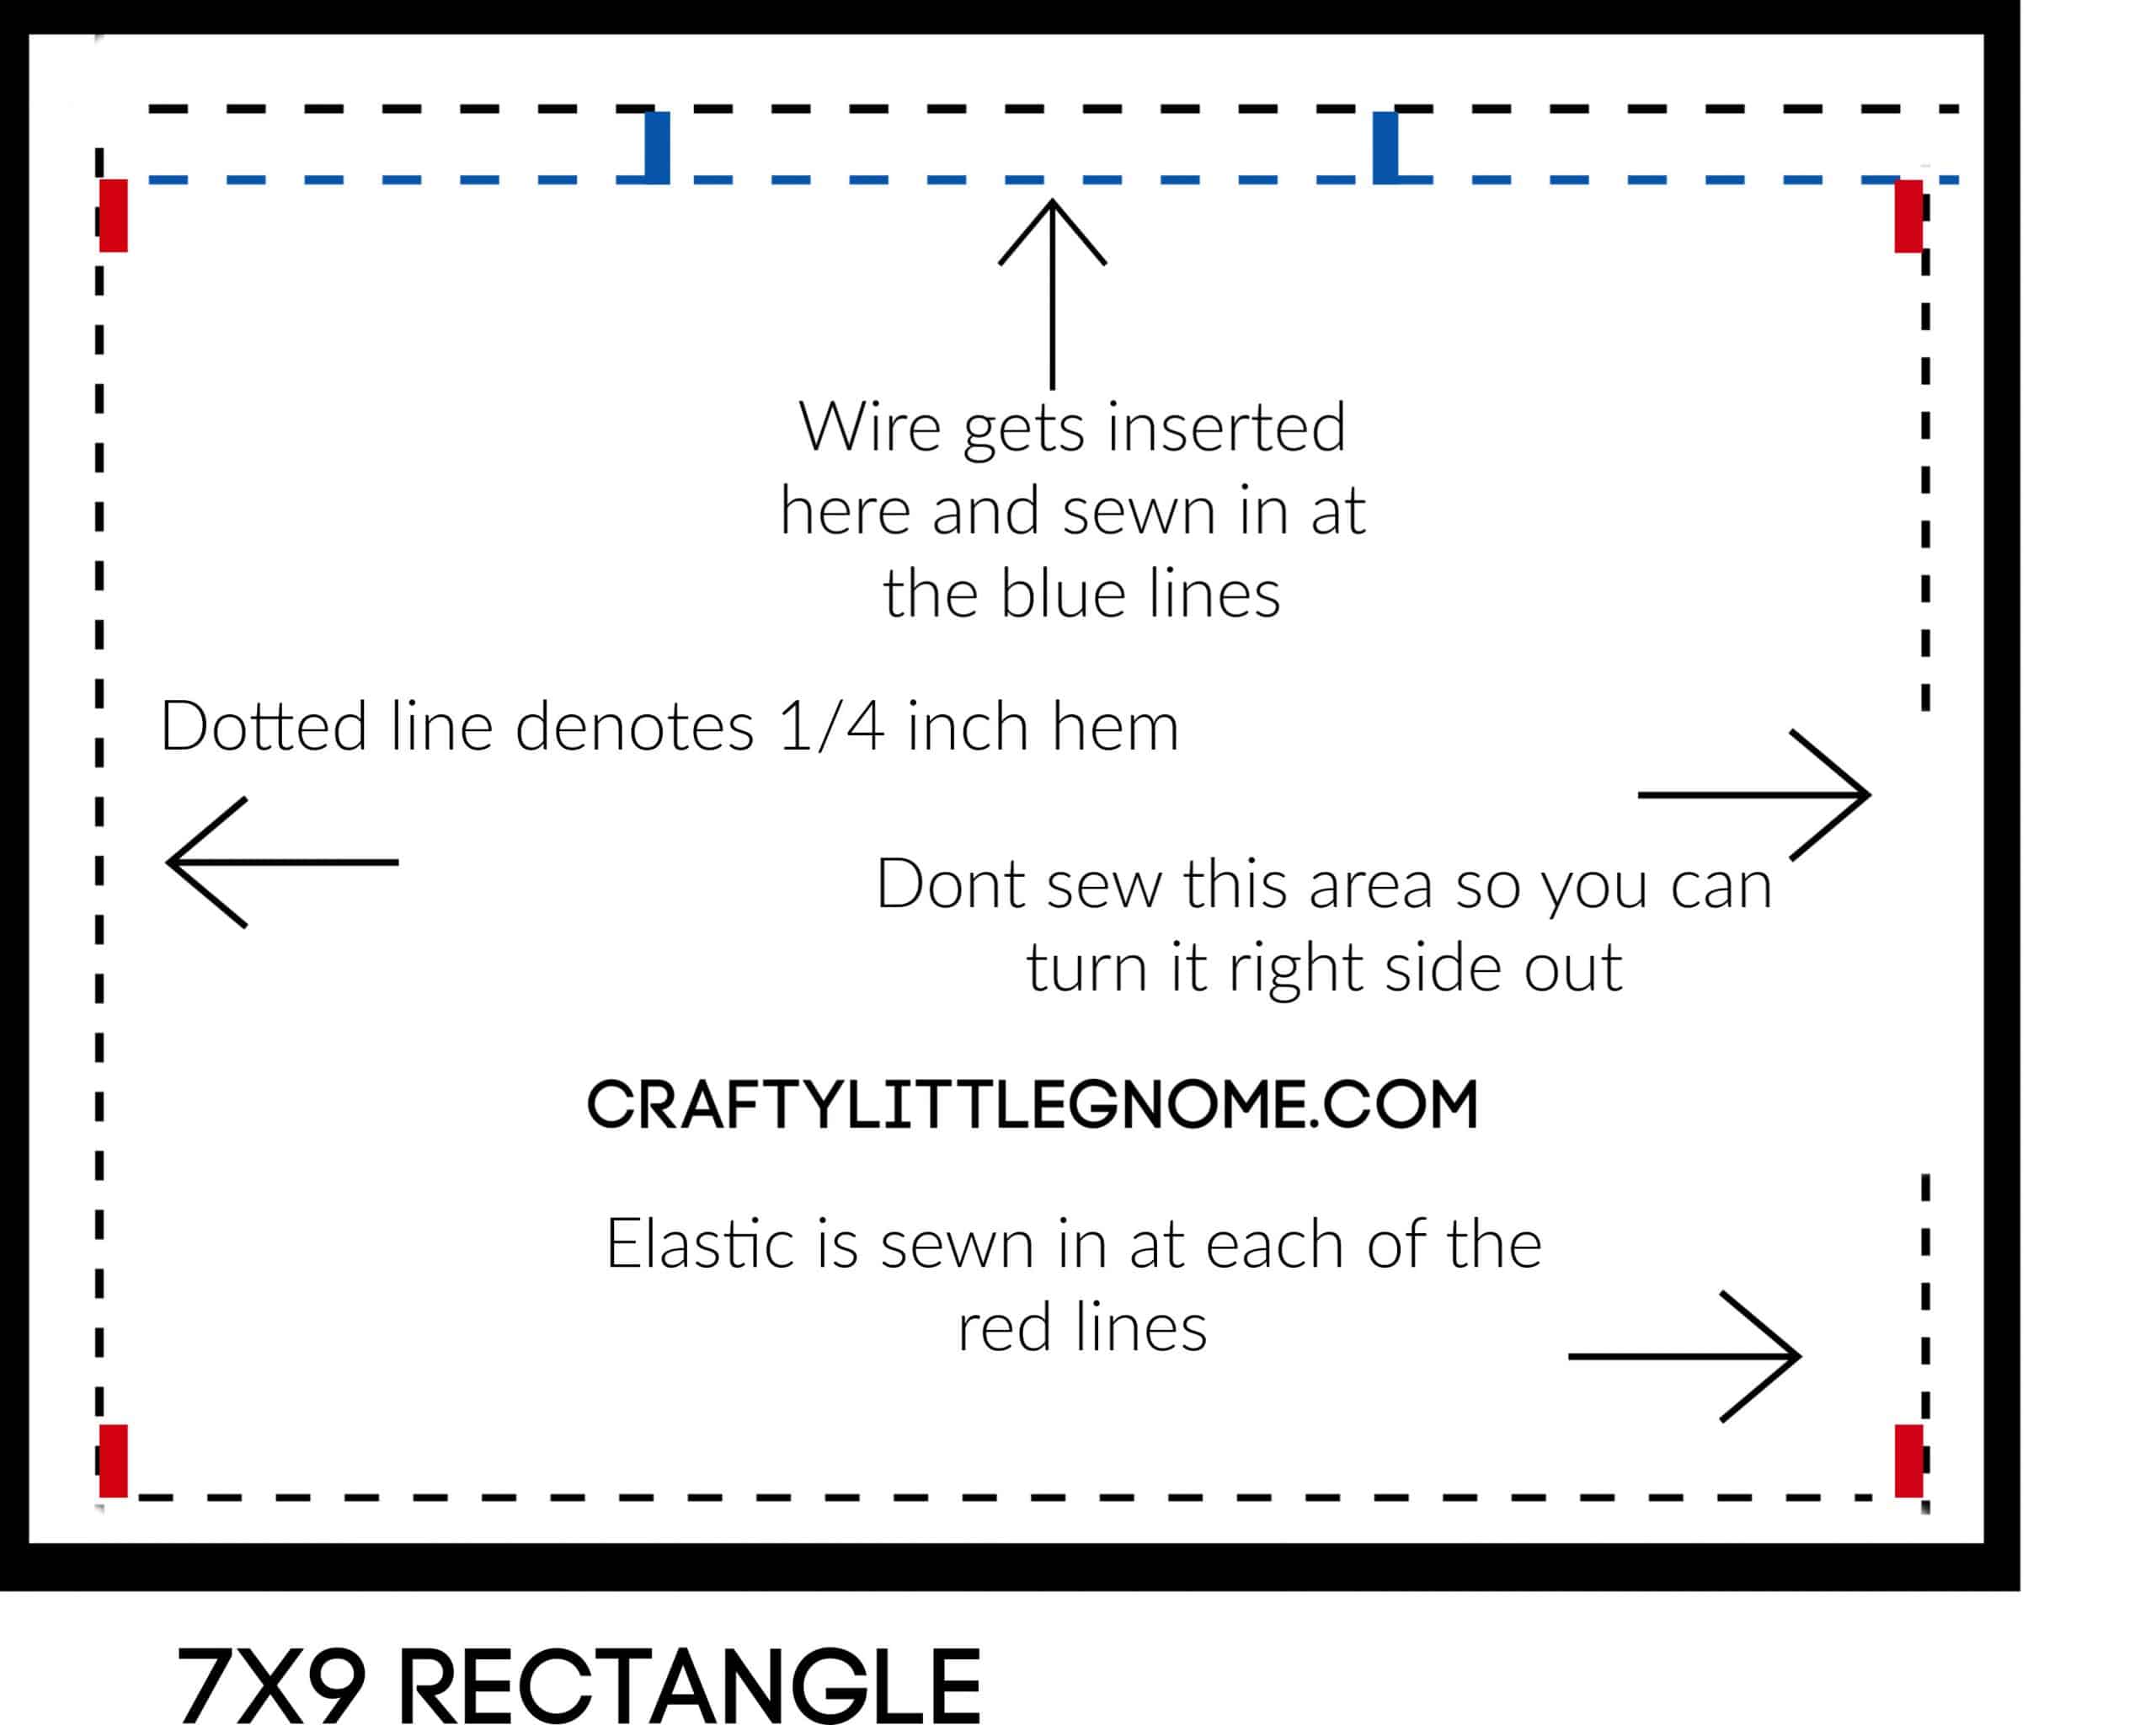
- First, print out the template and cut it out. It should measure 9x7 inches long.
- Wash and dry your fabric. Iron if needed.
- Place two different colors or patterns of fabric right sides together and set the template and trace it. Cut out the fabric pattern.
- Sew ¼ inch hem along the top 9 inch long side of the rectangle.
- Sew another line ¼ below the first line creating a little tunnel between the fabric.
- Then, take a 3 inch piece of wire and curl the ends.
- Next, push the wire down the little tunnel you created and center it.
- Sew a small line on either side of the wire to keep it in place.
- Cut two, 7 inch pieces of elastic.
- Pin them in place and sew a all the way around the perimeter except for a small gap so that you can turn the fabric inside out.
- Turn it inside out and iron if necessary.
- At the bottom of the mask place a pin every inch for 4 inches.
- Take the bottom pin and pinch it up to the pin on top of it.
- Hold it in place with your finger, remove the pins and place a new one to hold the pleat.
- Repeat with the top two pins.
- Sew a line on each side of the mask to keep the pleats in place.
- Now your mask is ready to wear.
Notes
Wash the mask after every use. Always place the same side against your face inbetween washings.
More posts you may like:
- How to make homemade baby wipes
- DIY hand sanitizer recipe
- DIY disinfecting wipes
- How to make reusable cloth unpaper towels

Hi I’m Adrienne Carrie Hubbard. I believe a rich life comes not from the things you have, but the things you do; the experiences you create and the people you meet along the way. Thanks for hanging out!
Shirley Granander says
Thank you for sharing your pattern and instructions. The video was great so I could make notes for questions I had with the instructions. May God bless you!
Doreen says
Thank you for sharing the instructions on making masks. I'm making some masks for several of my friends that are healthcare workers. Stay safe & strong.
Louise says
What is a fat quarter?
adrienne says
Its a square of fabric that is precut and normally used by quilters. It is approx a quarter yard of fabric. They sell them at Joanne fabrics and Walmart
Betty king says
really appreciate you creating a template with wire insert!!
having a bit of a problem printing the mask template to the exact size. originally thought it was a problem printing from my ipad, however get the same (smaller) results when printing from computer. I can mark up the smaller version, just wondering if you can lend some insight.
Nanci L says
Thank you for sharing i will be making these for family and people in my neighborhood.We can then leave N95 masks sergi masks for our healthcare providers.
Susan August says
I love this pattern--been looking for one with wire for friends and NEIGHBORS not to mention any visitors! I've already sent you an email requesting a copy of the pattern thanks again
Kate Pigula says
I would like the template for the fabric mask please. I printed the directions but no directions to print the template.thank You.
adrienne says
The instructions are in the blog post. There is a printable at the bottom of that page for the instructions. Sorry for any confusion.
Wendy Hirsch says
When you show the folding for the pleats you are tucking upward but when you put on the mask (same white print side) your tucks are going downward? Did you reverse it and same fabric on the back? And you look like when you use your 4” of tucks that you are up w/in 1” of the top and mine is 2” from the top. Just a little confused.
adrienne says
It might have been flipped upside down. If it's 2 inches that's fine as long as the end result is the same you can do whatever works. Feel free to experiment and see what works best for you.
June Budd says
Please send me the face mask pattern, thank you
June Budd
June budd says
Please send me the face mask pattern, thank you
Sarah Warren says
I signed up for the newsletter and never received the face mask pattern?
adrienne says
I'm so sorry. Send me an email at info@craftylittlegnome.com and I will send it right to you!
Brenda Mazell says
Thank you for all your ideas and diy's. Everyone needs all the help they can get. Now, I know this question might not be important or sound silly. But I was wondering where did the GNOME come from?
adrienne says
I just like Gnomes!! Thanks for reading!
Adrienne