Learn how to build a DIY bug hotel with this simple woodworking tutorial. We talk a lot on this blog about pest control and cleaning and while I like to keep the bugs out of my house and my vegetable garden using natural methods, I know it's important to protect our ecosystem. Pollinators like bees and butterflies are essential for the health of our planet. Create a safe haven for insects and bugs to hang out with this easy DIY bug hotel tutorial.

An insect hotel, also known as a bug hotel or insect house, is a man-made structure created to provide shelter for insects. Most consist of several different sections that provide insects with nesting facilities offering shelter or refuge for many types of insects.
I recently made a DIY Milk Jug Birdfeeder with my daughter. That is an easy project using a recycled milk jug. Today's project is a little more involved since we will be busting out the power tools, but it's not too hard I promise!
I am going to show you how to make your own insect hotel made from a 1x6x10 piece of pine wood from the hardware store.
What are the benefits of an insect hotel?
- Supplement the increasing loss of natural habitats.
- Encourage beneficial insects to help control pests.
- Stimulate biodiversity and ecological balance in the garden.
- Offer an opportunity for educating children about how balanced ecosystems work.
Materials needs for a diy bug hotel
- Wood a 1x6 10ft long pine board works great.
- Small wood screws or nails
- Screwdriver
- Craft wire
- Miter saw. I like this one. You need one that can cut 45 degree angles.
- Sandpaper
- Drill
- Environmentally wood stain or paint. I like this one. You could also keep it natural and not use any finish.
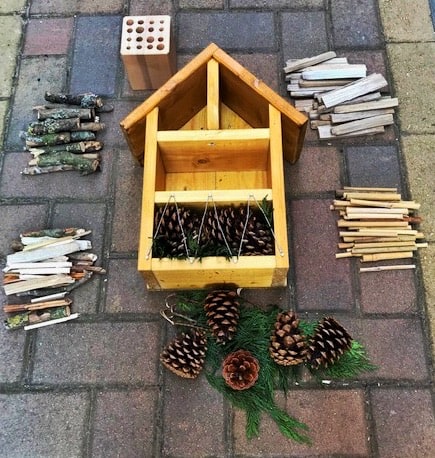
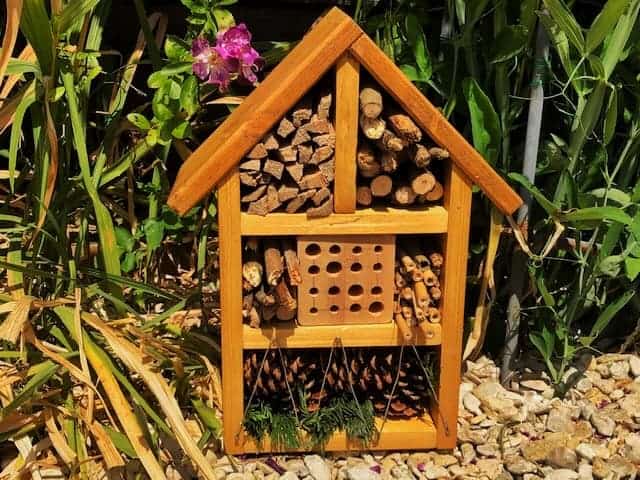
Fill the bug house with: pine cones, small twigs, broken garden pots, small block of wood.
Cut list for insect hotel
When you purchase wood from the hardware store it's actual size is different than what is listed. A 1x6 inch board is actually 5 ½ x ¾. The wood is cut as 1x6 but then it is planed so the end result is actually 5 ½ x 3x4 when you buy it.
To make things simple. I used the 5 ½ calculation for the width of all the cuts. That means you only have to cut the board one way into smaller sections and cut some pieces on an angle.
If you purchase a 1x6 board that is 10 feet long that should be plenty of wood to make all the cuts, plus a little extra in case you screw up!
- Cut three shelves 5 ½ x 11
- Cut two side pieces 5 ½ x 10- cut the top at a 45 degree angle so that it fits in with the slanted roof.
- Cut two back pieces 5 ½ x 13 (cut the top at a 45 degree angle. The shorter side should be 10 inches)
- Cut one roof pieces 5 ½ x 7.5
- Cut one roof piece 5 ½ x 8
- Cut one divide 5 ½ x 5 cut the edge of the 5 inch side at a 45 degree angle on both sides so that it fits into underside peak of the roof.


Instructions for a bug hotel
- Sand the edges of each piece of wood for a smooth finish.
- Screw the base piece to the two back pieces, this holds the two back pieces in place.
- Next, screw the two side pieces to the back pieces using a screwdriver.
- Using the piece and piece fix the roof by screwing the two pieces together to make a right angle. Place to the side.
- Make a T shape with the divide (and one shelf piece, attach with screws.
- Attach the roof and shelves using screws.
- Varnish to protect the wood if you like.
- Collect small twigs, pine cones for the inside filling.
- Using a small block of wood drill some holes in which become holes for bugs to hide.
- Fill the shelves with your twigs and natural products.
- The bottom shelf is ideal for pine cones attach some chicken wire or thread some wire to hold them in place. Use screws to secure wire.

Where is the best place to put an insect hotel?
Solitary bees such as mason bees, like to be warm so having the hotel on a south-facing wall is ideal. Therefore, the best position for insect hotels is in sunlight or light shade, preferably 4 ft off the ground.
What bugs live in a bug hotel?
- Bees
- Wasps
- Ladybugs
- Spiders
- Butterflies and other pollinators
How do I attract bugs to my insect hotel?
Place the bug hotel in a south-facing spot near nectar sources like flowers. Keep the bug house 5 feet from the ground. Fill the compartments with dry material to attract the desired bugs. Material such as weeds, sticks, burlap, old paper and string are all suitable.
How to maintain your DIY insect hotel
The bug hotel should be inspected at the end of summer to remove and clean dead cells. This will prevent mold and mitles that can multiply on dead bees or larvae.
Protect the bug house over winter by moving it to a cool dry place like a garden shed to help protect and inhabitants from the wind and rain until spring.
Check the nesting blocks and replace the filling as needed. An untreated wood bug hotel will last about 2-3 years.
DIY Bug Hotel
Make a DIY bug house with this simple woodworking tutorial
Materials
- Wood
- Small wood
- Craft wire
- Sandpaper
- Wood stain or paint
Tools
- Screwdriver
- Drill
- Miter saw
Instructions
Cut list:
Cut three shelves 5 ½ x 11
Cut two side pieces 5 ½ x 10- cut the top at a 45 degree angle
so that it fits in with the slanted roof.
Cut two back pieces 5 ½ x 13 (cut the top at a 45 degree
angle. The shorter side should be 10 inches)
Cut one roof pieces 5 ½ x 7.5
Cut one roof piece 5 ½ x 8
Cut one divide 5 ½ x 5 cut the edge of the 5 inch side at a 45
degree angle on both sides so that it fits into underside peak of the roof.
Instructions:
1. Sand the edges of each piece of wood for a smooth finish.
2. Screw the base piece to the two back pieces, this holds the two
back pieces in place.
3. Next, screw the two side pieces to the back pieces using a
screwdriver.
4. Using the piece and piece fix the roof by screwing the two
pieces together to make a right angle. Place to the side.
5. Make a T shape with the divide (and one shelf piece, attach with
screws.
6. Attach the roof and shelves using screws.
7. Varnish to protect the wood if you like.
8. Collect small twigs, pine cones for the inside filling.
9. Using a small block of wood drill some holes in which become holes
for bugs to hide.
10. Fill
the shelves with your twigs and natural products.
11. The
bottom shelf is ideal for pine cones attach some chicken wire or thread some
wire to hold them in place. Use screws to secure wire.
Notes
Pre-drill screw holes to prevent the wood from splitting.
More outdoor projects you may like:
- Jungalicious Jumanji Inspired Tree House
- DIY Windchime with Terra Cotta Pots
- How to Make Inside Out Tire Planters
- Milk Jug Bird Feeder
- How to Make a Solar Pool Heater

Hi I’m Adrienne Carrie Hubbard. I believe a rich life comes not from the things you have, but the things you do; the experiences you create and the people you meet along the way. Thanks for hanging out!
M says
Good idea, Bad bugs & good bugs both need a home. They can spend days investigating their surroundings. HOWEVER, I will keep it in the "B" family and call it a bird house. I love all the diferent size rooms for all the dierent size bugs or birds.
adrienne says
Thanks I love bird houses too. I'm going to be working on a fun tutorial for one soon!