Reverse tie dyeing is a fun twist on traditional tie dye. Instead of adding color to a white t shirt you remove the color from a dark t shirt with bleach. Reverse tie dye can be done in all sorts of patterns and kids will love to try this new way of decorating clothing. There are many reverse tie dye techniques to try and you can even make patterns with bleach pens for more embellishments.
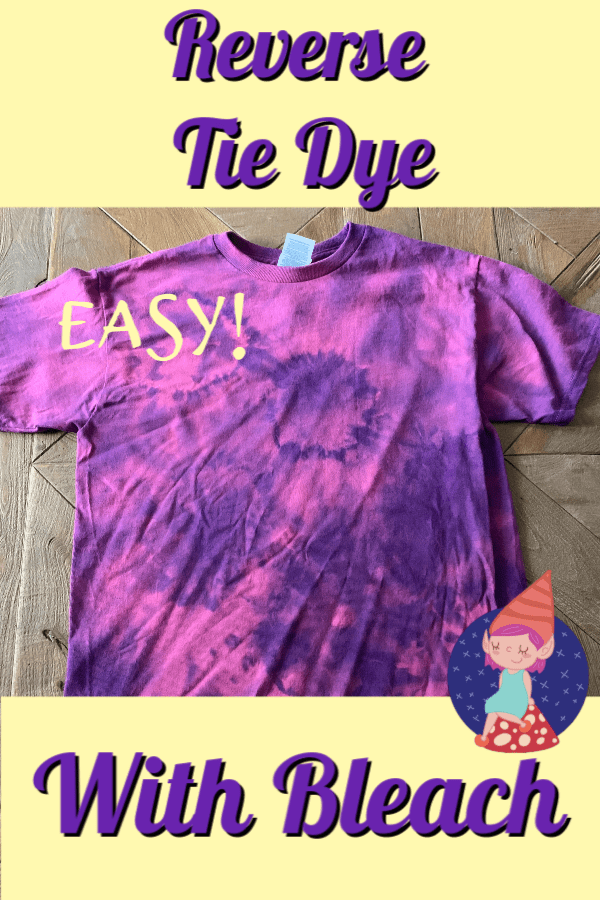
Table of contents
How To Reverse Tie Dye
I think that has happened to everyone at some point: You are cleaning or doing some laundry when suddenly you look down and notice a big bleach mark on your clothing.
Unlike stains you can’t try to rinse off the mark or use stain remover to quickly get rid of it. The damage is done. Normally I would cry a little on the inside and assign this article of clothing to be used as house cleaning or hair dyeing only attire.
I decided this time to just go with it and have some fun. Which brings us to today’s tutorial: Reverse Tie Dyeing. Instead of using dye to add color to parts of the garment you use bleach to remove color.
Take your shirt and tie elastic bands around it. I used hair elastics because I didn’t have rubber bands and it worked fine. I just grabbed parts of the shirt and twisted the ties as tight as I could. Then I used dental floss and wound around the whole thing to make it extra tight.
Full instructions are at the bottom this post.
Any colored t-shirt will work, but keep in mind that the bleach might not turn it the color you expected! Red will usually turn pink, sometimes white.
Orange most often ends up a lighter shade of orange. Yellow will usually turn white.
The following are affiliate links. We are a participant in the Amazon Services LLC Associates Program, an affiliate advertising program designed to provide a means for us to earn fees by linking to Amazon.com and affiliated sites. Thank you for being part of Crafty Little Gnome
Supplies you may need to Bleach Dye A T- Shirt
- T-Shirts or old clothing
- Chlorine bleach
- Elastic bands
- Spray bottle
- Bucket
- Fabric dye
How Long Does it Take to Bleach Dye a T-Shirt?
- Take a cap full of full strength bleach and sprinkle it on the balled up shirt.
- Leave for about another 20 minutes and do some chores while you wait.
- Rinse under water and then remove the elastics, then rinse again.
- Wash alone in the clothes washer, dry as usual.
You may also like: Homemade Bleach Recipe
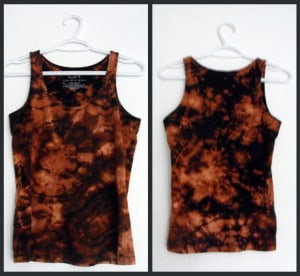
I would like to try this on a top that is maybe blue or another bright color. Black bleached out turns brownish- orange. This was a fun and clever experiment and kids would probably like to try this technique out too (with help from a grown up).

Bleach Dye Techniques:
DIY Bleach Tie Dye Jeans
- You will need a pair of jeans, rubber bands, bleach, rubber gloves and a bucket.
- Fill up your bucket with cold water and place the jeans in it.
- Ring them out.
- Tie as many or as little rubber bands as you want onto your jeans.
- Fill your bucket again with water and add half a bottle of bleach.
- Using your rubber gloves place your jeans into water.
- Let the jeans sit in the bleach water for 8-10 minutes
- Rise off the jeans and wash and dry like usual in the washing machine
You may also like: How to Tie Dye with Ice Cubes
Spray Bleach Tie Dye
In addition to submerging the clothing in bleach water you can also fill a spray bottle with bleach water and spray the fabric.
You can make some interesting patterns just from the sprayed bleach or you can place something on the fabric to block part of the bleach from lightening the shirt.
Lace can be placed over the fabric and bleach sprayed over it to make an interesting lace pattern on black fabric. You could also cut a picture out of cardboard of a simple shape or animal and spray over the cardboard making a silhouette on the fabric.
Splatter Reverse Tie Dye
Similar to the spray bleach method, you can dip a paint brush in bleach and flick the bleach onto the fabric. It will have a splatter effect on the clothing. If you decide to do this make sure you use extreme caution and use eye protection and do this outside where no one could accidentally get splashed with the bleach.
Bleach Pen Patterns
Use a bleach pen from the laundry department of the grocery store to draw patterns on dark clothing. Once the pattern has lightened to your desire you can simply wash the bleach off.
You can draw on articles of clothing that you already have reverse tie dyed to add some designs or simply write a quote or shape with the bleach.
Make your own bleach pen by mixing bleach with the following supplies:
- One cup of cold water
- Five tablespoons of cornstarch
- Five tablespoons of liquid bleach
Mix the ingredients together and put them in a squeeze bottle or old school glue bottle.
You may also like: Rainbow Crochet Scarf
How to Galaxy Dye A T-Shirt
Choose any of the methods above to reverse tie dye your article of clothing with bleach.
After you rinse the bleach out and the shirt is clean and damp, apply colored dye over the previously bleached areas. Apply the colors randomly so they blend together.
Let the dye sit overnight and in the morning wash and dry the shirt as usual in the washing machine.
The result with be a crazy colorful dyed shirt that looks like it came from outer space!
Reverse Tie Dye with Bleach

Learn how to reverse tie dye a t shirt with bleach
Materials
- T shirt
- Bleach
Tools
- Elastic bands
- Bucket
Instructions
- Use elastic bands to tie shirt in patterns
- Fill bucket or bowl with water and bleach 50/50
- Place shirt in bowl for 20-30 minutes or until the desired amount of color is lifted
- Remove shirt from bleach water and remove elastics
- Then, rinse shirt
- Finally wash and dry shirt as normal
Notes
Bleach has strong fumes so do this outside. Always supervise kids when working with household chemicals.
Have you tried reverse dyeing with bleach before? What's your favorite technique? Share with us in the comment!


Hi I’m Adrienne Carrie Hubbard. I believe a rich life comes not from the things you have, but the things you do; the experiences you create and the people you meet along the way. Thanks for hanging out!
Unknown says
I've been doing this for ages, except that I do not tie-dye quite as much, and I use chunky foam stamps dipped in bleach to give it a pattern. When working w/ bleach dying, ALWAYS have a spray bottle of vinegar around--it will stop the bleaching action. It's best to dip in vinegar BEFORE throwing in a washing machine.
Amy Her says
p.s. cool idea btw
Amy Her says
Is it just me, or can you see a face in the bottom left hand corner of the front of the tank??
Adrienne Audrey says
hahaha It's the face of Jesus on my shirt!
Elizabeth Richmond Papapietro says
Thank you for your wonderful instructions! Just did this today with two dresses I thought I had ruined (one brown and one purple). They came out gorgeous! But I should have done this outside, you were right about the overwhelming bleach smell.
Anonymous says
Cool! I ruined a perfect shirt with one speck of bleach on the front. I love the dark blue and it looks great in every way except for the tiny dot! I will do this and have a new twist! I tried the sharpie thing! It was noticeable like I had dropped food on my shirt! Then It washed out!
Scrollwork says
Serendipitous that I read this post right after I read your current Sharpie forest hall project (FABULOUS!), because I was going to answer your question by saying that I take a Sharpie and color back in the bleached spot! That is the extent of my Sharpie skills, unfortunately. Boo-hoo-hoo!