My modern rustic bathroom is a mixture of new and old materials in neutral colors with lots of character. This style is all about bringing the outdoors in.
Mix materials like wood, marble and brick tile along with natural fabrics like cotton. Whether in the kitchen, living room or bathroom there is no room in your home that this style won't look good.
Check out the before and after photos of my rustic modern bathroom renovation and the details of the projects I completed.

Rustic Modern Bathroom Renovation
Hey Gnomies,
I’m finally done my big bathroom renovation project. I started working on this project way back in January and six months later I’m finally done! Obviously, I took my time and took lots of breaks in between projects, but I must say, it feels so good to be done.
What I started with:
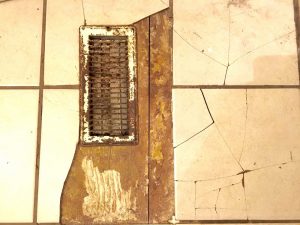
Let’s take a look at the before pictures:

This was what the house looked like when we first moved in. Our house is a manufactured home built in 1990. There was a lot of fake wood, floral wallpaper and brass knobs.
The people who lived here before us did some changes, but they weren’t done very well so we had a lot of issues like cracked tile and poorly installed trim.
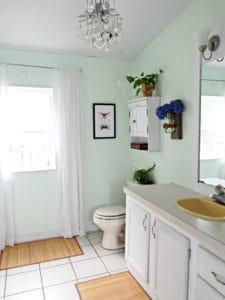
Several years ago I painted the bathroom, vanity and upgraded the light fixtures. That helped the space look a lot better but I knew I needed to replace the floor and install a new vanity. Since I would be doing those two major projects I thought I might as well install a new toilet, paint the walls, redo the trim and replace the mirror.
This is what the bathroom looked like when I redid it the first time:
The changes I made:
The first thing I did was rip up the old floor tiles and remove the old baseboard and door trim. I left the tile around the toilet in place until it was time to remove and replace the old toilet.
I painted the bathroom and installed my diy shiplap wall. The accent wall is comprised of peel and stick real wood planks from Stikwood. I used the "minimalist fir" variety.
The following are affiliate links. We are a participant in the Amazon Services LLC Associates Program, an affiliate advertising program designed to provide a means for us to earn fees by linking to Amazon.com and affiliated sites. Thank you for being part of Crafty Little Gnome
I reinstalled and painted the trim around the window and up near the ceiling.
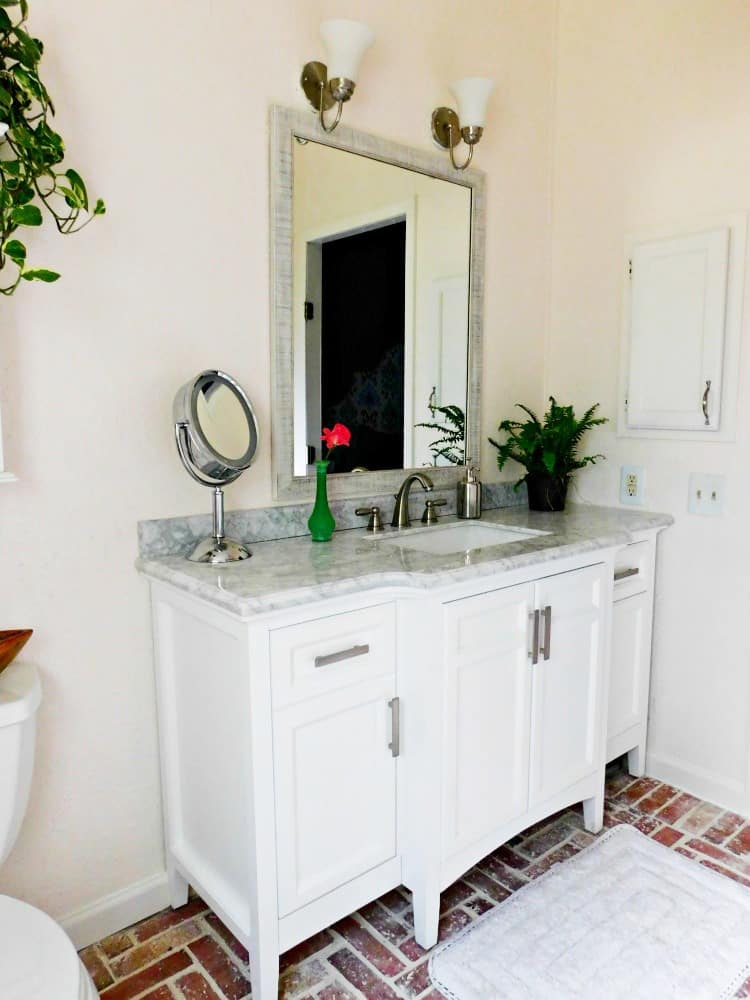
The Finished Look:

The next task was to remove the wall mirror. It was stuck permanently to the wall and I had to pry it off with a hammer.
I decided to texturize the walls. Because the dry wall was so terrible, had a million holes in it, and was especially bad around where I pulled off the old mirror, I used dry wall spackling to create a texturized look on the walls.
I realize the look of textured walls isn't for everyone, I'm not even sure if it's really for me, but it does look a heck of a lot better than what the walls would have looked like without the texture.
I painted the walls and ceiling with Valspar Reserve paint in "Delicate Bliss" It’s a very light off-white color with peachy undertones. I needed a color that was slightly warm to go with the pink tones in the wood plank wall.
I had to remove the bathroom vanity. Boy was I glad to get this thing out. The sink was an ugly shade of yellow and the whole thing was old and nasty.
After that came removing the toilet. We had to shut off the water supply to the toilet and then I pulled it out. Replacing a toilet it really simple and when I replace the one in our other bathroom I will make a video. To learn about different toilet heights and what one you need for your bathroom check out this article on standard toilet heights vs comfort height toilets here.

This next part was the biggest challenge of the reno. The floors. I had to scrape up bits of grout that were left over from the old tile and then lay down cement backer board down. Then I installed the thin brick tile, grouted it and sealed it. That was the biggest project I have ever done. Check out the full brick tile floor tutorial here.
Next I installed the new toilet, it’s from Kohler, and installed the new vanity. The vanity is from Home Depot. It's unbranded so I don't know who the manufacturer is.
Installation of the vanity was really simple. You just have to slide it in place and screw it to the wall.
The faucet is from Peerless and I installed it myself with this tutorial.
I cut and installed new trim around the floors and doors, painted them and touched up the paint around the room.
The painting is from my mom Nicole, I absolutely love it. It’s titled "Here’s Johnny". I had it framed at Hobby Lobby.
I accessorized the place with rustic modern bathroom décor like the wood bowl from Target on the back of the toilet and filled it with vintage Japanese fishing floats. I added some houseplants and a few flowers.
The bathmats are from Target and the shower curtain is from Bed, Bath and Beyond.
What do you think of my rustic modern bathroom? Are you a fan of this style? Let me know in the comments!

Hi I’m Adrienne Carrie Hubbard. I believe a rich life comes not from the things you have, but the things you do; the experiences you create and the people you meet along the way. Thanks for hanging out!
Jessica W. says
Wow, you put a lot of work into this project! it looks amazing!
Connie Gruning says
I love the mix of old and new. Great job. It's absolutely beautiful.